Grab your tape measure before you buy a single hook. A standard 2-car garage is 20 feet wide by 20 feet deep. That gives you roughly 400 square feet of floor and four 20-foot walls that run 8 feet tall.
Those walls add up to about 640 square feet of surface, plus a whole ceiling nobody uses. These garage organization ideas work from the walls and ceiling inward, because the floor is where your car lives, not your stuff.
Below you’ll find 30 ideas sorted into six zones, from wall systems and overhead racks down to budget builds you can knock out with scrap lumber. Every idea names its budget tier: under $25, $25 to $100, $100+, or DIY scrap.
Pick your zone, measure once, and start where the clutter is worst.
Why Volume Beats Square Footage in the Garage
Most people organize a garage like a closet: they look at the floor. A 20×20 garage holds a car that eats 180 square feet.
A workbench eats 12 more, and a mower eats 10. What’s left is a walkway.
Meanwhile the walls offer 640 square feet of vertical real estate and the ceiling adds another 400 square feet of air. Both usually hold exactly nothing. The fix is boring math, and it works every time.
A 4×8-foot slatwall panel hangs 32 square feet of hooks, shelves, and bins on wall space you’d otherwise lean a broom against. A 4×8-foot overhead rack rated for 750 pounds adds up to 105 cubic feet of storage above the car hood, where the space was wasted air.
French cleats turn a 12-foot wall into a modular tool wall for the price of half a sheet of plywood. Renters, note this now: anything that only needs screws in studs comes out clean with a dab of spackle. Half the ideas below are freestanding or removable, and damage-free ratings are flagged per point.
Zone 1: Wall Storage Systems That Swallow the Clutter
The walls are your biggest free asset. A standard 20×20 garage has four walls at 8 feet tall, which is roughly 640 square feet of surface. Most garages use about 60 of it, and the five systems below fix that.
For the full wall-storage deep dive, see these garage wall storage ideas.
- Start on the wall closest to the garage door: that’s where grab-and-go gear (rakes, balls, step stool) should live.
- Hang everything at least 6 inches off the floor. Floor contact is where rust, mouse damage, and flood damage start.
- Keep a 3-foot clear lane from the door to the house door. If a wall system blocks it, the system is in the wrong spot.
1. Slatwall Panels: Turn One Wall Into 32 Square Feet of Gear
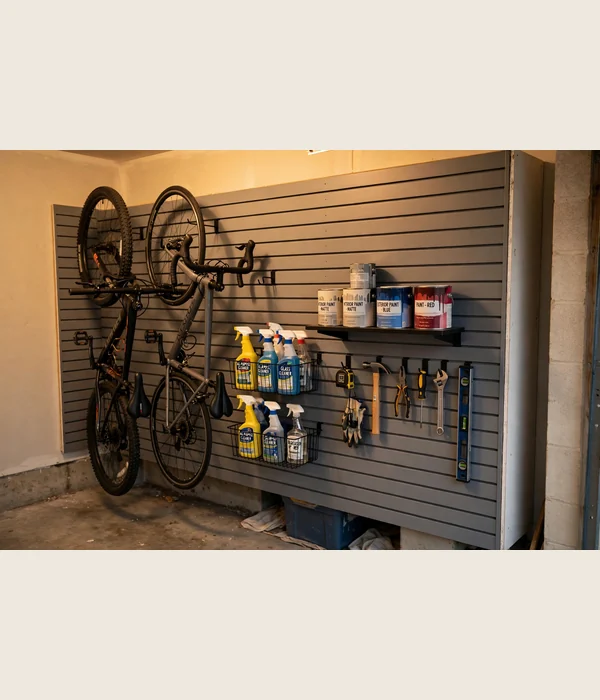
A 4×8-foot slatwall panel hangs 32 square feet of reconfigurable storage on a wall that currently holds nothing. Hooks, baskets, shelves, and bins lock into 3-inch horizontal slots. The whole layout rearranges without drilling new holes.
That matters in a garage, because what you store changes with the season. Bikes in summer, snow gear in winter, all on the same panel. No other wall system adapts that fast.
Put the first panel on the wall you face when the garage door opens. That’s the wall your eyes land on, which means it’s the wall you’ll actually use. Center it at eye level, 48 to 60 inches high, and leave the bottom 24 inches clear for floor items.
Standard PVC slatwall runs about $6 to $7 per square foot. A single 4×8 panel lands around $200 before accessories, which puts this firmly in the $100+ tier. It screws through the panel into studs every 16 inches, and after that a hand drill is the only tool you’ll need.
Tips for best results: Start with one panel and add hooks over time; drive every screw into studs, not just drywall.
Watch out: Budget panels with thin slots sag under ladders and bikes, so check the slot weight rating and hang anything over 30 pounds on a stud-mounted hook.
2. Steel Pegboard: The $25 Tool Wall
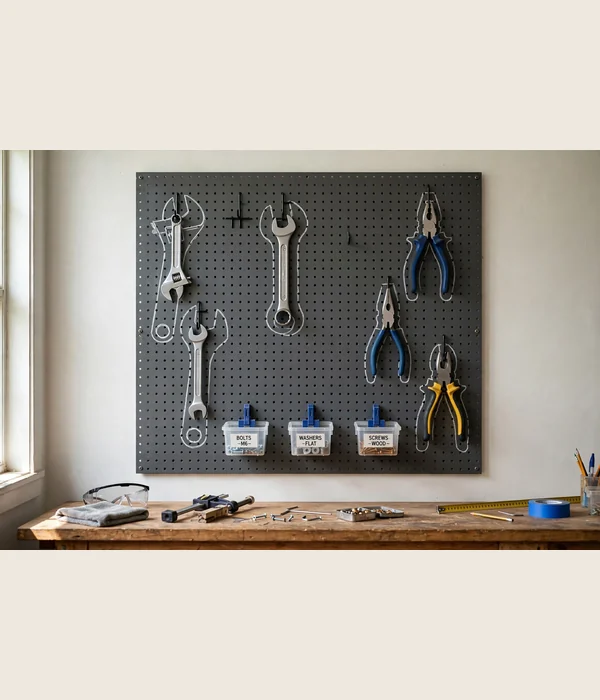
Pegboard is the cheapest honest way to get 16 square feet of tool storage on a wall. A 4×4-foot steel pegboard panel uses the industry-standard 1-inch hole grid with 1/4-inch holes. That means any standard hook or accessory fits, no proprietary ecosystem required.
Steel panels resist the humidity swings that warp hardboard. A framed steel panel is typically rated for 50 to 75 pounds per square foot when it’s mounted on its frame and screwed to studs. That’s a full set of hand tools with margin to spare.
Hang it over the workbench or beside the garage door. Outline each tool with a marker so a missing silhouette tells you what’s out in the yard. The panel itself stays under $25, and a starter hook kit adds a few dollars more.
If you rent, freestanding pegboard frames lean against the wall with zero screws. They still hold light hand tools, and they move with you. For a renter, that’s the whole argument.
- What you can do with it: Outline tool silhouettes so missing tools are visible at a glance; add 1-gallon color bins for screws and bolts; mount a 6-inch shelf across the bottom for paint cans; keep the center clear for the 10 tools you grab weekly.
- Watch out: Thin hardboard sags in humid garages and cracks around heavy hooks. If you hang drills, saws, or anything over 5 pounds, use steel panels and hook every screw into a stud, not drywall alone.
3. Wall Track Rails: Hang Ladders, Not Just Hammers
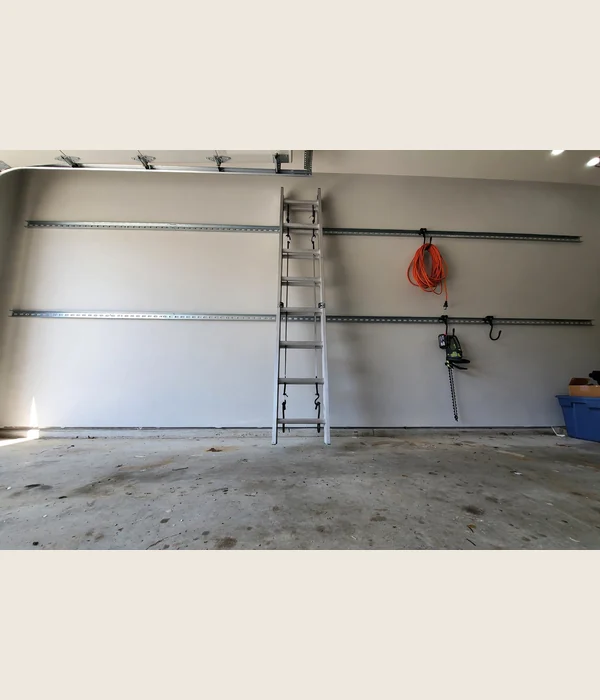
Track rail systems solve the one thing slatwall can’t: a 40-pound extension ladder. The rails are 48-inch steel channels rated around 50 to 75 pounds each when screwed into studs at 16 inches on center. Hooks slide along the rail and lock in place.
You reposition a hook by lifting it off, not unscrewing anything. That sounds minor until you’ve moved the same hook six times. This is the system for awkward, heavy, oddly shaped things: ladders, hedge trimmers, cord reels, pressure-washer wands.
A four-pack of 48-inch rails covers a 16-foot run of wall. Most rails land in the $25 to $100 tier per pair, and everything hangs above the floor. The wall sweeps clean and the car door clears, which is the real test.
Measure your longest item before you shop. The rail run needs to be at least as long as the ladder plus 12 inches of hook spacing on each end.
Tips for best results: Map your studs first and stagger rails so every rail catches at least two studs. Leave 48 inches of clear rail for a ladder’s two contact points.
Watch out: Rails rated for 50 pounds sag when you hang two 30-pound items side by side. Read the per-hook rating, not just the per-rail rating, before loading ladders.
4. French Cleat Wall: Half a Sheet of Plywood, Infinite Layouts
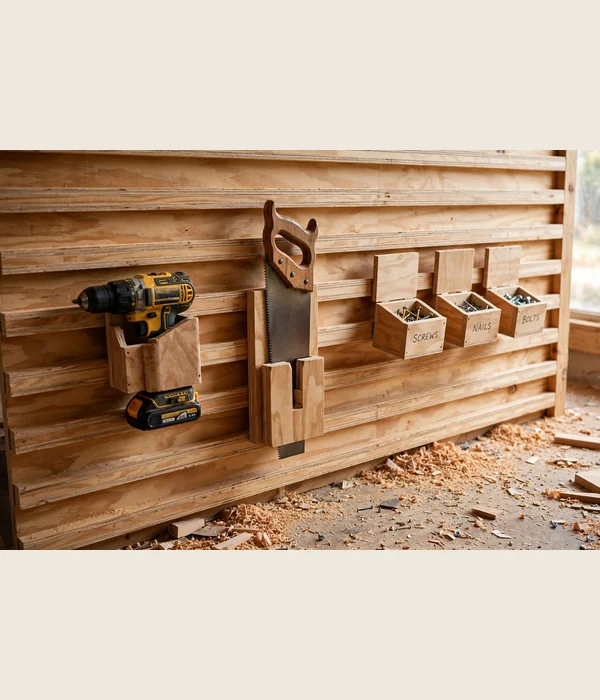
A French cleat wall is the DIY version of slatwall that costs less than lunch. Rip 3/4-inch plywood into 3-to-4-inch strips and cut one long edge of each strip at 45 degrees on a table saw.
Screw the angled strips to the wall with the bevel facing up, and attach matching strips to whatever you want to hang.
Gravity locks the two bevels together, and the heavier the load, the tighter the joint. Run the wall cleats 8 inches apart from floor to ceiling. The open standard (3 inches tall, 45 degrees, 3/4 inch thick, 8 inches on center) means any tool holder you build this year will still fit a cleat you add next year.
Half a sheet of plywood covers a 4×8-foot section. That puts this in the DIY scrap tier if you have plywood offcuts, or under $25 for a new half sheet. Nothing else on this list gives you this much flexibility for this little money.
Tips for best results: Screw wall cleats into studs with 2.5 to 3-inch construction screws, heads flush. Batch-cut every cleat in one session so the 45-degree angle is identical.
Watch out: This is not renter-friendly, since every cleat means screw holes. A mismatched bevel angle gives you a wobbly mount, so test-fit before loading.
5. Wall-Mounted Folding Workbench: A Bench That Disappears
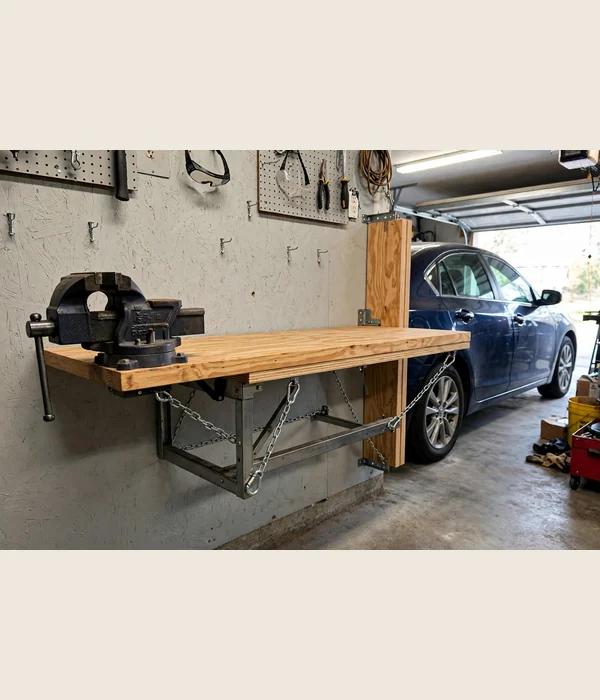
A folding workbench folds flat to about 4 to 6 inches deep when you’re done. That means your workbench stops eating 12 square feet of floor when the car comes home. The bench top is typically 48 inches wide by 20 to 24 inches deep.
It mounts to a wall ledger with heavy hinges and locking legs or chains. Those are rated for 200 to 300 pounds of working load, which covers real work, not just light assembly.
Folded flat, you can park a second car. Unfolded, you get a work surface at 36-inch bench height.
This is the fix for single-car and tight two-car garages where a permanent bench would block a car door. Ready-made versions run in the $100+ tier. A DIY version from 2x4s and 3/4-inch plywood lands under $100 if you already own hinges and screws.
- What you can do with it: Mount it beside the garage door for repair jobs; add a French cleat strip above it so tools ride along; keep a 4-foot folding sawhorse pair underneath for overflow; choose a sealed or melamine top so glue and paint wipe off.
- Watch out: The hinge and leg hardware is the whole project. Cheap hinges with a 300-pound bench plus a 200-pound person leaning on it will fail. Buy hinges rated well above your expected load and bolt the ledger through studs.
Zone 2: Ceiling and Overhead Storage
The ceiling is the most wasted volume in the house. A 20×20 garage with 8-foot ceilings holds 3,200 cubic feet of air. The 3 feet directly above your car, the mower, and the workbench holds exactly nothing right now.
Overhead systems turn that dead air into 100-plus cubic feet of storage. That’s where the bulky seasonal stuff goes: the things that otherwise fill a bedroom closet. For the dedicated overhead playbook, see these overhead garage storage ideas.
- Measure joist spacing before buying anything. Most garages run 16 or 24 inches on center, and nearly every overhead rack is built for one or both.
- Keep the rack bottom at least 72 inches off the floor in walkways. Test with your tallest car before loading: a rack that clears the sedan might not clear the SUV with a roof box.
- Overhead is for light, bulky, and rarely touched: holiday decor, camping gear, luggage. Anything you touch weekly belongs on the wall, not on a ladder.
6. The 4×8 Overhead Rack: 105 Cubic Feet Above the Car
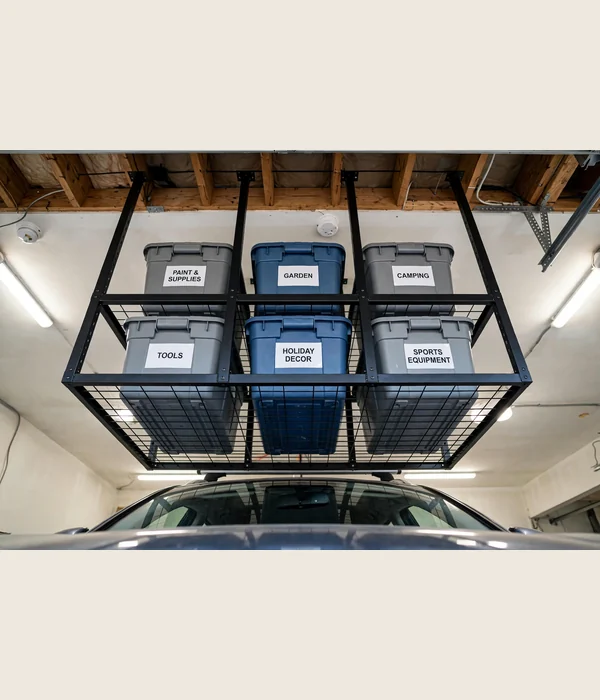
This is the single biggest storage gain in the garage. A 4×8-foot ceiling-mounted rack drops 22 to 40 inches from the joists. It’s typically rated for 600 to 750 pounds of evenly distributed load, which works out to roughly 100 to 105 cubic feet of storage.
That’s four to six 27-gallon totes of holiday decorations, camping gear, or luggage. All of it floats above the car hood, where the space was wasted air. Nothing else moves this much volume off the floor in one afternoon.
Installation means lag bolts into wood joists and six vertical posts on the better designs. The frame is cold-rolled steel, and most racks fit 16 or 24-inch joist spacing. The rack lands in the $100+ tier; the totes are what you already own.
For seasonal stuff that lives in the garage half the year anyway, read up on storing holiday decorations in the garage before you load the bins.
Tips for best results: Distribute weight evenly and keep heavy items toward the center, not the edges. Leave 2 inches of clearance between the rack bottom and the tallest thing parked underneath.
Watch out: Never mount to drywall, metal joists, or a tilted ceiling unless the rack is rated for it. If your joists are 48 inches apart, only buy racks that explicitly support that span.
7. Ceiling Pulley Bike Hoist: Get Bikes Off the Floor for $25
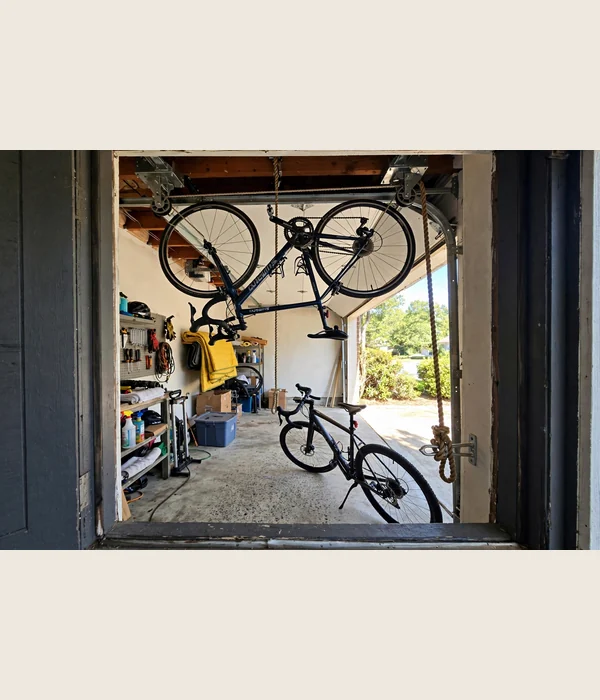
A bike hoist uses two ceiling pulleys and a rope to lift the bike flat against the ceiling. Most are rated for 50 to 100 pounds, which covers every adult bike. Check the rating first if you ride an e-bike, since some push past 60 pounds.
The bike hangs roughly 12 to 18 inches below the ceiling. In a garage with 8-foot ceilings, the walkway stays clear and the car fits underneath. Lowering a bike is a 20-second one-person job: uncleat the rope and control the descent.
This is the under-$25 tier, and it solves the real bike problem. Bikes on the floor lean, fall, and eat 6 square feet each. Four hoists over the car bay clear 24 square feet of floor for about the price of one pizza night.
The rope locks in a cleat on the wall, so the bike stays put. No straps to buckle, no hooks to lift the bike onto. If you can tie a cleat hitch, you can use this.
Tips for best results: Mount each pulley into a ceiling joist, never drywall alone. Center the pulleys 48 to 54 inches apart to match your bike’s length.
Watch out: Grease from a recently ridden chain drips, so wipe the chain or hang a drip mat underneath. Test the rope lock with the bike 6 inches off the ground before trusting it overhead.
8. Between-Joist Shelf: Free Storage in the Ceiling Frame
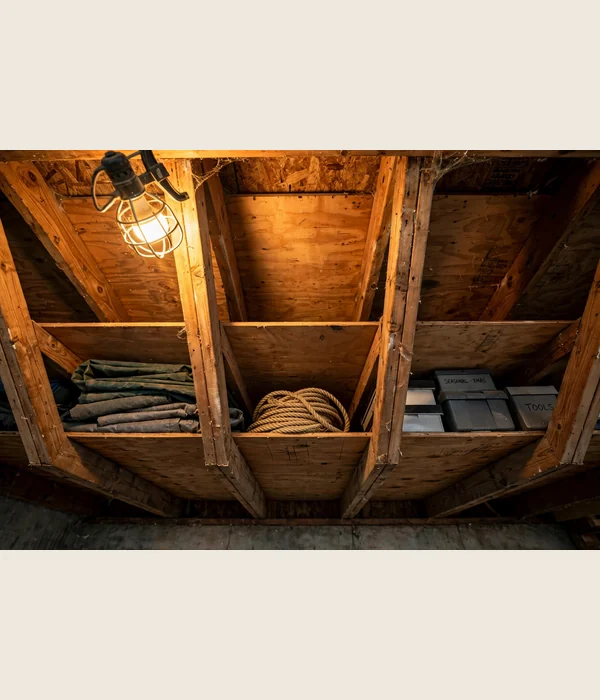
Look up at an unfinished garage ceiling and you’ll see 2×8 or 2×10 joists running 16 or 24 inches apart. The bays between them are empty. A between-joist shelf screws 1/2-inch plywood strips into the joist sides to make a ledge, then lays plywood or OSB across the ledge.
Each bay becomes a 16-by-48-inch shelf, about 5 square feet. It’s rated for 20 to 30 pounds per bay when screwed properly, which covers flat, light things: extension cords, folded tarps, spare furnace filters, garden kneelers.
This is pure DIY scrap territory. Leftover plywood, a box of 2-inch screws, and an hour.
Nothing heavy goes up here, and nothing you need in a hurry. It’s the attic you didn’t know you had.
- What you can do with it: Cut plywood ledges to fit your exact joist spacing; label each bay with painter’s tape so you remember what’s up there; keep a dedicated step stool nearby because this shelf is useless if reaching it is a project.
- Watch out: Keep loads light and flat. A between-joist shelf is not a 2×4 platform, and 50 pounds of paint cans in one bay will bow the ledge. Also confirm your garage ceiling isn’t a fire-rated assembly that forbids added storage.
9. Overhead Bin Rails: Six Totes on 34 Inches of Ceiling
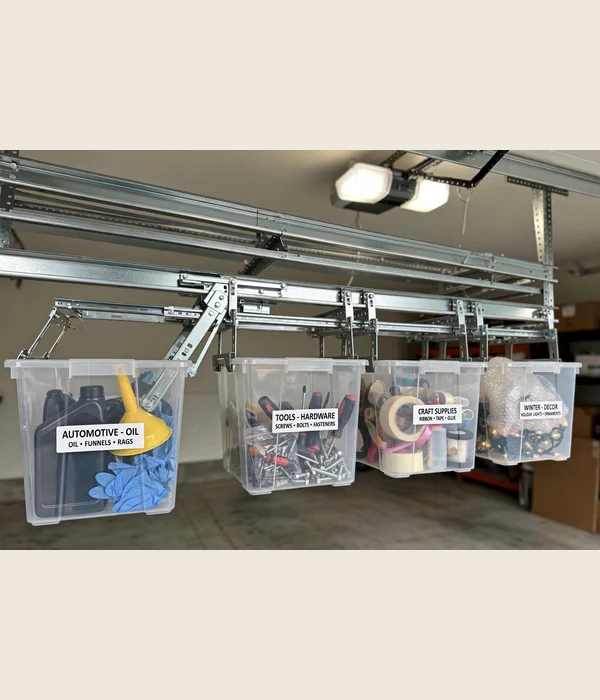
Bin rails are the middle ground between a full overhead rack and nothing. Two 17-inch steel rails screw into joists, spaced to catch the lip of standard storage totes. Each rail set is typically rated for 100 pounds and holds up to 6 bins.
One 34-inch-wide installation carries roughly 16 cubic feet of totes. Two or three rail sets side by side give you a labeled tote wall on the ceiling. Totes included, the whole thing lands in the $25 to $100 tier.
The brilliance is access. Unlike a deep rack where the back tote is a mystery, bin rails hold totes by the lip so each one slides out independently. You see every label, and you never unload three bins to reach the fourth.
Standardize on one tote size so bins are interchangeable. When every bin fits every rail, reorganizing is just moving boxes, not repacking them.
Tips for best results: Buy all your totes first and space the rails to the tote lip, not the other way around. Keep the rails level or the bins slide on their own.
Watch out: Rails only work with totes that have a sturdy rim lip. Flimsy dollar-store bins crack at the lip under a full load, so test one bin fully loaded before committing to the system.
10. Corner Overhead Platform: The Dead Corner That Stores 50 Pounds
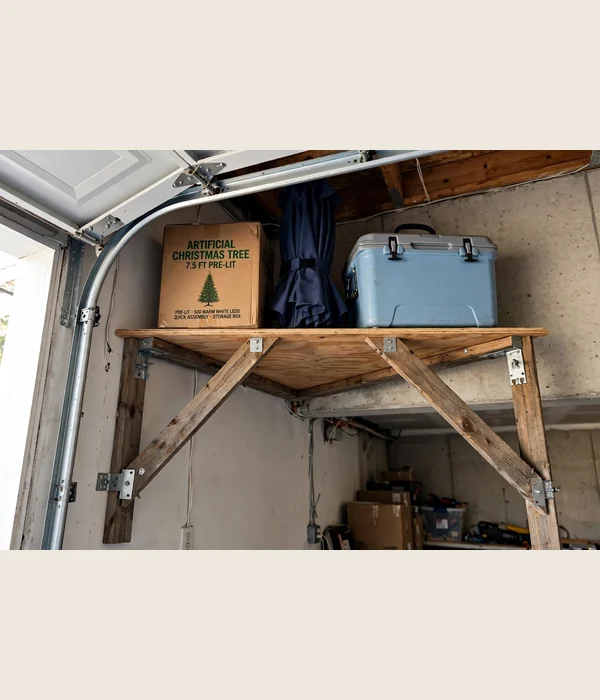
Every garage has a corner above the door tracks or beside the opener where nothing fits and nothing reaches. A corner overhead platform is a triangular or L-shaped plywood deck, 3/4 inch thick. It screws into two walls’ top plates and gets diagonal 2×4 braces underneath.
A 4×4-foot corner deck holds 16 square feet. It’s good for about 50 to 75 pounds of light bulky items: the artificial tree, the patio umbrella, the spare cooler. These are the things you use twice a year, and they finally have a home.
It’s DIY scrap if you have plywood and 2x4s, or under $25 for new lumber. The trick is the bracing: the diagonal braces carry the load, not the screws into drywall.
Find the top plate with a stud finder and drive 3-inch screws through the deck frame into it. The top plate is the strongest anchor in the room, so use it.
Tips for best results: Add diagonal braces at 45 degrees from each corner for a deck that doesn’t bounce. Keep the platform 6 inches clear of the door’s travel path.
Watch out: A platform that interferes with the door spring or opener is a safety hazard. Open and close the door fully after install, before loading anything.
Zone 3: Floor and Mobile Storage
Some things belong on the floor. They’re too heavy for walls, too awkward for ceilings, or they need to roll where the work is. The trick is giving floor storage a parking spot with borders.
A cabinet that drifts across the garage becomes clutter with doors. These five systems keep heavy gear on the ground and still let you park the car. They round out the full picture in these home garage storage ideas.
- Measure the car’s door swing before placing any floor unit. A cabinet that survives the parking test but blocks the driver door gets moved within a week, permanently.
- Anything on wheels needs locking casters. A 200-pound tool cabinet that rolls on a sloped garage floor is a slow-motion accident.
- Leave 4 inches of clearance behind floor cabinets for the garage’s slope, hoses, and the inevitable spider kingdom.
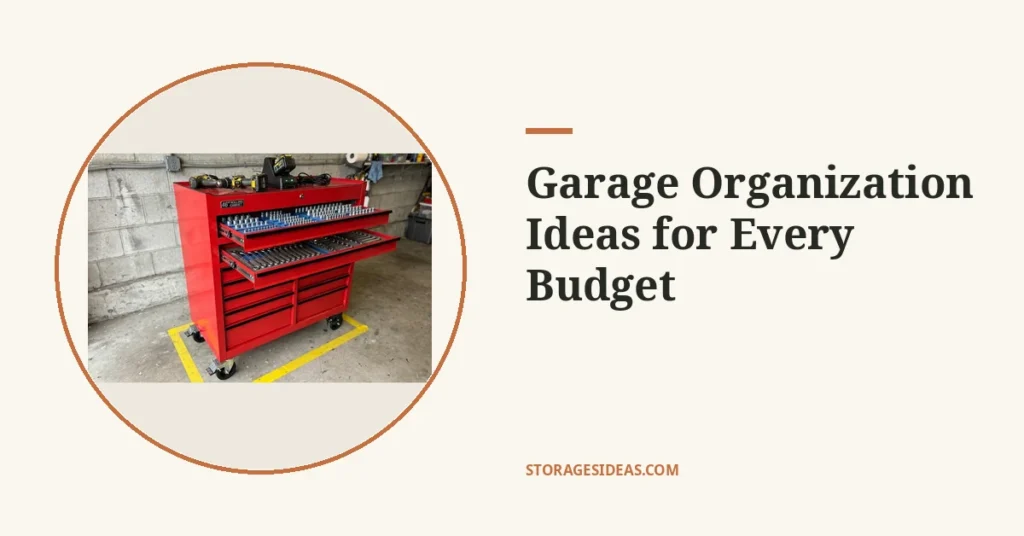
11. Rolling Tool Cabinet: The 46-Inch Workshop on Wheels
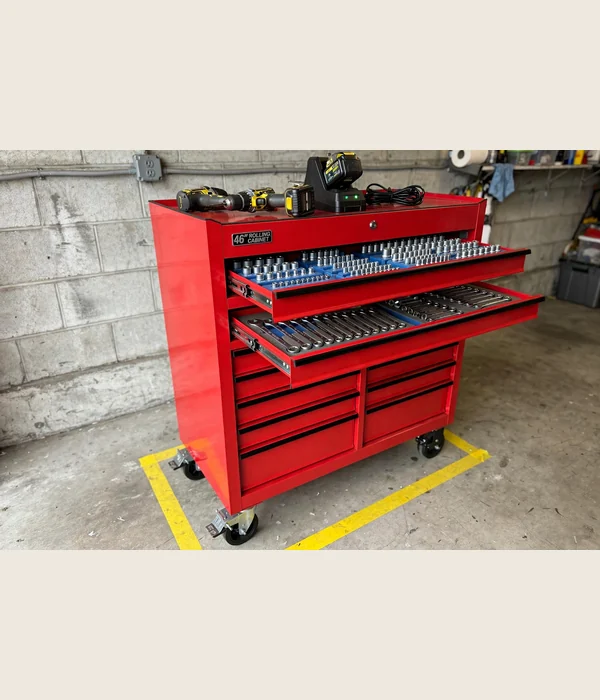
A rolling tool cabinet is the garage’s dresser. It’s typically 46 inches wide, 18 to 24 inches deep, and 37 to 42 inches tall, with drawers rated 50 to 100 pounds each. The top doubles as a work surface, and the best versions have a power strip built into the side for chargers.
The whole thing rolls on 5-inch locking casters. The mechanism is simple: tools live within arm’s reach of the project, then roll back to their parking spot against the wall. That beats walking to a fixed toolbox forty times per oil change.
This is the $100+ tier and worth every dollar if you work on cars, bikes, or anything with small parts. Look for ball-bearing drawer slides rated for the load, a tubular side handle, and casters rated at least 1,000 pounds total.
Tips for best results: Park it in a taped rectangle on the floor so it always returns to the same spot. Load the heaviest tools in the bottom drawers to keep the center of gravity low.
Watch out: Cheap cabinets with friction slides jam under a full drawer of sockets. Check the per-drawer rating, and if you have kids, get one with a locking bar.
12. Heavy-Duty Garage Cabinets: Hide the Ugly, Keep the Access
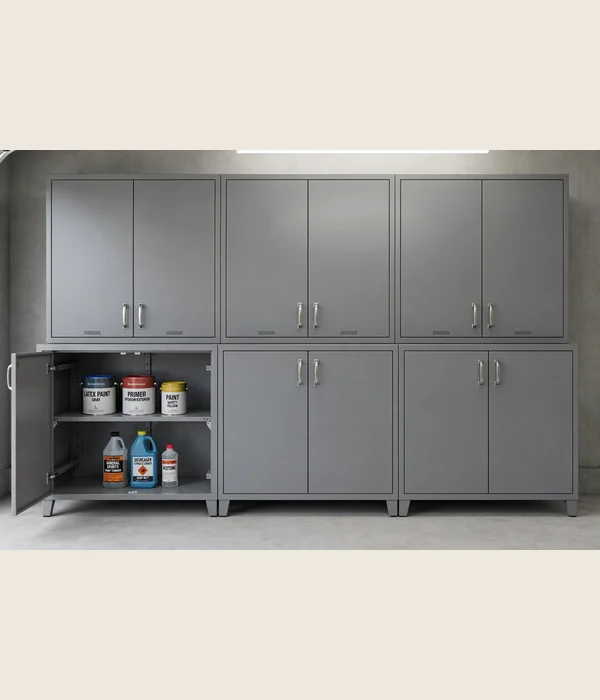
Wall and base cabinets turn the garage’s mess into a kitchen that happens to hold motor oil. Standard garage base cabinets run 24 inches deep and 34 to 36 inches tall. Wall cabinets run 12 to 16 inches deep and 24 to 30 inches tall.
A 6-foot run of base plus wall cabinets gives you roughly 30 cubic feet of closed storage. Closed storage is what makes a garage look organized even when it isn’t, because the doors hide the reality.
This is the $100+ tier per cabinet. The honest shopping spec is the shelf rating: look for adjustable shelves rated 50 pounds each and a steel or 3/4-inch plywood carcass. Particle board swells in garage humidity, and swollen shelves mean doors that stop closing.
Mount wall cabinets into studs with 3-inch screws. Shim base cabinets level, because garage floors slope toward the door and unshimmed cabinets rack and bind.
- What you can do with it: Keep chemicals, paints, and pesticides locked in one base cabinet away from kids and pets; store seasonal decor in the wall cabinets you touch twice a year; leave one base cabinet empty on purpose for the project you’re about to start.
- Watch out: Particle-board cabinets are the most common regret purchase in this category. One humid summer swells the shelves and the doors stop closing. Steel or plywood costs more and lasts a decade longer.
13. Mobile Workbench: 60 Inches of Bench That Parks Anywhere
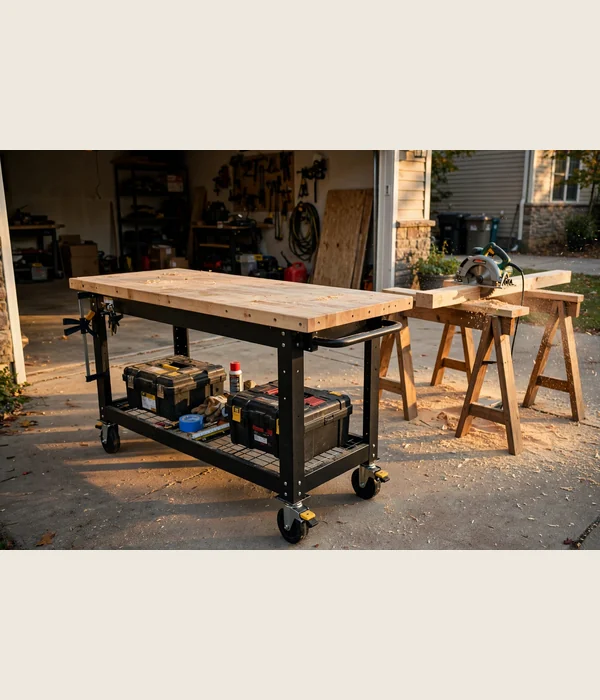
A mobile workbench is a 48 to 60-inch-long bench, 24 to 30 inches deep, on locking casters. Most have a lower shelf and some add drawers. It rolls to the driveway for messy cuts, rolls to the car for repairs, and rolls back against the wall for parking.
The lower shelf alone holds 8 to 10 cubic feet of toolboxes. The bench top is a real work surface at 34 to 36 inches high, which is the height your back will thank you for after an hour of work.
This is the $100+ tier ready-made, or the $25 to $100 tier as a DIY build. For the DIY version, use 2x4s and a solid-core door slab or 3/4-inch plywood top.
Either way, the spec that matters is the caster rating: four 4-inch casters rated 250 pounds each carry a 600-pound bench plus load with margin.
Tips for best results: Size the bench to your longest common project, since 60 inches handles a bike frame and most lumber. Add a power strip to the side so chargers and tools travel with the bench.
Watch out: A workbench without a parking spot migrates to the middle of the garage and stays there. Tape its home rectangle on the floor on day one, and lock two casters minimum whenever it’s parked.
14. Three-Tier Utility Cart: The $25 Rolling Shelf
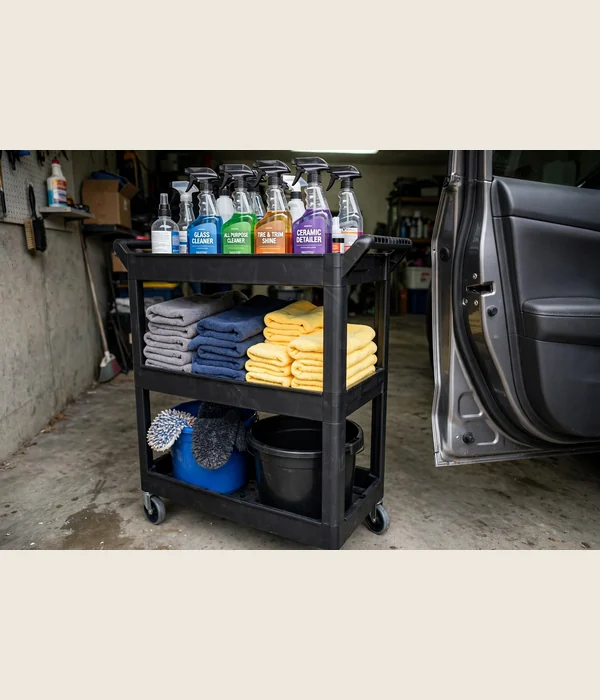
The humble three-tier utility cart is 18 by 30 inches per shelf and stands about 34 inches tall. Most versions are rated for 300 to 500 pounds total across the three shelves. It costs under $25 and assembles in 15 minutes with no tools.
It goes where the project is. Car detailing supplies roll to the driveway, gardening supplies roll to the yard, holiday bins roll to the attic stairs. When the project ends, the cart rolls back to its corner.
This is the best first buy on this entire list for anyone starting from zero. It’s useful on day one with no installation, and it holds the stuff that doesn’t deserve a permanent home yet. The plastic versions wipe clean and don’t rust; the metal versions carry more weight.
The top shelf is for the 5 things you grab daily. The middle takes the project supplies, and the bottom takes the heavy stuff. That loading order matters, because a top-heavy cart tips.
- What you can do with it: Load one cart per project and wheel it back when done; use the top shelf for the 5 things you grab daily; park it inside a floor cabinet’s footprint when you need it out of sight.
- Watch out: The 300-pound rating is total, not per shelf. Three shelves of paint cans will bow the middle shelf, so keep dense loads on the bottom and light bulky stuff up top.
15. Tall Locker Cabinets: 72 Inches of Vertical Hiding
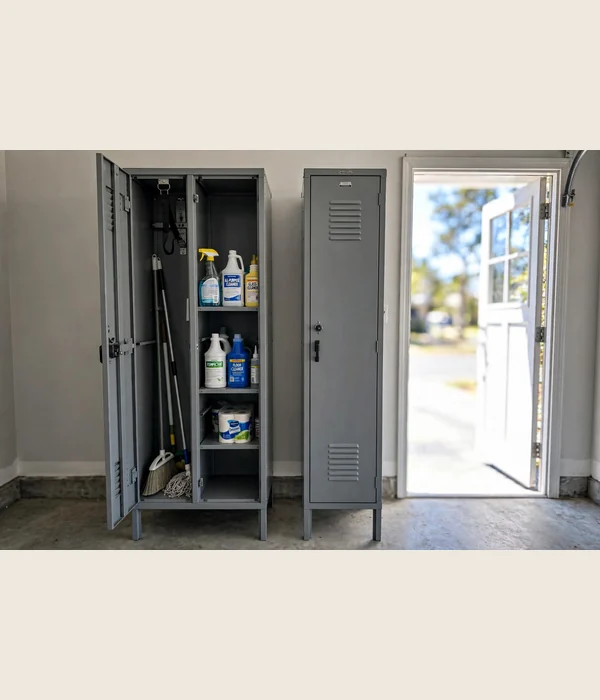
A tall locker cabinet is typically 72 inches high, 30 to 36 inches wide, and 16 to 20 inches deep. It has adjustable shelves and double doors, and one locker holds about 20 cubic feet. That’s the push broom, the mop, the shop vac accessories, the bag of rags, and the gallon jugs, all behind doors.
Two lockers side by side make a 6-foot cleaning station that looks like built-ins. Put the locker closest to the door you enter through, since that’s where cleaning gear gets grabbed.
This is the $100+ tier. The spec to check is the shelf adjustment range: shelves that move in 2-inch increments let you fit tall bottles and short boxes in the same locker. Anchor every tall locker to the wall with the included anti-tip strap.
A 72-inch cabinet loaded top-heavy will tip forward if a kid climbs it. The strap takes 5 minutes and two screws into a stud. It’s non-negotiable, and it’s the first thing to install.
Tips for best results: Dedicate one locker to cleaning and one to garden or car supplies so categories never mix. Keep the heaviest jugs on the bottom shelf.
Watch out: Unanchored tall cabinets are the garage’s most dangerous furniture. Skip the strap and a curious kid can pull 100 pounds of supplies onto themselves.
Zone 4: Small-Item and Hardware Systems
The garage eats small things. Screws vanish, drill bits multiply, and the 10mm socket achieves legend status. Small-item systems work because they give every tiny thing a visible, labeled home.
Keep that home within arm’s reach of where the thing gets used. These five ideas are almost all under $25, and together they save more frustration per dollar than anything else on this list. If tools are your whole garage, the dedicated tool storage ideas guide goes deeper on workshop setups.
- Sort small hardware once, properly, into labeled homes. The 2-hour sort pays for itself the first time you don’t buy screws you already own.
- Keep fasteners near the workbench and project hardware near the project. A screw stored 20 feet from where it’s used might as well be lost.
- Clear containers beat opaque ones. If you can’t see it, you’ll buy it again.
16. Parts Organizer Cabinets: 40 Drawers of No More Junk Drawer
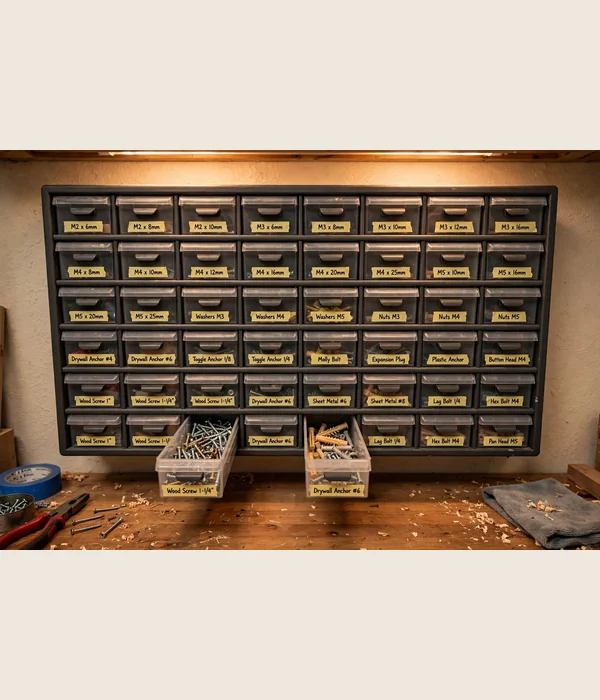
A parts organizer cabinet is the wall of tiny drawers you see in every real workshop. It’s typically 24 to 64 drawers in a 20-by-16-inch frame, each drawer 2 to 4 inches wide. Screws, wall anchors, wire nuts, drill bits, and fuses each get a drawer, and the drawer fronts take a label.
The whole cabinet hangs on two screws or sits on the workbench. This is the under-$25 tier, and it kills the coffee-can-of-mystery-screws forever. The mechanism is visibility plus specificity: when every fastener has a labeled drawer, you stop buying duplicates and you stop digging.
Buy the cabinet with removable drawer bins. Then you can carry the screws to the project instead of carrying the project to the screws. That one feature decides whether the cabinet gets used or admired.
Mount a second cabinet beside the first when the drawers fill up. Two cabinets side by side still take less wall than one pegboard.
Tips for best results: Label with a label maker, not marker, because marker fades. A label maker forces specificity: “#8 x 1-1/4 wood screws” beats “screws” every time.
Watch out: Cheap cabinets have drawers that fall out when you tilt them. Test the drawer retention in the store: tip the cabinet 45 degrees and see what stays put.
17. Magnetic Tool Strips: 24 Inches That Hold 20 Pounds of Wrenches
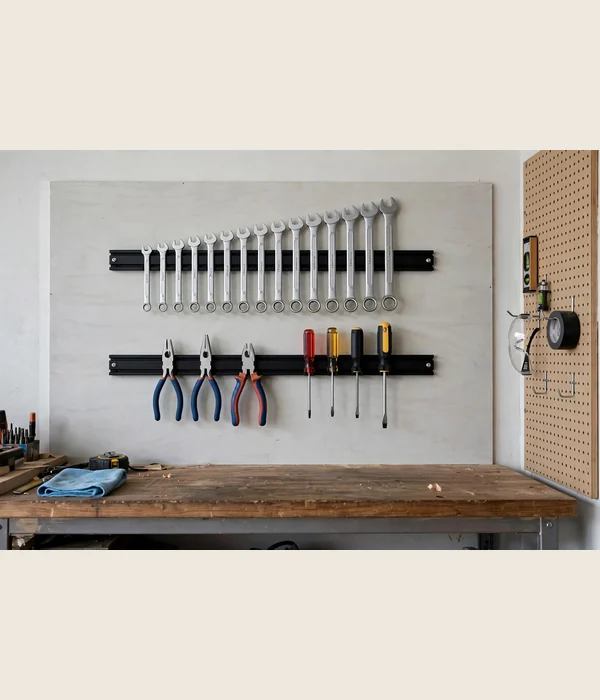
A magnetic tool bar is a 12 to 24-inch steel bar with embedded magnets, screwed to the wall. It holds wrenches, pliers, drill bits, and screwdrivers in plain sight. Most 24-inch bars are rated for 15 to 25 pounds of tools, which covers a full wrench set and then some.
Tools click on and pull off, and no hook has to match the handle. Mount two bars above the workbench at 48 and 60 inches high. That turns 4 square feet of wall into the most-used 4 square feet in the garage.
This is the under-$25 tier per bar. The honest limit: magnets hold flat steel beautifully and round or coated tools less well. Test your heaviest wrench before committing the whole set, and keep the daily drivers on the bar.
- What you can do with it: Line up drill bits in size order so the missing one is obvious; keep the daily-use screwdrivers on the bar and the specialty ones in a drawer; mount a short 12-inch bar inside a cabinet door for hidden fastener storage.
- Watch out: Strong magnets and pacemakers don’t mix, so keep bars away from seating and warn visitors. Also keep magnetic strips away from credit cards, and don’t trust them for heavy hammers: if it falls, it was too heavy.
18. Clear Labeled Tote System: One Size, Every Shelf
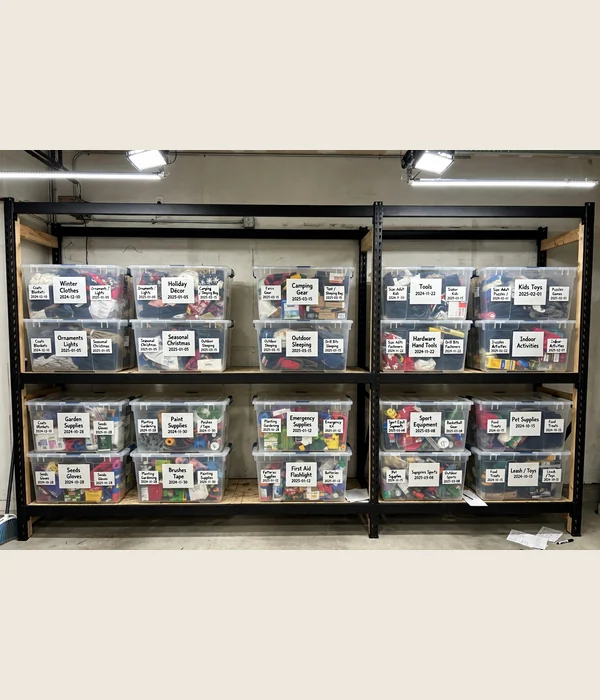
The tote system is not about the totes. It’s about the rule: one tote size, everywhere. Standardize on a single 27-gallon tote, roughly 30 by 20 by 15 inches, and every shelf, rack, and bin rail in the garage fits every bin.
When bins are interchangeable, reorganizing is just moving boxes, not repacking them. That’s the difference between a system you maintain and a system you abandon. The label is the other half: write contents plus date on three sides, since you’ll read the tote from whatever angle the stack allows.
Twenty-seven-gallon totes run in the $25 to $100 tier for a 6-pack. The spec that matters is the lid: snap lids keep dust and mice out, and totes that nest when empty save space when they’re not in use. A “Holiday lights, checked 2026” label tells you what’s inside and whether it’s current.
Overloading is this system’s only failure mode. A 27-gallon tote of books weighs 80 pounds and will crack its own handles.
Heavy stuff gets small totes; light bulky stuff gets the big ones. Store totes no more than 3 high on open shelves.
Tips for best results: Standardize the whole garage on one tote size before buying the sixth pack. Keep a permanent marker and spare labels on the shelf where totes get packed.
Watch out: Cheap totes with weak lids pop open when stacked. Press-test the lid latch in the store with the tote loaded, not empty.
19. Under-Shelf Jar Storage: Free Hardware Drawers From Trash
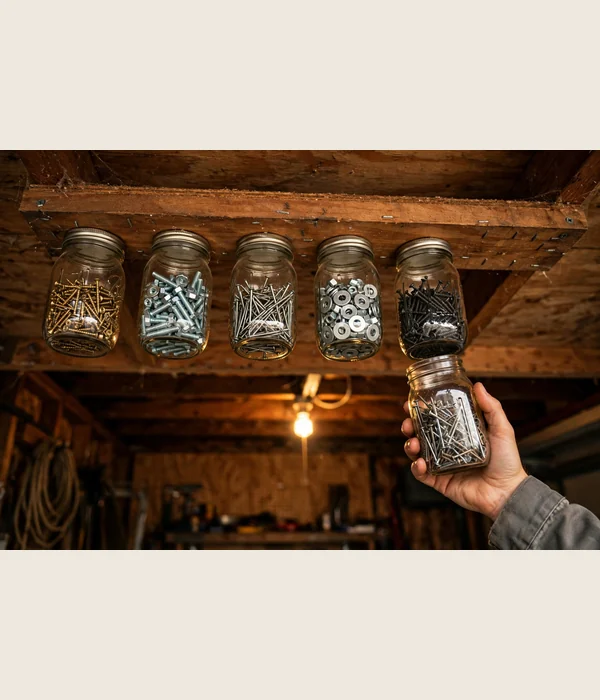
Screw mason jars or baby food jars under a shelf by their lids and you’ve built hardware drawers for the price of the screws. The trick is simple: screw the metal lid to the underside of a shelf with two 3/4-inch screws, fill the jar with screws or bolts, and twist the jar onto its lid.
The contents hang visible, sorted, and off the workbench. A 12-inch shelf holds 4 to 6 pint jars, each good for about a pound of fasteners. That’s a full hardware assortment in one square foot of dead space under a shelf you already own.
This is the DIY scrap tier: jars from the recycling bin, lids you already have, and 10 minutes. It’s the best small-hardware system for renters, because it unscrews clean with zero wall damage. Use wide-mouth pint jars, since standard mouths are a finger trap when you’re fishing for the last screw.
Tips for best results: Sort by project, not by size: one jar of “picture hanging” beats three jars of sorted nail lengths. Keep the jars you open weekly at the front edge.
Watch out: Glass jars plus a garage floor equals a bad day. If kids use the garage, switch to plastic peanut-butter jars with the same lid trick, and never hang jars over the walkway.
20. Drawer Dividers and Foam Inserts: Every Tool Has a Silhouette
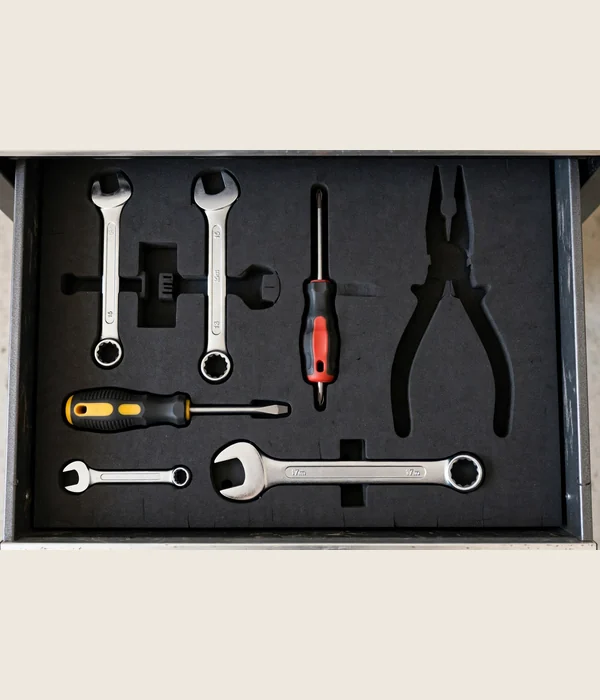
A tool drawer without dividers is a junk drawer with better intentions. Adjustable drawer dividers, spring-loaded or cut-to-fit, run in the under-$25 tier. They turn one 24-inch drawer into 6 to 8 compartments, and foam inserts let you cut a silhouette for each tool.
The mechanism is the same as the pegboard silhouette trick: empty space is information. When the 10mm socket’s outline is empty, you know it’s in the engine bay, not lost. Cut foam to the drawer depth, usually 3 to 4 inches for tool cabinet drawers, and lay tools flat.
Stack nothing, because stacked tools are hidden tools. Label each silhouette with a marker, and photograph the organized drawer. That photo is your reset reference after big projects, when the drawer looks like a crime scene.
- What you can do with it: Cut one foam layer per drawer and label the silhouette with a marker; keep one divider section as the “inbox” for tools that need to go back to other homes; photograph the organized drawer so you have a reset reference after big projects.
- Watch out: Foam inserts eat about an inch of drawer depth, so measure first if your drawers are shallow. Buy closed-cell foam, not open-cell: open-cell foam absorbs oil and swells into a greasy sponge within a year.
Zone 5: Sports and Outdoor Gear
Sports gear is the garage’s worst tenant. It’s big, oddly shaped, seasonal, and used by people who never put it back. The system that works is one grab, one return: every item hangs or docks in a spot a kid can reach and an adult can see.
These five ideas get balls, bikes, and long-handled tools off the floor and into a zone that survives a family. For the full treatment, the sports equipment storage and bike storage ideas for the garage guides cover each category in depth.
- Give sports gear its own wall, near the door the family actually uses. Gear stored behind the car might as well be in storage.
- Mount kid gear at kid height: 36 to 48 inches. A hook a 7-year-old can’t reach is a hook that never gets used.
- Balls go in corrals, long things go vertical, bikes go on walls or hoists. Three rules, whole zone.
21. Vertical Bike Wall Mounts: One Bike Per 2 Square Feet of Wall
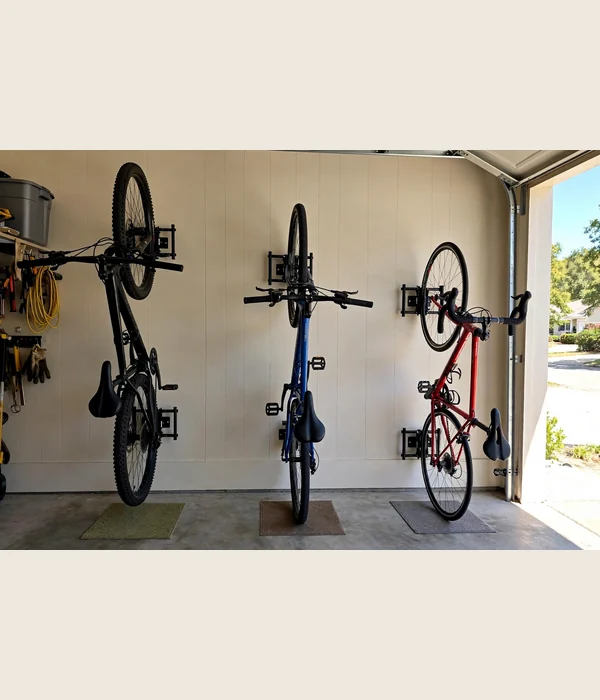
A vertical bike wall mount holds the bike upright by its front wheel. One bike occupies about 2 square feet of wall instead of 6 square feet of floor, which is the whole argument. Most wall mounts are rated for 40 to 50 pounds, covering standard adult bikes.
E-bikes need the heavy-duty mounts rated 60-plus pounds. Verify the rating before buying, because a 65-pound e-bike on a 50-pound hook is a slow failure. Mount at a height where the rear wheel clears the floor by 6 inches: for a standard 29-inch wheel bike, that’s a hook at about 70 inches.
Stagger multiple mounts at different heights so handlebars don’t collide. This is the $25 to $100 tier per mount, and four mounts turn an 8-foot wall into a 4-bike rack the family actually uses. Put a small square of old carpet under each bike to catch drips.
Tips for best results: Hang the heaviest bike lowest and closest to the door. Stagger heights by 6 inches between neighboring bikes so bars clear.
Watch out: Front-wheel hooks stress the wheel over time if the bike hangs for months. For seasonal storage, hang by the frame on a padded arm instead, or rotate the bike monthly.
22. Ball Corral: Every Ball Contained in 4 Square Feet
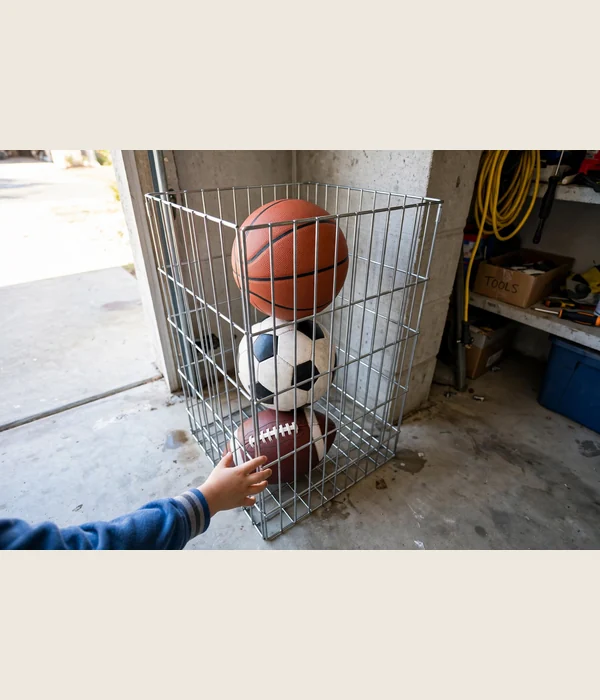
A ball corral is a 24-by-24-inch corner rack, typically 36 to 48 inches tall. It holds 10 to 15 balls of mixed sizes in a stacked column. The frame is steel or PVC, the front is open, and kids grab from the bottom and drop in from the top.
The whole thing lives in a corner that was holding nothing. This is the $25 to $100 tier ready-made, or under $25 as a DIY build from 1.5-inch PVC pipe and bungee cord.
The mechanism is gravity and visibility: balls roll down to the opening, kids see them, kids grab them.
The return trip is one toss. No lid, no latch, no excuse, which is why this works where a lidded bin doesn’t. Sort by size with the biggest balls on top.
Put the corral where the kids enter so the return trip is 3 steps. An unanchored corral tips when a kid climbs it, and a kid will climb it, so screw the back to the wall or weigh the base.
- What you can do with it: Sort by size with the biggest balls on top; keep the pump and needles in a pouch zip-tied to the frame; anchor the back to the wall or weigh the base with a sandbag.
- Watch out: An unanchored corral tips when a kid climbs it, and a kid will climb it. Screw the back to the wall or weigh the base with a sandbag, and keep it out of the car door’s swing path.
23. Long-Handle Tool Rack: Rakes and Shovels in 12 Inches of Wall
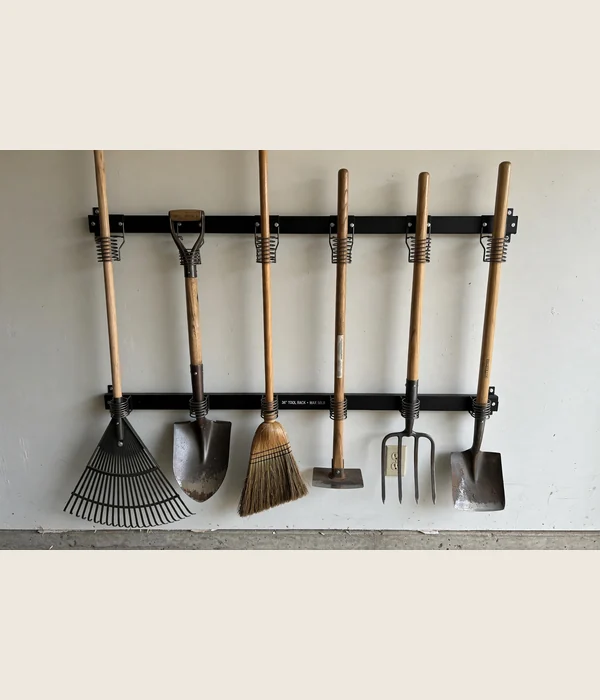
A long-handle tool rack is a wall-mounted bar, 24 to 36 inches wide, with spring-loaded grips or slots. It holds 6 to 10 rakes, shovels, brooms, and hoes upright, tools hanging by their handles with heads down, in about 12 inches of wall depth.
Most racks are rated for 30 to 50 pounds total. This is the under-$25 tier, and it ends the leaning-tools-in-the-corner era, where every grab triggers an avalanche. Mount at 60 inches high so the tool heads clear the floor and kids can’t reach the sharp ones.
The spring grips accommodate handles from 1 to 1.5 inches in diameter. That covers every standard rake and shovel, plus most brooms and hoes.
Hang the tools you grab most (broom, dustpan) at the ends. Keep the seasonal ones (snow shovel, leaf rake) in the middle.
Spring grips wear out, so test the grip strength yearly. If a shovel slides, the springs are done. Replace the rack before a tool falls on someone’s foot, because a falling shovel always finds a foot.
Tips for best results: Mount into studs, not drywall, since 10 tools at 3 pounds each add up fast. Keep the sharp-edged tools toward the wall side.
Watch out: Don’t mount above the workbench or walkway. A tool that slips its grip should fall onto the floor, not onto a person or a project.
24. Kayak and Paddleboard Wall Arms: 100 Pounds on Two Arms
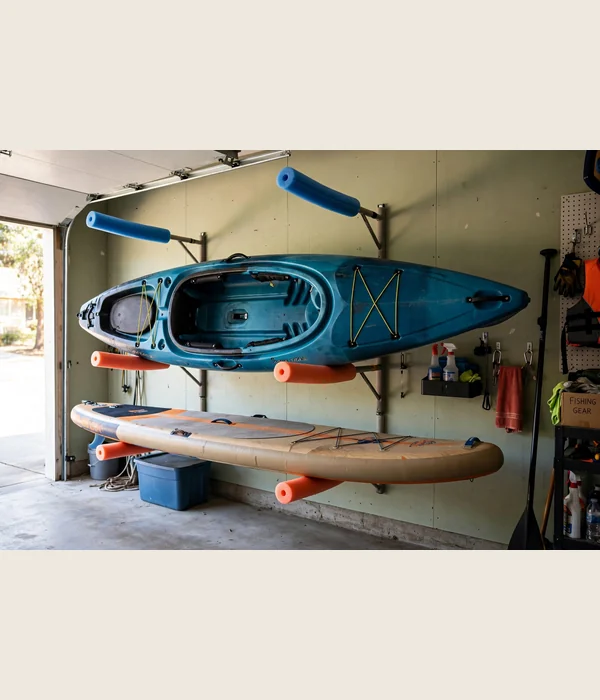
Kayaks and paddleboards are 10 to 14 feet of awkward that eat a whole wall when they lean. Wall-mount arms solve it: two padded steel arms bolt to the wall 4 to 6 feet apart, and the boat rests across them.
Most arm sets are rated for 75 to 100 pounds per pair. That covers recreational kayaks at 40 to 60 pounds and paddleboards at 25 to 35 pounds, with margin. Mount the arms at 48 to 60 inches high so the boat loads at waist height, and pad the arms with foam pool noodles to protect the hull.
This is the $25 to $100 tier. The rule for hull health: store kayaks on their side or deck-down on wide supports.
Never hang by the grab handles, which deforms the hull over a season. Space the arms at roughly one-third and two-thirds of the boat’s length for even support.
A 14-foot kayak needs 14 feet of clear wall, so measure the wall run before buying arms. Keep the boat away from the water heater and furnace: heat and UV are what actually kill plastic hulls.
Tips for best results: Strap the boat to the arms in storm season if the garage door stays open. Wipe the hull dry before storing to prevent mildew.
Watch out: Cheap arms with thin padding dent soft hulls over time. Check the contact points each season and replace flattened padding before it marks the boat.
25. Ski and Snowboard Wall Rack: Winter Gear Ready in October
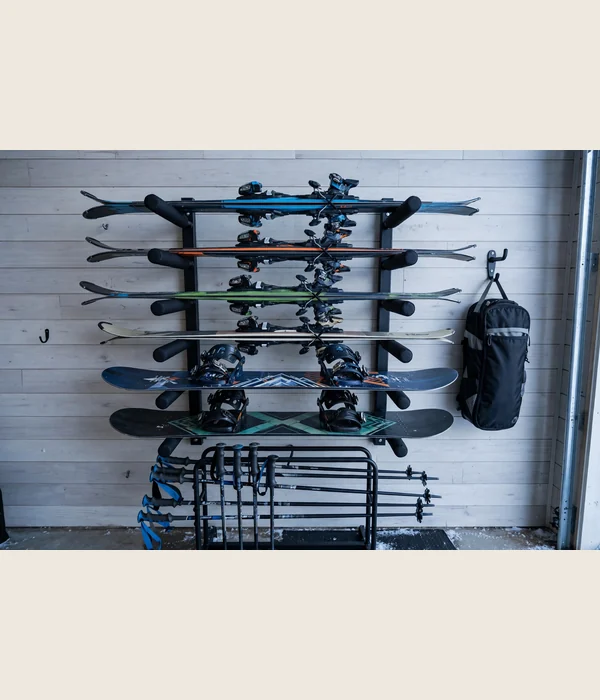
A ski and snowboard wall rack holds 4 to 6 pairs of skis or 3 to 4 boards horizontally on padded arms. It takes about 48 inches of wall width, with arms typically 10 to 12 inches deep and rated for 50 to 75 pounds total. That covers a family’s quiver.
Skis rest on their edges or flat, bindings up, and everything stays visible and dry. This is the $25 to $100 tier, and the payoff is timing: when the gear is visible and accessible in October, the waxing and binding checks happen. When it’s buried behind the mower, they don’t.
Mount at 48 inches high and pad every contact point. Keep the rack on an interior wall away from the garage door’s damp drafts, since moisture is what rusts edges. Hang the boot bag on a hook beside the rack so the whole kit is one stop.
Never store skis or boards wet. Wipe edges dry before hanging or you’ll find rust in spring. Keep the rack off the floor: concrete wicks moisture into bases all winter long.
- What you can do with it: Hang the boot bag on a hook beside the rack so the whole kit is one stop; store poles in a tall umbrella stand next to it; wax in fall while the gear is already in your hands.
- Watch out: Never store skis or boards wet. Wipe edges dry before hanging or you’ll find rust in spring, and keep the rack off the floor: concrete wicks moisture into bases all winter.
Zone 6: Budget DIY Builds
Everything above has a store-bought version. These six builds are for the other path: lumber, screws, and a Saturday. Each one costs under $25 in new materials or nothing if you’re working from the scrap pile.
Each one is sized with real dimensions so it actually works the first time. The companion garage shelving ideas guide covers the shelf-building basics these projects assume.
- A circular saw, a drill, and a speed square build everything in this zone. Borrow the saw if you don’t own one; don’t buy a table saw for one shelf.
- Always pre-drill within 2 inches of a board end. Split lumber is how a $15 build becomes a $30 build.
- Build to your stuff, not to the plan: measure the tallest tote and the widest tire before cutting anything.
26. DIY 2×4 and Plywood Shelves: 8 Feet of Shelf for Under $25
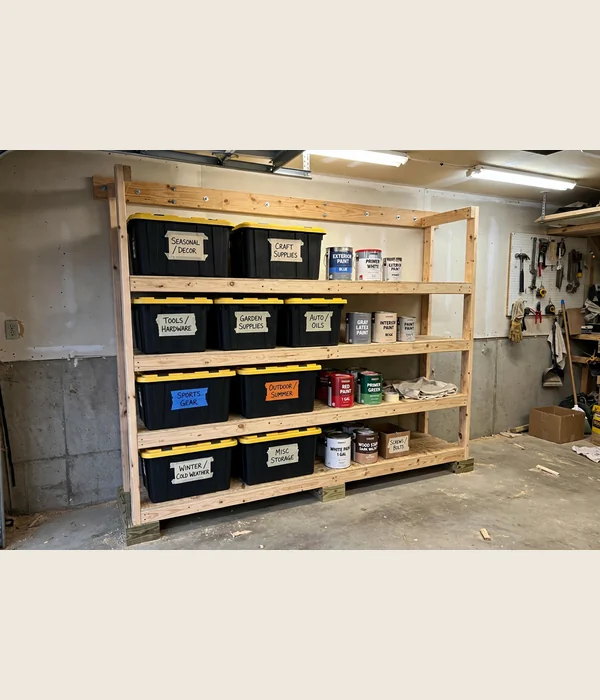
The classic garage shelf is a frame of 2x4s with 3/4-inch plywood decks. Uprights go every 24 inches, with horizontal 2×4 rails front and back at each shelf level and plywood laid on top. An 8-foot-long, 24-inch-deep, 72-inch-tall unit with four shelves gives you 64 square feet of shelf.
Each shelf carries 100-plus pounds when the rails are screwed, not just nailed. Two screws per joint with 2.5-inch construction screws is the difference between a shelf and a future collapse.
Build it 24 inches deep to fit the standard 27-gallon tote, with 18 inches of vertical clearance per shelf for totes with lids.
The lumber runs about $20, which puts this firmly under $25. Anchor the top to the wall with a 2×4 ledger screwed into studs. Free-standing tall shelves tip, and 64 square feet of loaded shelf tipping is a disaster.
Keep the unit 4 inches off the floor on pressure-treated feet. Otherwise it wicks garage moisture into the end grain and rots from the bottom up within a few years.
Tips for best results: Cut all uprights in one batch so the shelves sit level. Screw rails with 2.5-inch construction screws, two per joint, and check for square as you go.
Watch out: 3/4-inch plywood sags past a 24-inch span under heavy loads. Don’t stretch the upright spacing to save lumber, or the middle shelf becomes a hammock.
27. Pallet Wood Crates: Free Bins That Stack

Heat-treated pallets break down into free 1×4 and 1×6 slats. Look for the HT stamp and never use MB-stamped pallets, which were fumigated with methyl bromide. Screw the slats into open crates, roughly 18 by 12 by 12 inches, and you’ve built stackable bins for the price of a box of screws.
Four crates hold a shelf’s worth of spray bottles, rags, car-care supplies, and garden chemicals. This is the DIY scrap tier at its purest: the wood is free, the build is an hour with a pry bar and a saw, and the crates stack two high on any shelf.
Sand the slats with 80-grit so nobody gets splinters. Leave 1/2-inch gaps between slats for the rustic look that also vents moisture. Build to fit your exact shelf depth so no space is wasted, and stencil the contents on the end grain with a marker.
Pull every nail and check with a magnet when you break pallets down. A missed nail in a crate is a flat tire waiting to happen, and pallet nails are exactly where you stop looking.
- What you can do with it: Build to fit your exact shelf depth so no space is wasted; stencil the contents on the end grain with a marker; keep one crate as the “donation” crate for the stuff leaving the garage.
- Watch out: Pull every nail and check with a magnet: a missed nail in a crate is a flat tire waiting to happen.
28. PVC Pipe Tool Holders: $10 of Pipe, Zero More Avalanches
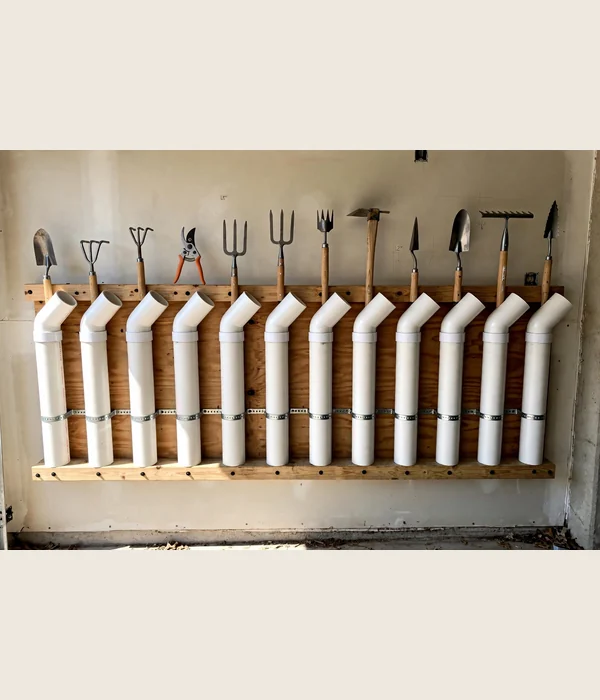
Three-inch and 4-inch PVC pipe, cut into 12-inch lengths and screwed to a 2×4 backer board, makes individual holsters for every long-handled tool you own. Each tube holds one tool upright: shovel, rake, broom, pruning saw.
A 10-foot stick of 3-inch PVC costs under $10 and yields ten holsters. A full wall of them lands in the under-$25 tier with the screws included. Mount the backer board to studs at 48 inches high and drop the tools in handle-first.
Unlike spring grips, PVC tubes never wear out. They fit any handle diameter up to the tube size, and a tool can’t fall out sideways. Cut the tube tops at a 45-degree angle so tools slide in without catching on the rim.
Twelve inches is the right tube length for control. Shorter tubes let tools tip, longer ones waste pipe. Ten holsters on a 4-foot backer board covers most households’ long tools with room for the next impulse rake purchase.
Tips for best results: Pre-drill the PVC before driving screws or it cracks. Space tubes 5 inches apart so tool heads don’t jam together.
Watch out: PVC gets brittle in freezing garages over years. Check the tubes each spring for cracks, and keep the whole rack out of direct sun through windows: UV is what ages PVC fastest.
29. DIY Tire Rack: Four Tires Off the Floor in 2x4s
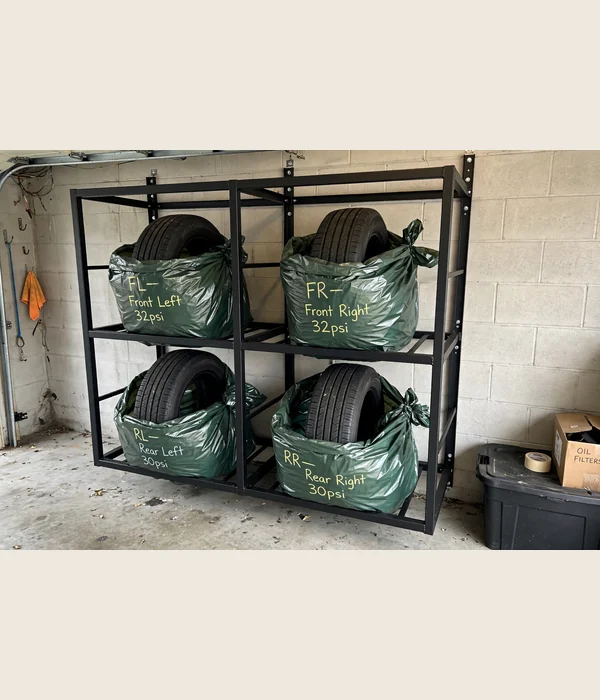
A tire rack is a simple 2×4 frame. Two horizontal rails run 48 inches long, held 14 inches apart by vertical legs, with the tires standing upright between the rails like books on a shelf. A standard car tire is 25 to 28 inches in diameter and 8 to 10 inches wide.
Four tires fit a 48-inch rack with room to spare. Total lumber is six 2x4s and a box of screws: under $25. Size the rail gap to your tire width plus 2 inches so tires slide in without forcing.
Stack tires upright, never flat in a tall stack. Flat stacking deforms the bottom tire’s sidewall over a season, and a deformed sidewall is a vibration you can’t balance out. Bag each tire in a lawn bag to keep brake dust off everything nearby.
Keep the rack on an interior wall away from the furnace. Heat and ozone from motors age rubber faster than time does. Label each tire’s position (front-left, rear-right) with chalk for rotation day.
Tips for best results: Anchor the rack to the wall so a bump doesn’t topple 200 pounds of truck tires. Build the legs from full 2x4s, not ripped strips.
Watch out: Don’t store tires near the water heater. The heat cycling is brutal on rubber, and a tire rack beside a heat source ages tires twice as fast.
30. Wall-Mounted Ladder Hooks: The 28-Foot Problem, Solved
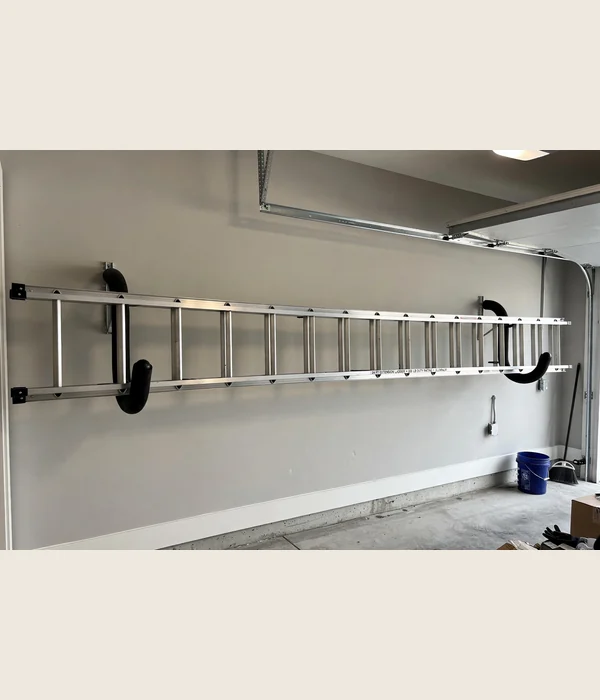
An extension ladder is 14 feet closed and up to 28 feet of awkward. Two heavy-duty wall hooks, each rated 50 to 75 pounds, mounted 10 to 12 feet apart on the same wall, hold the ladder horizontally at 60 to 72 inches high.
The ladder lives flat against the wall, above head height, and the floor underneath stays clear. This is the under-$25 tier for the hooks, and it’s the last avalanche to fix: the ladder leaning in the corner that takes down everything when you grab it.
Use J-hooks or ladder-specific brackets with a rubber coating so the rails don’t get chewed. Drive every screw into a stud with 3-inch lag screws. Drywall anchors and ladders are not friends, and a 40-pound ladder falling from 6 feet is a genuine hazard.
Measure your ladder’s closed length before spacing the hooks. A 24-foot ladder needs hooks at least 16 feet apart so the ladder doesn’t sag in the middle. Keep the hooks 6 inches clear of the garage door track.
Tips for best results: Mount the second hook only after hanging the ladder on the first, so the spacing matches reality. Add a bungee across the ladder to stop it walking off the hooks.
Watch out: The hooks must clear the garage door track by 6 inches or the door will hit the ladder on every cycle. Cycle the door fully before calling the job done.
Conclusion
A garage gets organized the same way it got messy: one zone at a time, starting with whatever blocks the car door. You don’t need all 30 ideas. You need the three that match your worst clutter: probably a wall system, an overhead rack, and one small-item fix.
Best first buy: the three-tier utility cart from point 14. It’s under $25, it needs no installation, and it’s useful the day it arrives. While you’re deciding on the big systems, the cart holds the project together.
After that, the 4×8 overhead rack is the single biggest volume gain per dollar in this entire guide. That’s 105 cubic feet of storage for one afternoon’s work, and it never touches your floor space.
Measure first, buy second, and anchor everything tall to a stud. Your garage has 640 square feet of wall and 400 square feet of ceiling doing nothing right now. That’s the whole project.
Frequently Asked Questions (FAQ)
How much does it cost to organize a garage with these garage organization ideas?
If you DIY the lumber builds and start with the under-$25 fixes, a working system costs $100 to $300. A full wall of slatwall plus an overhead rack plus cabinets runs $800 to $1,500 in materials. Start with the cart, the pegboard, and one wall system, then add the big pieces as the budget allows.
What’s the best first project if my garage is completely overwhelming?
Start with the floor. Pull everything out, sweep, and tape the car’s parking rectangle plus a 3-foot walkway.
Then install one wall system for the stuff that was blocking the car. If the garage is too full to sort in place, the weekend plan in how to organize a garage breaks the whole job into a two-day sequence.
Can I install overhead storage if my garage has drywall on the ceiling?
Yes, if you can find the joists. Use a stud finder to locate the wood joists through the drywall and drive lag bolts through the drywall into the joist.
If you can’t locate solid joists, or the ceiling is a fire-rated assembly, skip overhead and put the budget into wall systems instead. Never mount to drywall alone.
Are French cleats strong enough for heavy tools?
Yes, when they’re built right. A 3/4-inch plywood cleat screwed into studs with 2.5-inch screws holds tool cabinets and heavy hand tools without complaint.
The 45-degree bevel locks tighter as the load increases, which is the whole genius of the design. The failures are always screws into drywall or a sloppy bevel.
How do I organize a garage on a tight budget?
Work the zones in this order: free first (declutter and the between-joist shelf from scrap), then under $25 (pegboard, PVC holders, jar storage, ladder hooks), then one $25-to-$100 wall system. The DIY builds in Zone 6 outfit a two-car garage’s walls for less than one store-bought cabinet, if you have a Saturday and a saw.
What’s the best way to store holiday decorations in the garage?
Overhead, in standardized totes, labeled on three sides. Holiday decor is bulky, light, and touched twice a year, which is exactly what ceiling racks and bin rails are for.
Keep the tree and wreaths in the corner platform and the boxed ornaments in lidded totes on the rack. Next December starts with one trip up the ladder.
Should garage cabinets be metal, wood, or plastic?
For humid garages, powder-coated steel or 3/4-inch plywood beat particle board and thin plastic every time. Particle board swells and sags within a couple of humid summers, while steel wipes clean and plywood can be resealed. If you buy plastic cabinets, check the shelf rating: many are rated 25 pounds per shelf.
How do I keep a garage organized once it’s done?
Give everything a labeled home and enforce the one rule that matters: it goes back where it lives, the same day. Do a 10-minute reset every time you finish a project, and a seasonal purge each spring and fall when you swap the gear. If a zone stops working, move the storage to where the mess actually happens.