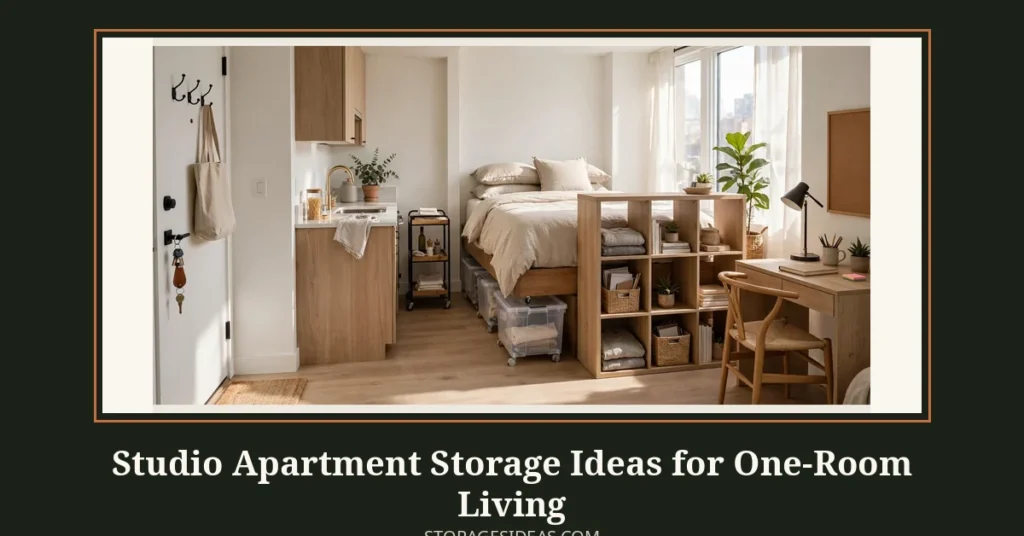
Studio apartment storage ideas work best when you think in zones instead of rooms. A studio is one room, usually 400 to 600 square feet, and every square foot has to earn its place twice: sleep and work, cook and store, enter and exit.
Grab your tape measure before you read another list. Every idea below carries the exact clearances it needs, from the 6 inches of under-bed space that fits a rolling bin to the 2 inches a folded-down desk takes from the wall. When you know your gaps, you buy once and you buy right.
I’ve grouped these 18 ideas by zone: the sleeping corner, the kitchen wall, the entry strip, and the work corner. Each one includes what it holds, what it costs, and whether your landlord can complain about it (renter-safe picks are flagged). Start with the zone that bothers you most.
Why One Room Means Every Inch Counts
Your studio has no spare rooms, so storage has to live inside the furniture and on the walls. That is the whole strategy behind these studio apartment storage hacks: shrink the footprint of what you own, then stack it, slide it, or fold it into space you were not using.
Measure these five gaps before you buy anything. Write the numbers on your phone so they are with you in the store.
- Floor to bed frame: the magic number for under-bed bins. Most platforms sit at 5 to 7 inches; bins need 6 to 7.
- Fridge to wall or cabinet to cabinet: slim carts fit 5 to 8 inch gaps.
- Top of door frame to ceiling: 8 inches or more fits an over-door rail without scraping.
- Floor to the underside of your desk: 26 inches clears a rolling drawer unit.
- Usable wall height above counters and desks: 12 to 18 inches is prime real estate for strips, rails, and pegboards.
One room also means every storage piece is on display. Pick closed bins and uniform baskets over open piles, and keep the storage ideas for small spaces mindset: one zone’s trick often works in another. A rolling cart that holds pantry goods today can become a desk caddy next month.
The sleeping corner: points 1 through 5.
1. Riser-Lifted Bed With Rolling Under-Bed Bins: 33 Square Feet of Hidden Closet
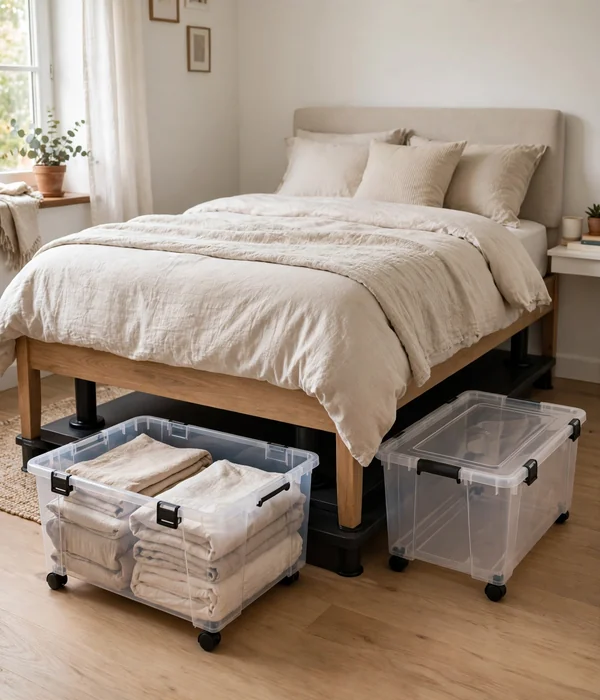
The space under your bed is the largest unused rectangle in most studios, and risers turn it into a shallow closet. Most platform frames sit 5 to 7 inches off the floor, which fits nothing useful. A 5-inch set of risers doubles that clearance to 10 to 12 inches, enough for rolling bins that slide out like drawers.
A queen bed is 60 by 80 inches, so the footprint underneath is 33 square feet. Four 56-quart bins at 30 by 24 by 6.1 inches swallow two wardrobes of folded clothes, or 24 pairs of shoes, or all your spare linens. Clear latching bins keep dust out and let you see what is inside.
- Measure from the floor to the underside of the bed frame at each leg and note the lowest number.
- Pick risers that add 3 to 6 inches; check the cup fits your leg width and the set rating covers bed, mattress, and sleepers (most are rated 1,000 to 2,500 pounds).
- Lift one corner at a time and seat each leg fully in its cup; felt pads under the risers protect hard floors.
- Buy bins 1 inch shorter than your final clearance and check the wheel direction before ordering.
- Load the heaviest bins near the head of the bed, out of your walking path.
Renter-safe and fully reversible. A center support leg blocks bins longer than 36 inches, so measure around it.
2. Loft Bed With a Living Room Underneath: Reclaim Your Whole Bed Footprint
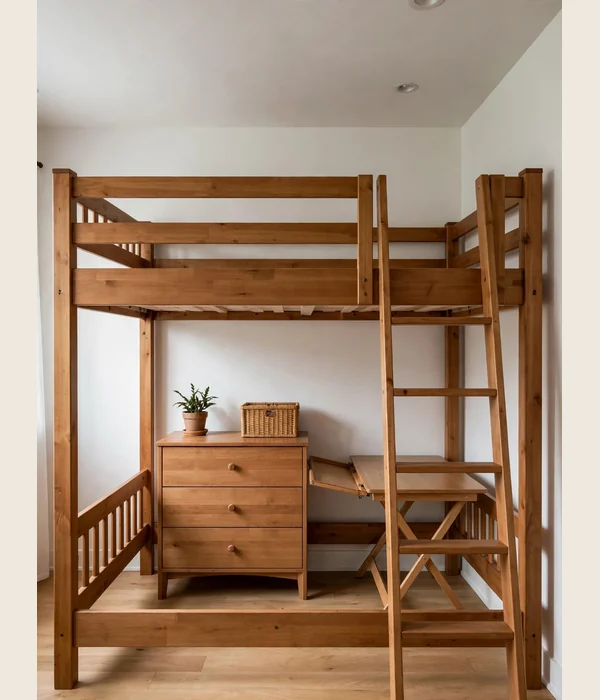
A loft bed reclaims your whole bed footprint as usable floor. In a 500-square-foot studio, a full-size loft at 54 by 75 inches hands back about 28 square feet, enough for a desk, a dresser, and a reading chair. Sleeping goes up, living goes down.
Loft heights run 55 to 72 inches. With an 8-foot ceiling you need about 33 inches between the mattress top and the ceiling to sit up without ducking, so most renters land on a 61 to 68 inch loft. Check the weight rating too; a 300 to 400 pound limit covers the frame, mattress, and sleeper comfortably.
What you can do with it:
- Slide a 30-inch dresser (30 by 18 inches) underneath for a wardrobe that never touches your closet.
- Tuck a standard 29-inch-high desk under the tall end and reclaim a real work corner.
- Park a rolling cart along the ladder side for shoes, bags, and laundry supplies.
- Clip a reading lamp and a small shelf to the guardrail for books and your phone.
- Budget 200 to 450 dollars for steel with guardrails; wood costs more but feels sturdier.
- Keep the ladder path clear of bins; a blocked ladder is how lofts turn into unused towers.
Fully renter-safe since the best lofts are freestanding, with no wall screws. Measure your ceiling twice: under 7 feet 6 inches, a full loft feels cramped, so a mid-height 50-inch platform is the kinder pick.
3. Bookcase Headboard With Hidden Shelves: Nightstand Storage With Zero Floor Space
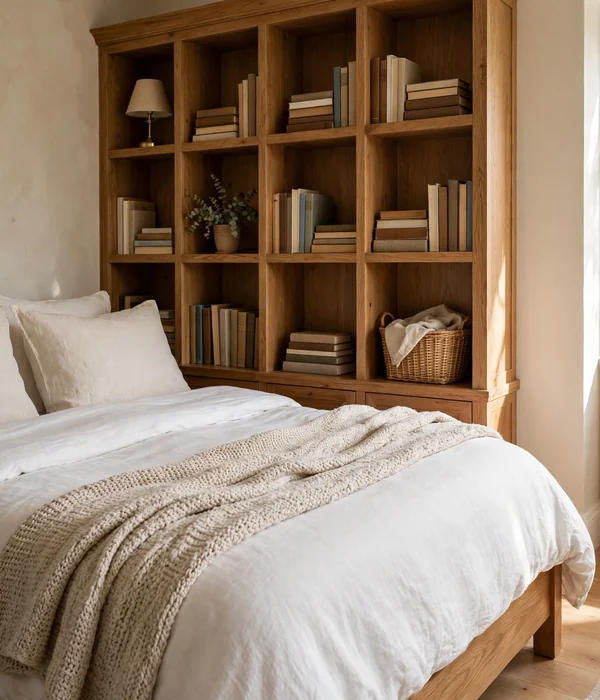
The wall behind your bed is dead space in most studios, and a bookcase headboard puts it to work. A queen headboard at 64 inches wide with 8 to 10 inch deep shelves holds what a nightstand holds, books, glasses, chargers, a lamp, without stealing a single inch of floor.
Typical units run 40 to 48 inches tall with 6 to 8 cubbies, and each shelf carries 10 to 15 pounds, plenty for books and a small lamp. Freestanding models slide behind the bed frame, so there is nothing to mount and nothing for a landlord to object to. Expect 80 to 150 dollars for a solid, wobble-free unit.
- Measure your bed width; a queen frame needs a 62 to 66 inch headboard so it does not peek out oddly.
- Choose shelves at least 8 inches deep so paperbacks and a lamp base fit without overhang.
- Slide the unit behind the bed, centering it on the mattress before you push the bed back.
- Put the lamp and charger station on the middle shelf where your arm reaches it from the pillow.
- Fill the end cubbies with books or baskets; open tops collect dust, so cap them with small bins.
Skip the wall-mounted styles if you rent; the freestanding kind does the same job with zero holes. Dust the top monthly, because it sits right where you breathe at night.
4. Vacuum-Seal Bags for Bedding and Bulky Clothes: Shrink Soft Goods to a Third
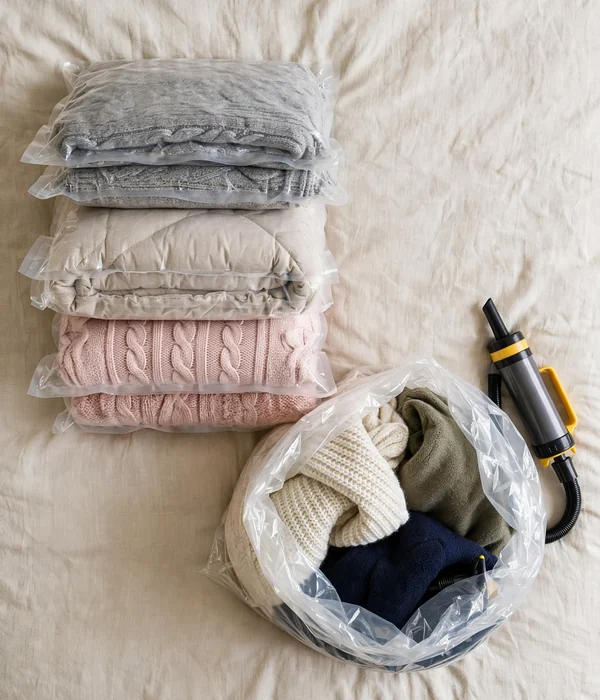
Vacuum bags shrink soft goods to about a third of their volume, which is the cheapest cubic footage you will ever buy. A queen comforter that fills an entire under-bed bin flattens to a 4-inch slab you can slide beside the mattress. The mechanism is just air removal, so there are no moving parts to break and nothing to assemble.
Jumbo bags run about 40 by 28 inches, and each holds a queen comforter, 4 pillows, or 12 to 15 sweaters. A 6 to 8 pack costs 15 to 25 dollars with a hand pump included. Stack sealed bags flat like files so one pulls out without unstacking.
What you can do with it:
- Store off-season coats and bedding in bags under the bed or on a closet shelf.
- Compress guest bedding; a full guest set shrinks to the size of a laptop bag.
- Keep one bag for the winter coat rotation so the entry hooks stay clear.
- Double-seal the zipper strip and check the valve before you walk away; most “failed” bags were never fully closed.
- Skip vacuum storage for down items you will not open for a year; long compression can flatten the loft.
Fully renter-safe with nothing to install. Do not store anything damp; trapped moisture in a sealed bag turns musty in about a week.
5. Clip-On Bedside Shelf and Hanging Bedside Caddy: Ditch the Nightstand Entirely
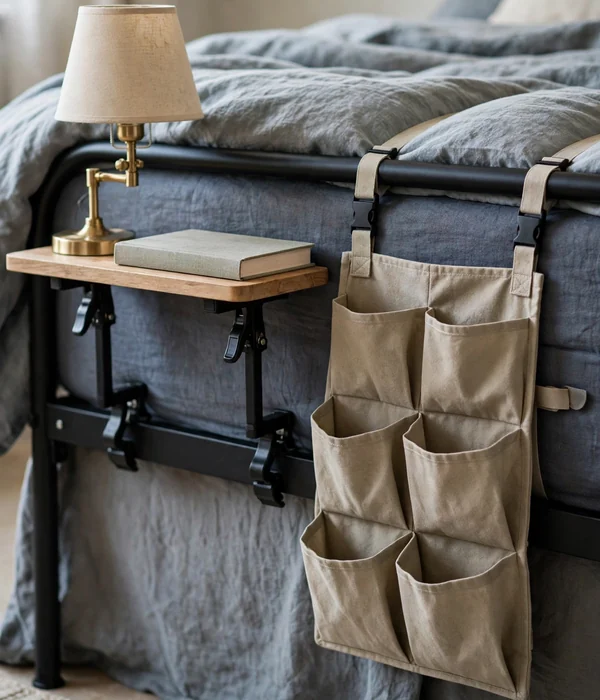
A nightstand eats about 2.5 square feet of floor you do not have. A clip-on shelf and a hanging caddy replace it with zero footprint. The shelf clamps to the bed frame and holds your lamp and water glass; the caddy straps to the mattress and swallows your phone, book, and glasses in six pockets.
Clip-on shelves run 15 by 10 inches, clamp frames up to 2.5 inches thick, and hold 15 to 20 pounds, plenty for a lamp and an alarm clock. Caddies measure about 11 by 8 inches with straps that fit mattresses 6 to 14 inches thick. Both together cost 12 to 20 dollars, which is less than one cheap nightstand.
- Measure your bed frame rail thickness so the shelf clamp actually fits; most top out at 2.5 inches.
- Clamp the shelf on your dominant-hand side, about 4 inches above the mattress for easy reach.
- Set the lamp toward the wall edge so the base cannot get knocked off in the night.
- Loop the caddy straps under the mattress and center the pockets beside your pillow.
- Keep total shelf load under 15 pounds; the water glass goes in a caddy pocket, not on the shelf edge.
No screws, no holes, fully renter-safe. If your bed has an upholstered frame with no rail to clamp, the caddy alone still beats a floor nightstand.
The kitchen wall: points 6 through 10.
6. Slim Rolling Cart for the Dead Gaps: Pantry Storage in 6 Inches of Gap
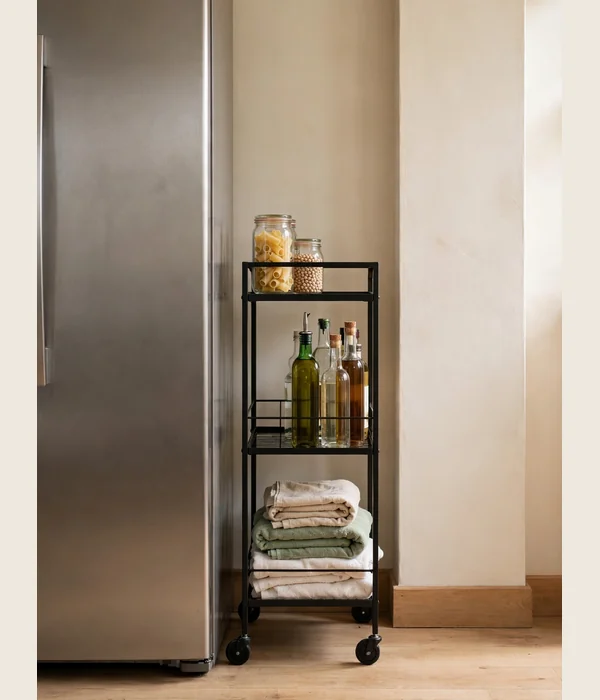
Every studio kitchen has dead gaps: 6 inches between fridge and wall, 5 beside the stove. A slim rolling cart turns that gap into 3 or 4 tiers of pantry. The mechanism is pure vertical stacking on wheels, so you roll it out to reach the back row and roll it away when you need the floor.
Slim carts measure 5 to 8 inches wide, 15 to 21 inches deep, and 27 to 35 inches tall, each tier rated for 5 to 8 pounds. The 3-tier cart runs 13 3/4 by 17 3/4 by 30 3/8 inches with 13-pound shelves at about 40 dollars; the small 11 by 15 by 24 inch version runs about 30.
What you can do with it:
- Load the top tier with daily items (oils, salt, coffee) and heavy cans on the bottom for stability.
- Roll it to the stove while you cook, then park it back in its gap.
- Add small bins per tier so bottles do not slide when you roll.
- Lock the casters on uneven floors; a loaded cart drifts on old linoleum.
- Keep total load under 40 pounds so it rolls out with one hand.
- Measure your gap first; a 7-inch cart will not forgive a 6.5-inch space.
No mounting, no drilling, fully renter-safe. This is the small space on a budget hero: one 25 to 45 dollar cart replaces a whole pantry cabinet.
7. Over-the-Cabinet-Door Organizer: Two Tiers of Storage on Every Door
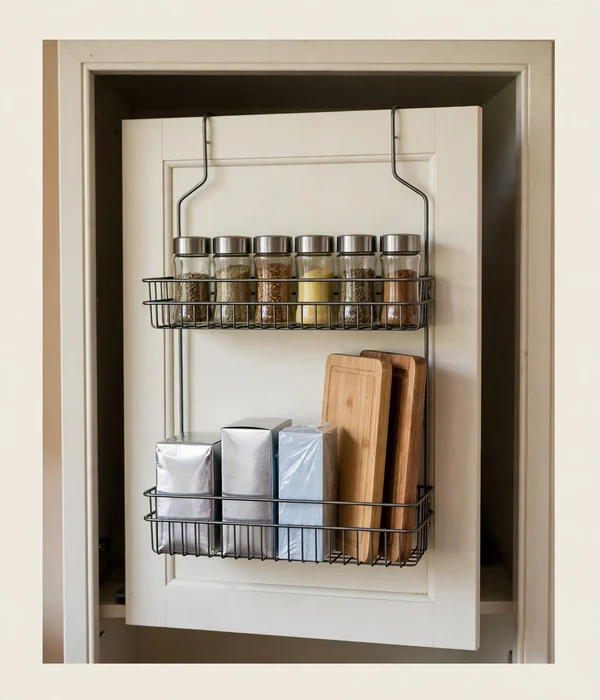
Cabinet doors are flat, unused real estate in every small kitchen. An over-the-door organizer hangs on 1.5 to 1.75 inch thick doors, which is the standard, and gives you two or three tiers of racks for foil, cutting boards, and spices. Nothing drills, nothing sticks, and the whole thing lifts off when you move.
Wire racks run about 9 by 18 inches with 2 to 3 shelves, and most hold 20 to 35 pounds total, enough for spices and cutting boards. Price lands at 15 to 25 dollars. Measure the clearance above the door: you need about half an inch between the door top and the frame or it will not close.
- Open the cabinet and measure the door thickness and the gap above it.
- Hook the organizer over the door top and let it hang flat against the face.
- Load spices and light items on the top tier where the brackets carry the least strain.
- Put cutting boards and wraps on the lower tiers, close to the door’s hinge side.
- Open and close the door three times; if it rubs, the brackets need bending or a thinner door.
Renter-safe with zero damage, and it comes with you on moving day. Skip the adhesive versions on cabinet doors; heat and steam from cooking loosen them within months.
8. Shelf Risers and Hanging Under-Shelf Baskets: Double Every Cabinet Shelf
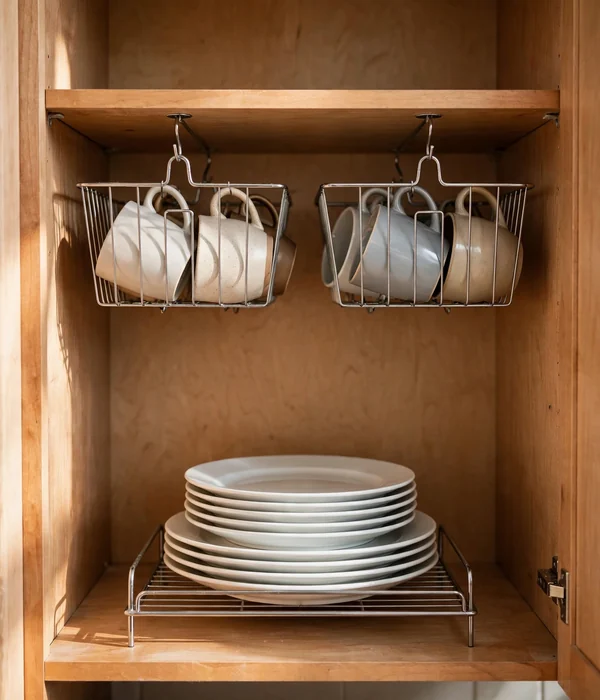
A standard cabinet shelf is about 18 inches tall, which means a stack of plates uses the bottom 4 inches and the rest is air. A shelf riser lifts half the dishes 5 to 9 inches, and a wire basket hooks under the shelf above for mugs. One shelf becomes two layers without a single screw.
Risers measure 12 to 15 inches wide and 5 to 9 inches tall, sized for standard 12-inch-deep cabinets. Under-shelf baskets run about 12 by 8 by 5 inches and hook over shelves 0.75 to 1 inch thick. A set of one riser plus two baskets costs 12 to 22 dollars and typically doubles a cabinet’s usable layers.
What you can do with it:
- Put everyday plates on the riser and the fancy set below; you reach the daily ones without lifting.
- Hang one basket for mugs and one for small bowls to stop the wobble-stack.
- Line the riser with a non-slip mat so plates do not slide when you pull the stack.
- Measure your shelf thickness before ordering baskets; thick solid-wood shelves reject standard hooks.
- Keep each basket under 8 pounds; they are for mugs and lids, not cast iron.
No drilling and no adhesive, so landlords never enter the conversation. If your shelves are adjustable, lower one shelf 4 inches and the riser gives you three layers instead of two.
9. Magnetic Knife Strip and Magnetic Spice Tins: Free the Counter and the Cabinet
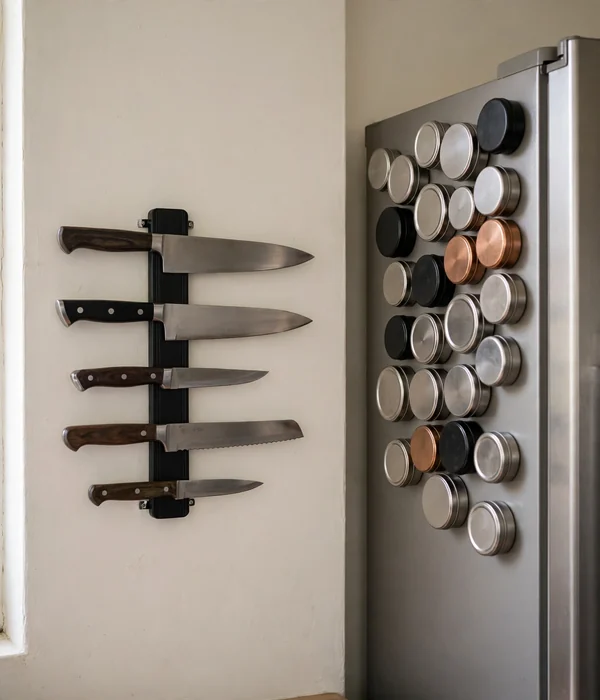
A knife block eats 6 by 12 inches of counter you cannot spare, and spice racks swallow a whole cabinet shelf. A magnetic strip moves the knives to the wall, and magnetic tins stick 2.5-ounce jars to the side of the fridge. Both use vertical surfaces your kitchen was wasting.
Strips run 12 to 18 inches long and hold 6 to 8 knives; adhesive-backed versions are rated 10 to 15 pounds and peel off cleanly. Spice tins are about 2.5 inches in diameter, hold 2.5 ounces each, and a set of 12 costs 10 to 15 dollars. The strip plus tins together run 15 to 25 dollars.
- Pick a wall spot at least 6 inches from the stove; heat weakens adhesive and warps handles.
- Clean the spot with rubbing alcohol and let it dry fully before sticking the strip.
- Press the strip hard for 30 seconds, then wait one hour before hanging knives.
- Fill the tins, label the lids with a marker, and stick them in cooking order on the fridge side.
- To remove at move-out, slide dental floss behind the strip and roll the adhesive off with your thumb.
Adhesive versions are fully renter-safe; the screw-mounted kind is not. Never store the strip above the stove where steam and grease coat the blades.
10. Tension-Rod Cabinet Dividers and a Lazy Susan: End the Leaning Pile Forever
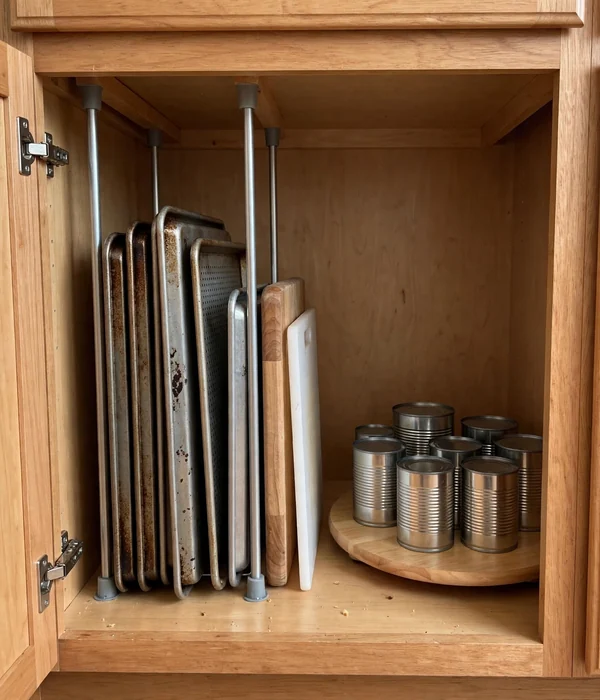
Baking sheets, cutting boards, and trays slide into a leaning pile when they have no dividers, and the back of a deep cabinet is where cans go to expire. A tension rod turns a 15.5 to 28 inch cabinet into vertical file slots, and a lazy susan spins the back row forward. Both fix the two most annoying cabinet behaviors.
Tension rods for cabinets span 15.5 to 28 inches and cost 8 to 12 dollars for a pair; place two vertically and trays file between them. Lazy susans run 10 to 12 inches in diameter and hold 10 to 12 cans or 8 spice jars; a two-pack costs 12 to 18 dollars. Together the pair stays under 20 dollars.
What you can do with it:
- File baking sheets and cutting boards vertically between two rods like records.
- Put the lazy susan in the deepest cabinet where cans disappear; spin, do not dig.
- Corral cooking oils on one susan so the whole group moves as a unit.
- Measure cabinet depth before ordering; a 12-inch susan overhangs an 11-inch shelf.
- Keep rods fully inside the cabinet frame; rods that poke out block the door.
No tools, no holes, completely renter-safe. If your cabinets are wider than 28 inches, link two rods end to end or the tension will not hold.
The entry strip: points 11 through 14.
11. Over-Door Hook Rail and Slim Shoe Organizer: Turn the Door Into a Closet
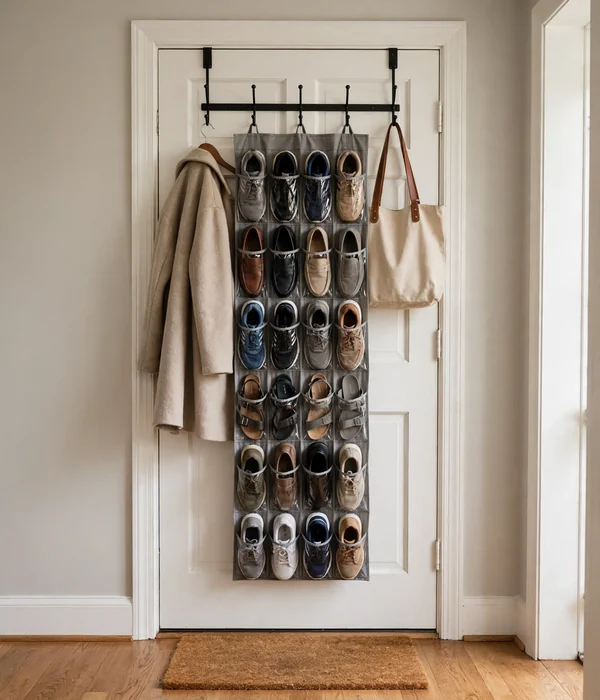
Your entry is usually a 3-foot-wide strip of floor with no closet, and coats plus shoes will eat it alive. An over-door hook rail grabs the back of the door for coats and bags, and a 24-pocket shoe organizer turns the same door into shoe storage. The door you were ignoring becomes a 7-foot-tall closet.
Doors in rentals run 1.375 to 1.75 inches thick, which standard over-door brackets fit. A 5-hook rail holds about 35 pounds total, enough for two coats and two bags, and the 24-pocket organizer (about 22 by 64 inches) fits shoes up to men’s size 13 in each pocket. The pair costs 12 to 18 dollars.
- Measure your door thickness and the gap above it; you need about half an inch of top clearance.
- Hang the hook rail on the bedroom side if the entry door opens against a wall.
- Hang the shoe organizer on the same door or the closet door, brackets first, fabric second.
- Put daily shoes in the middle pockets at hand height and occasion shoes up top.
- Test the door swing three times with everything loaded; shifting weight is what breaks brackets.
Zero holes and zero adhesive, so this is the most renter-safe idea on the list. If your door has a closer or a tight frame, move the setup to a closet door instead.
12. Drop-Leaf Folding Entry Shelf: A Table That Disappears
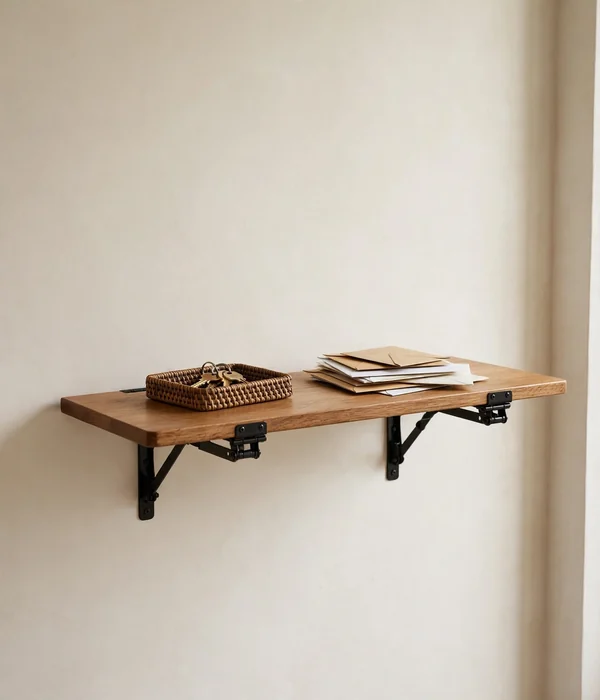
You need a landing spot for keys, mail, and a bag, but a console table steals 10 inches of floor along the whole entry wall. A drop-leaf shelf folds down to 24 by 12 inches when you need it and collapses to 2 inches deep when you do not. It is a table that disappears.
Folding brackets run 8 to 12 inches and hold 40 to 50 pounds per pair when screwed into studs; the shelf board is 24 by 12 inches. Bracket sets cost 25 to 35 dollars plus a 10-dollar pine board. Honest flag: this needs 6 to 8 screws into studs, so it is not renter-safe unless your lease allows it.
What you can do with it:
- Fold it down when you walk in with groceries; fold it up when guests need the hallway.
- Keep a small tray on it for keys and mail so the surface never becomes a pile.
- Add two adhesive hooks underneath for the dog leash and reusable bags.
- If screws are off the table, a 9-inch-deep console table does the same job freestanding.
- Stud-find before you drill; drywall anchors alone will not hold 40 pounds of groceries.
- Sand and seal the pine board so bag straps do not snag on rough edges.
Best for owners or renters with written permission. For everyone else, the narrow console table is the no-drama twin of this idea.
13. Storage Ottoman or Entry Bench With Cubbies: Seating, Shoes, and Catch-All in One
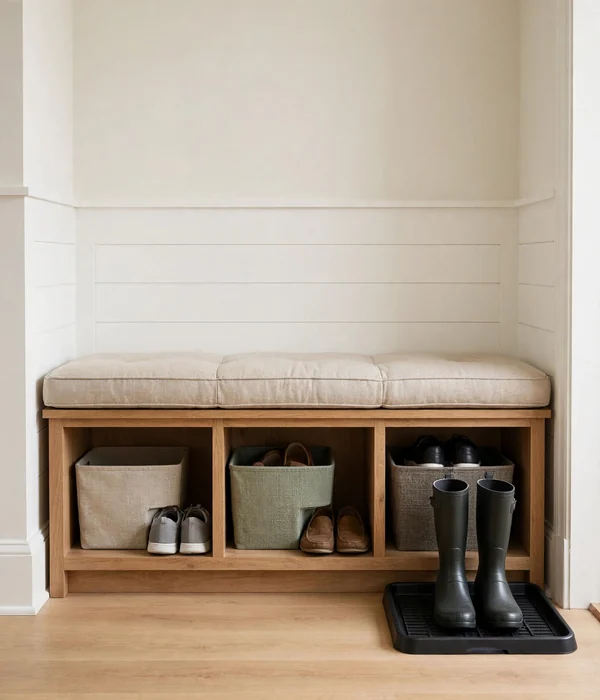
An entry bench is seating, shoe storage, and a catch-all in one rectangle. A 36-inch bench with two cubbies swallows 4 pairs of daily shoes plus the bag you grab every morning, and the top is a seat for pulling on boots. One piece of furniture does the work of three.
Ottomans run 30 to 40 inches wide and 15 to 17 inches tall with a 250 to 300 pound sit rating; the hollow inside fits shoes or a folded throw. Benches run 36 to 45 inches wide, 15 to 18 inches tall, and 12 to 15 inches deep, with cubbies sized for 11-inch fabric bins. Expect 40 to 80 dollars.
- Measure your entry wall; leave 36 inches of clear walkway in front of whatever you buy.
- Choose a bench no deeper than 15 inches so the hallway still feels like a hallway.
- Slide 11-inch fabric bins into the cubbies, one per person, labeled if you share the place.
- Put a boot tray underneath or beside it; wet shoes will ruin a fabric bench in one winter.
- Add felt pads under the legs so it does not scratch the floor when you slide it to sweep.
Freestanding and fully renter-safe. If the entry is too narrow for even a 12-inch bench, the over-door organizer from point 11 is your backup plan.
14. Damage-Free Hook Command Center: 24 Pounds of Gear, Zero Holes
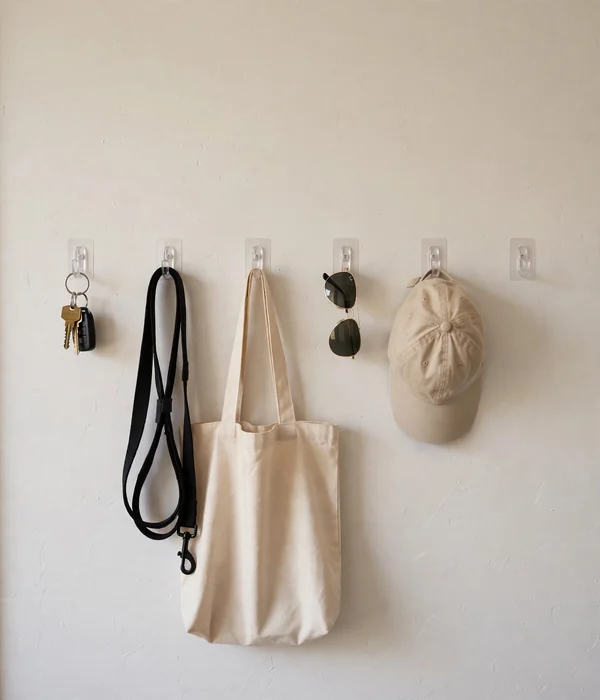
Keys, sunglasses, the dog leash, and tomorrow’s bag need one home or they migrate to every surface. Six large adhesive hooks on one entry wall create a command center that holds 24 pounds of daily gear. The mechanism is a foam strip that bonds to paint and stretches off cleanly when you leave.
Large adhesive hooks hold 4 pounds each, and the metal versions hold 5; a six-hook wall therefore carries about 24 pounds. An 8 to 12 pack costs 10 to 15 dollars. The strips need one hour to cure and they only bond to smooth, clean surfaces, so textured walls and brick are out.
What you can do with it:
- Hang tomorrow’s bag, today’s keys, and the leash at shoulder height for grab-and-go.
- Reserve two hooks for guests so their coats never land on your bed.
- Keep one low hook for the reusable grocery bags you always forget.
- Label nothing; the positions become the system within a week.
- Photograph the wall on move-in day so any paint questions at checkout have an answer.
The poster child for renter-safe: no holes, no residue when removed right. Pull the tab straight down and stretch it a full 15 inches; yanking outward tears paint.
The work corner: points 15 through 18.
15. Cube Storage Unit as a Room Divider: Divide the Room, Store Everything
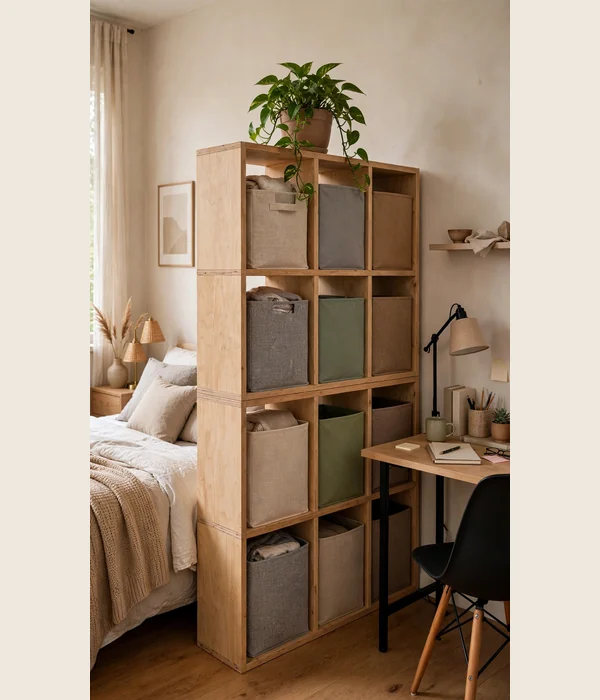
A studio needs a visual line between sleep and work, and a cube unit draws it while storing everything. A 2-by-4 unit laid horizontally stands 30 inches tall, which divides the room without blocking light or sight lines. Eight cubes swallow office supplies, media gear, and the clutter that makes a studio feel small.
The classic 2-by-4 runs 57 7/8 inches wide, 30 3/8 inches tall, and 15 3/8 inches deep, and each cube fits an 11-inch fabric bin. Expect 70 to 100 dollars for the unit plus 3 to 5 dollars per bin. It also works as a TV stand, a desk return, or the back of a reading nook.
- Measure the divider line; the unit needs 58 inches of wall-to-walkway space.
- Assemble it horizontally and load the bottom cubes first so it cannot tip while you work.
- Face the finished side toward the living area and the open cubes toward the work side.
- Sort by frequency: daily items at arm height, archives in the bottom cubes.
- Anchor it with anti-tip straps; this needs two small screws, so check with your landlord first.
This is the vertical thinking behind vertical storage ideas: storage that climbs instead of sprawls. Two screws is the only renter question on this whole idea.
16. Wall-Mounted Fold-Down Desk: An Office That Exists Only at Work Hours
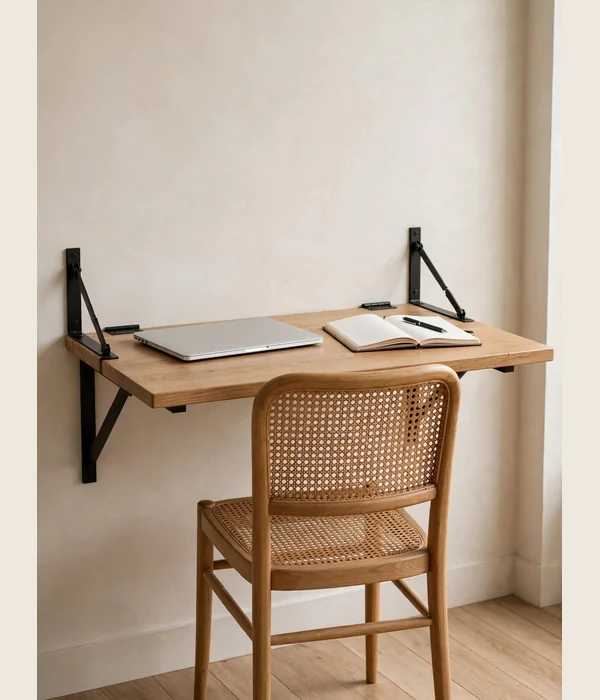
A desk is non-negotiable when you work from home, but a permanent desk claims 8 square feet forever. A wall-mounted fold-down desk opens to 31 by 23 inches of real work surface and folds to under 5 inches deep when the laptop closes. Your office exists only during work hours.
Fold-down desks run 31.5 by 23.5 inches open and about 4.7 inches deep folded, with ratings of 33 to 50 pounds, enough for a laptop, monitor, and notebook. Prices run 70 to 130 dollars. The honest flag: this needs 6 to 10 screws into two or three studs, so it is not renter-safe without written permission.
What you can do with it:
- Mount it at 29 to 30 inches high, standard desk height, so your chair still works.
- Keep the setup light; a 33-pound rating means laptop plus monitor, not a printer.
- Add a small shelf above for the items that used to live on the desk.
- Fold it up every evening; a visible desk in a studio keeps your brain at work.
- If drilling is banned, a C-shaped side table at 26 by 18 inches slides over most chairs.
Best for owners and long leases. Renters, the fold-down shelf brackets from point 12 use the same idea with a smaller footprint.
17. Rolling Drawer Unit Under the Desk: Drawers for a Desk That Has None
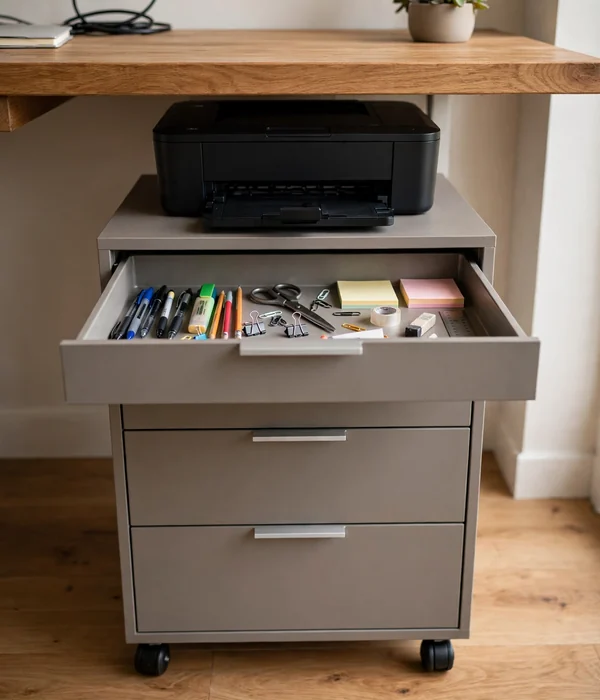
Desk drawers are where office clutter goes to hide, and most small desks have none. A 3-drawer rolling unit slides into the 26 inches of clearance under a standard 29-inch desk and gives you paper, supplies, and tech storage on wheels. Pull it out to reach, push it back to disappear.
Three-drawer units run about 15.75 by 19.7 by 26 inches, with drawer depths around 3, 6, and 9 inches from top to bottom. The top surface holds a printer up to 30 pounds. Expect 40 to 60 dollars, and look for lockable casters so it stays put on hard floors.
- Measure from the floor to the underside of your desk; you need 26.5 inches of clearance.
- Choose a unit with a top drawer shallow enough for pens and a deep bottom drawer for files.
- Roll it under the desk on your non-dominant side so your knees keep the center.
- Put the printer on top only if the unit is rated for 30 pounds; otherwise the printer lives on a shelf.
- Lock two casters once it is parked so it does not drift when you pull a drawer.
Fully renter-safe with nothing to mount. If the drawers stick in humid months, a rub of candle wax on the runners fixes it.
18. Pegboard Wall Panel for Desk Overflow: Get Small Things Off the Surface
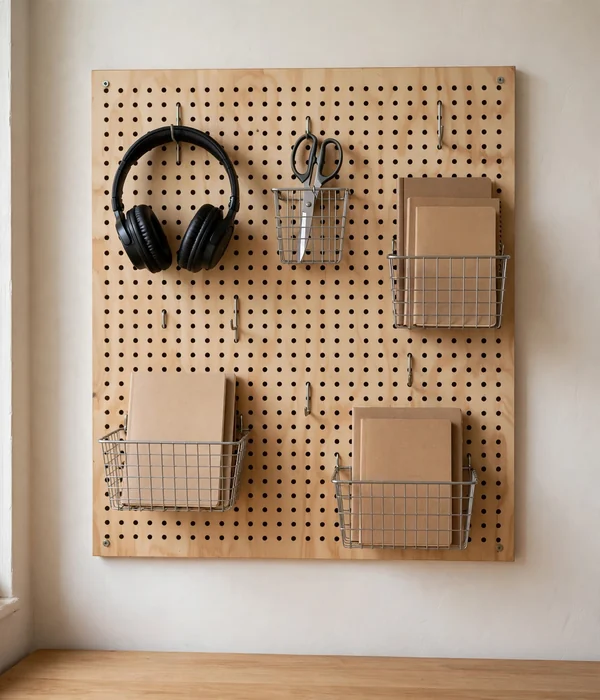
Desk surfaces in studios collect everything because there is nowhere else for small things to go. A 22 by 32 inch pegboard on the wall above the desk gives scissors, headphones, cables, and notebooks a home off the surface. The desk stays a desk instead of becoming a storage unit.
Pegboards run 22 by 32 or 32 by 32 inches, and individual hooks hold 2 to 5 pounds each, which covers headphones, scissors, and small baskets. A panel with a starter hook set costs 20 to 40 dollars. Screw mounting holds the most weight; heavy-duty adhesive strips work for light loads under 5 pounds total.
What you can do with it:
- Hang headphones and cables on the outer edges where they are easy to grab.
- Add small wire baskets for notebooks, chargers, and the tape you can never find.
- Keep a 6-inch clear band at the bottom so items do not knock your monitor.
- Trace your most-used tools on the board in pencil so everything has a marked home.
- If you rent, start with the adhesive version and keep total load under 5 pounds.
Renter-safe in the adhesive version, owner-grade with screws. Either way, the wall above the desk stops being blank space and starts earning rent.
Conclusion
One room rewards people who measure before they shop. Every idea on this list works because it fits a gap you can name in inches, not because it looked good in a cart.
Best small-space fix: the riser-lifted bed with rolling bins from point 1. Nothing else on this list buys you 33 square feet of hidden storage for under 50 dollars with zero holes in the wall. Do that one first, then spend the savings on the zone that annoys you most.
Before you buy anything, run the tape over this checklist:
- Bed frame clearance and leg width (points 1 and 5)
- Gap widths beside the fridge and stove (point 6)
- Door thickness and top clearance (points 7 and 11)
- Desk underside height (point 17)
- Wall space above the desk and counters (points 9 and 18)
Buy for the gaps, not the wishlist, and the studio stops feeling like one room with too much stuff and starts feeling like four rooms that happen to share walls.
Frequently Asked Questions (FAQ)
What are the best studio apartment storage ideas for a renter?
If your lease bans holes, then stick to the freestanding and adhesive picks: risers with bins, rolling carts, over-door organizers, clip-on shelves, and adhesive hook walls. Those five alone add serious storage with zero damage. Save the fold-down desk and drop-leaf shelf for a place you own or a landlord who says yes in writing.
How do I store clothes in a studio with no closet?
If you have no closet at all, then build the wardrobe from furniture: risers plus rolling bins under the bed for folded clothes, a dresser under a loft bed or inside a cube divider, and vacuum bags for off-season bulk. A freestanding garment rack at 36 to 48 inches wide handles the hanging items. Keep the daily outfits on the rack and everything else filed away.
What measurements should I take before buying studio storage?
If you measure once, then buy once: floor to bed frame, gap widths beside the fridge and stove, door thickness plus top clearance, floor to desk underside, and usable wall height above counters. Write all five on your phone. Nearly every return in small-space storage comes from guessing one of these numbers.
Is a loft bed worth it in a studio with low ceilings?
If your ceiling is under 7 feet 6 inches, then skip the full loft; sitting up in bed will feel cramped and the room will feel smaller. A mid-height platform at 40 to 50 inches still fits dressers and bins underneath without the boxed-in feeling. Only go full loft at 61 inches or more when you have a true 8-foot ceiling.
How do I keep a studio from looking cluttered with all this storage?
If the storage is visible, then make it uniform: matching bins, closed fronts, and one color family across open shelves. Open, mismatched piles read as clutter even when they are organized. Hide the busy stuff behind the bed, under it, or inside the cube divider, and keep the sight lines from the door as clean as you can.
What is the cheapest way to add storage to a studio apartment?
If the budget is tight, then start with tension rods, adhesive hooks, and vacuum bags; all three together stay under 40 dollars and need no tools. Next tier up, a slim rolling cart and an over-door organizer add major capacity for another 40 dollars. Buy in that order and you will feel the difference before you spend 100 dollars.
Can I fit a real workspace in a studio without losing the living area?
If you work from home, then yes: a fold-down desk gives you 31 by 23 inches of surface that vanishes to 5 inches deep after hours, and a rolling drawer unit hides supplies under it. Renters who cannot drill can use a C-shaped side table instead. Either way, fold or roll the office away each evening so the studio feels like home again.