A cluttered desk is almost never a desk-size problem, it’s a storage-placement problem. Your desk is a worktop, not a shelf, and every item sitting on it is paying rent in square inches you need for actual work.
These 25 home office storage ideas clear your desk by giving everything on it a better home: under it, above it, beside it, or in the dead spaces of the room nobody is using.
All 25 work in small apartments and rental rooms, most are renter-safe, and every idea comes with the exact measurements, sizes and price bands you need to buy right the first time.
Why Your Desk Makes You Think You Need More Storage
The average desk top is 48 inches wide by 24 inches deep, 8 square feet of work surface, which sounds generous until a monitor, keyboard, coffee, phone, notebook and a stack of “I’ll deal with this later” claim it. The failure mode is always the same: storage that competes with the worktop instead of supporting it.
Effective home office storage solutions work by moving things along three axes, down (drawers, under-desk), up (shelves, pegboard, walls), and out (closets, room edges), while the desk top keeps only what your hands need mid-task.
Office organization research consistently shows the sweet spot: a clear worktop with an arms-reach zone for active tools and everything else parked within a swivel, roughly 24 to 30 inches away. Renters get a special win here: nearly every idea below is damage-free or screws-optional, because adhesive, freestanding and clamp-mounted storage has caught up to the drilled kind.
Measure your desk depth, your wall space above it, and the gaps around it before buying anything, three tape-measure readings turn this from a shopping list into a plan.
Desk Surface & Drawers
1. Under-Desk Rolling Drawer Unit: Reclaim the Floor You Can’t See
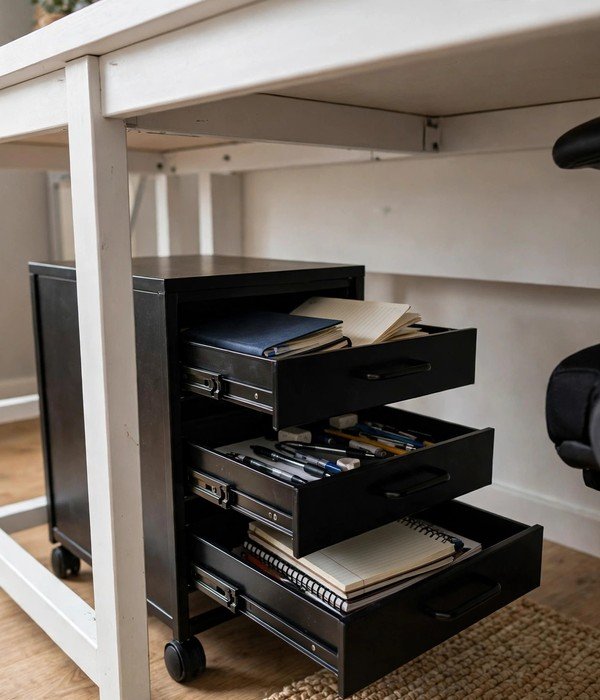
The space under your desk is roughly 3 to 4 cubic feet of storage doing nothing.
A rolling drawer unit (typically 12 to 16 inches wide, 16 to 20 inches tall) slides under a standard 29-inch-high desk and holds supplies, notebooks and peripherals in 2 to 4 drawers, and because it rolls, you can pull it out for cleaning or repositioning in seconds.
- Measure your knee clearance: you need at least 24 inches of width between your desk legs or the modesty panel.
- Choose a unit 4 inches narrower than that gap so it glides without scraping.
- Put heavy items (paper stacks, chargers) in the bottom drawer so the unit stays stable when you roll it.
- Lock the casters if your floor is smooth, a unit that drifts when you bump it is worse than none.
Price bands run $35–$70 for plastic, $80–$140 for metal or wood-faced units. Watch the drawer depth: shallow top drawers (2–3 inches) are for pens and sticky notes; one 8-inch-deep bottom drawer holds a printer or stack of files.
2. Monitor Riser With Hidden Storage: Lift the Screen, Gain a Shelf

A monitor riser lifts your screen to eye level and turns the dead space under the display, usually 4 to 6 inches tall and the full monitor width, into a storage tray for keyboards, tablets and hard drives.
Buy a riser rated for your monitor’s weight (most handle 20–40 lbs; check your display’s spec, a 27-inch monitor is typically 8–12 lbs with its stand).
- Measure your monitor’s footprint with its stand; buy a riser 2 inches wider on each side.
- Set the riser height so your eye line hits the top third of the screen, 4 to 5 inches works for most seated setups.
- Store a keyboard flat underneath when you switch to a laptop; stash portable hard drives and docks in the tray.
- If the riser has a cable slot in back, route your monitor power through it now, future you will thank present you.
Under $25 buys bamboo or basic; $35–$60 gets a riser with side drawers or a built-in drawer. Renters: no mounting, no screws, zero damage, this is a pure placement play.
3. Tiered Desktop Organizer: Sort Up Instead of Stacking Out
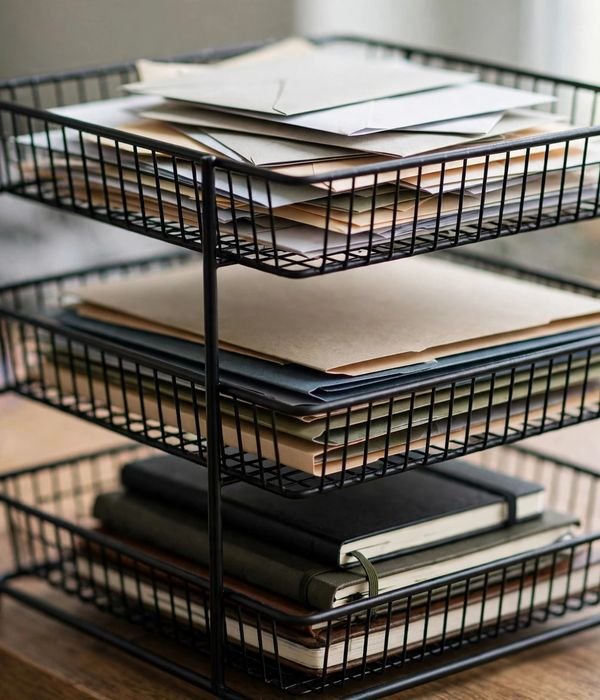
A three-tier desktop organizer (roughly 12 wide × 9 deep × 14 tall inches) converts one flat pile footprint into three sorted levels: incoming work on top, active projects in the middle, reference below.
The vertical sort is the mechanism, it makes category visible at a glance, which is why “one organizer” beats “three flat trays” even though the footprint is identical.
- Assign each tier a rule before you put anything in: top = today, middle = this week, bottom = reference.
- Keep tier height under 14 inches if your shelves above the desk start at 16 inches, measure first.
- Put the heaviest items on the bottom tier; a top-heavy organizer tips.
- Empty the top tier daily (see idea 7) so the sort stays honest instead of becoming a prettier pile.
Look for metal or bamboo units ($20–$45) with letter-size depth (11.5 inches) so papers lie flat without curling. Wire versions cost less but show dust, solid-bottom tiers wipe clean in seconds.
4. Divided Drawer Inserts: End the Junk Drawer Forever

One undivided desk drawer is where pens, batteries, USB sticks and mystery cables go to breed. A bamboo or plastic insert (sized to standard drawer widths of 12, 15 or 18 inches) splits that chaos into 6–10 compartments, and the visibility alone cuts your “where is it” hunting to zero, you can’t lose what you can see.
- Measure the drawer’s inside width and depth (subtract half an inch for clearance) before ordering.
- Choose adjustable dividers over fixed ones if you share the desk, compartments change with seasons.
- Give every category one home: pens, sticky notes, USB drives, batteries, headphones, tools.
- Leave one empty compartment on purpose, the “inbox” for items awaiting a category, emptied weekly.
Inserts cost $12–$25; bamboo lasts longer than plastic under daily wear. The mechanism here is friction reduction: a 5-second retrieval time versus a 5-minute dig means supplies actually get put back where they belong.
5. Clamp-On Side Tray: Borrow Six Inches You Didn’t Have

A clamp-on tray or edge-mounted shelf hangs off the side of your desk and adds a 6-to-10-inch-wide surface for a coffee, phone or notebook, worktop that doesn’t touch your worktop. Most clamp onto desk edges from 1 to 3 inches thick, which covers nearly every standard desk and most dining tables pressed into office duty.
- Check your desk’s edge thickness and material, clamps need solid wood or thick MDF, not hollow-core doors.
- Mount it on your non-dominant side so reaching for coffee doesn’t cross your keyboard.
- Keep the load under 5 lbs on most clamp trays, coffee and a phone, not a bookshelf.
- Position it toward the front third of the desk depth so it doesn’t collide with your chair arms.
$15–$30. Renter note: clamps can leave pressure marks on soft wood, add a felt pad or microfiber cloth under the clamp pad. It’s removable in ten seconds, which is the whole point.
Paper & Files
6. Rolling File Cart: A Filing Cabinet That Leaves the Room
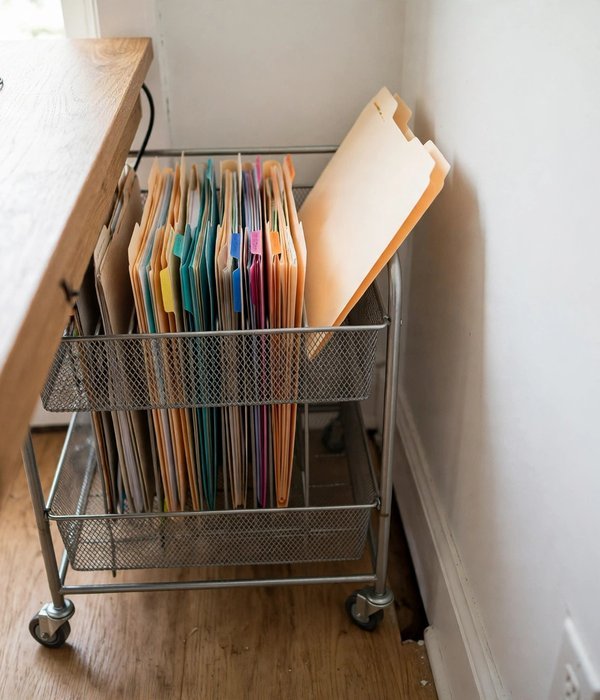
A rolling file cart (the standard is 15 wide × 12 deep × 24 tall inches, fitting letter files at 12 × 10 inches and legal at 14 × 9) holds a full year of active files and slides into the 16-inch gap beside your desk or under a side table.
Because it rolls, the files come to you, then disappear when you don’t need them.
- What you can do with it: one hanging folder per active project, bills, tax documents, and household admin, roughly 20–30 folders per cart
- Where it works best: the dead space between your desk and the wall, beside a bookcase, or tucked under a window
- Size math: a single-tier cart holds about 1.5 cubic feet; add a second tier for backstock (inactive files) so active files stay lean
- Renter flag: fully freestanding, zero installation, roll it into a closet on weekends if the room doubles as a guest room
- Price band: $30–$55 for metal mesh; $60–$90 for wood-accented versions with a locking lid
Label every folder tab on day one. An unlabeled file cart is a junk drawer with wheels.
7. The One-Inbox Rule: Stop Paper at the Door
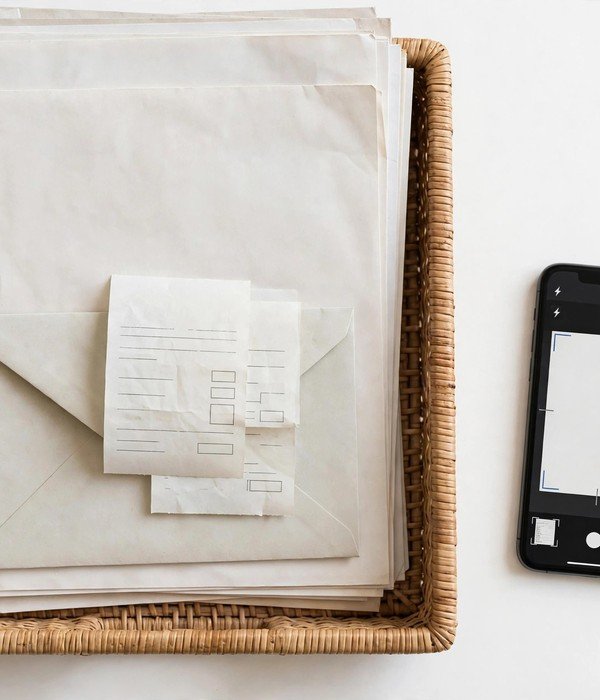
Every sheet of incoming paper, mail, receipts, school forms, bills, lands in one inbox tray (letter-size, 12 × 9 inches, with 2–3-inch-high sides so nothing slides out). Nothing lands on the desk itself. Once a week, usually Friday, you process the tray to zero: file it, act on it, scan it, or recycle it.
The tray is the mechanism, but the rule is the system.
- What you can do with it: contain 100% of paper chaos to a single 12×9-inch zone
- Where it works best: the corner of the desk, or on top of the rolling file cart from idea 6, never in the center
- Process rule: touch each sheet once during the weekly session; a sheet that goes back “unprocessed” is a future mess
- Scanners help: a phone scanning app converts the “keep just in case” pile into a searchable folder, one cubic foot of paper becomes zero
- Price band: $12–$25 for a stacking tray set; add a second tier if your mail volume is high
Watch out: a second “miscellaneous” inbox defeats the entire system. One inbox, processed weekly, or it’s decoration.
8. Wall-Mounted File Sorter: Files With No Footprint
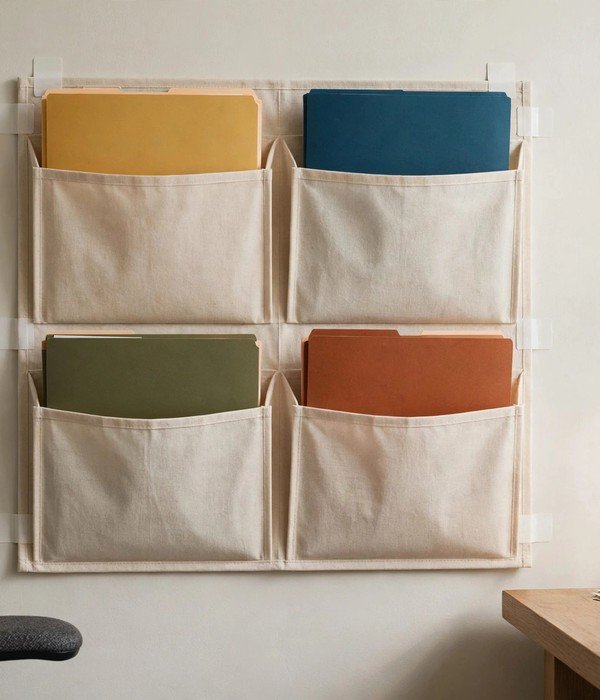
A wall-mounted file sorter hangs active project files vertically on the wall (typical size: 12 wide × 10 deep × 12 tall inches, holding 4–6 compartments), the footprint is literally zero desk inches. Adhesive-mounted versions hold 5–10 lbs on clean, dry walls; screw-mounted versions handle more but need landlord approval.
- What you can do with it: sort by project, person, or deadline, one slot each, visible at a glance
- Where it works best: the wall immediately beside your desk within arm’s reach, or inside a closet door (idea 22)
- Weight math: paper is heavy, a full sorter with 200 sheets per slot weighs 5–8 lbs, so check the adhesive rating and give it 24 hours to cure before loading
- Renter flag: adhesive and over-the-door versions remove cleanly; command-style strips hold best on smooth paint
- Price band: $18–$35 adhesive; $25–$45 screw-mount with metal construction
This is the renter’s filing cabinet. It holds less than a cart but costs zero floor and zero desk space, perfect for active projects, not archives.
9. Magazine Files for Active Projects: One Spine Per Project

A set of magazine files (each about 4 wide × 10 deep × 12 tall inches) stands one per active project on a shelf or bookcase, corralling the folders, printouts, notebooks and samples that belong together. Three to six files fit on a standard 24-inch shelf, and the spine faces out so you can grab a project without opening anything.
- What you can do with it: keep project materials upright and grouped, folders, notebooks, printed reference, samples
- Where it works best: a shelf over the desk (idea 16), a bookcase beside it, or the top of the rolling drawer unit (idea 1)
- Label everything: spine labels face outward; the file you can’t name is the pile you’re rebuilding
- Rotation rule: when a project ends, its file gets archived to the backstock bin (idea 20) and the slot stays empty, a permanently full set is a hoarding signal
- Price band: $3–$8 each in kraft; $8–$15 in linen or metal
Kraft is cheapest and takes labels beautifully. Buy a 6-pack even if you only need four, the extras will find a purpose within a month.
10. Slim Filing Cabinet in the Desk–Wall Gap: The Forgotten Six Inches
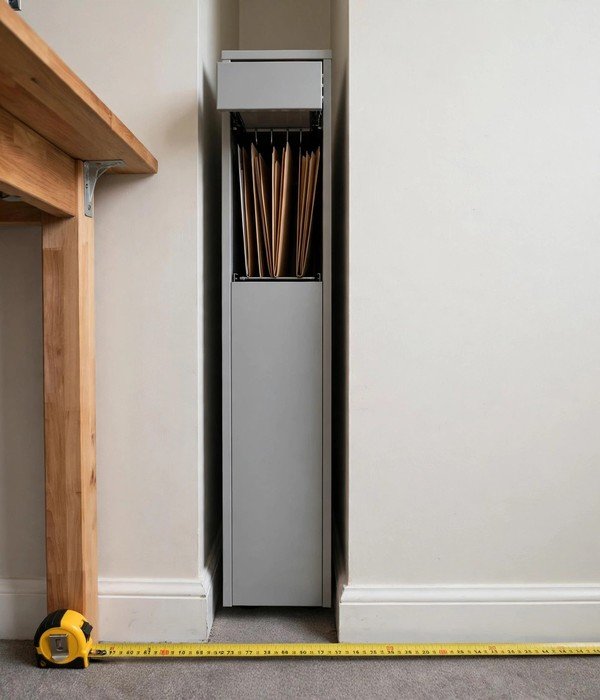
There’s almost always a 5-to-8-inch gap between your desk and the wall. A slim filing cabinet (designed at 6 wide × 18 deep × 24 tall inches) slides exactly into that gap and holds a full drawer of letter files plus a tray top.
It converts dead air into a lockable, label-visible archive without surrendering a single usable inch of the room.
- What you can do with it: house tax records, contracts, medical files, the “keep for years” paperwork, up to 40–60 hanging folders
- Where it works best: that gap, measure it before buying, because 6-inch units are built for standard desk placement and your gap may be 7 or 8
- Lock it: a $5–$10 difference buys a lockable unit; office paperwork deserves one
- Top surface: the 6×18-inch top holds a small plant or the inbox tray (idea 7), layered storage
- Price band: $45–$85 metal; check the glide quality in reviews, a sticky drawer in a 6-inch gap is misery
Measure the gap at three points (desk, middle, wall), walls bow, and a cabinet that’s a quarter inch too wide is a wall decoration.
Cables & Tech
11. Under-Desk Cable Tray: Get the Power Strip Off the Floor
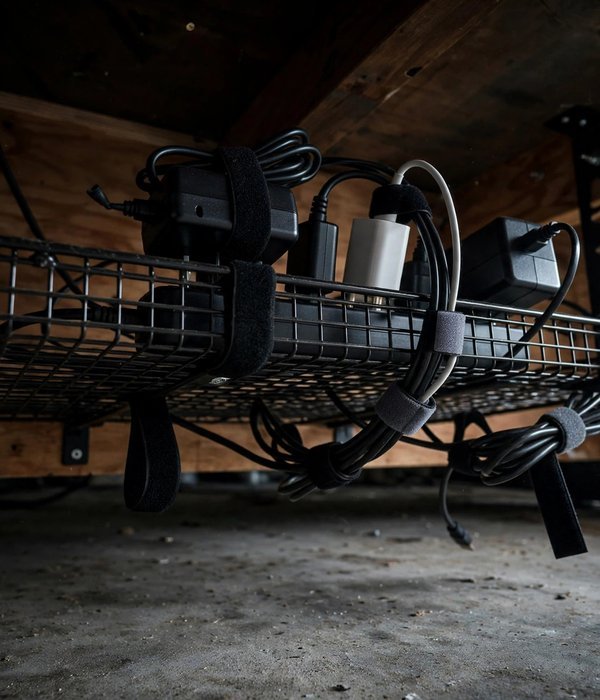
A metal cable tray (typically 15 to 20 inches long, 4 to 6 inches wide, 3 to 5 inches deep) screws or clamps under the back of your desk and holds the power strip, adapters and slack cable off the floor.
The mechanism is simple elevation: cables you can’t see, kick or vacuum up are cables you stop tripping over, and the dust-bunny habitat underneath disappears.
Tips for best results: choose a tray with open mesh so adapters cool properly, enclosed trays trap heat, and a hot brick on a long workday is a fire-adjacent risk.
Mount the tray within reach of the wall outlet with the power strip already plugged in, then bundle the remaining slack with reusable velcro ties (a 50-pack costs under $10). Leave service loops, 6 inches of slack per cable, so you can pull the desk out without unplugging everything.
Watch out: check your desk’s underside thickness before buying screw-mount trays, ¾-inch minimum, or the screws punch through the top. Renters: clamp-on versions exist and hold just as well for standard loads. Budget $18–$35.
12. Power Strip Mounted to the Desk Underside: Outlets Where Your Hands Are
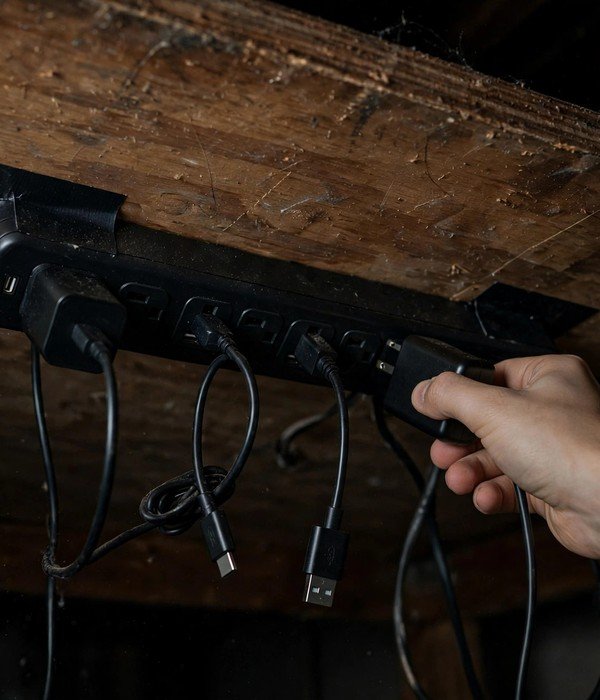
Mounting the power strip itself under the back edge of the desk (a 6-to-8-outlet strip is usually 10–12 inches long and 2–3 inches wide) puts every plug within arm’s reach and off the floor. The win is ergonomic: you stop crawling under the desk to plug in a laptop brick, and the strip’s switches stay accessible for the end-of-day shutdown.
Tips for best results: adhesive-mount strips hold 3–5 lbs on a clean, dry underside, wipe with rubbing alcohol first and give it an hour to cure before hanging anything. Face the outlets downward or outward so plugs don’t fight gravity. If the strip has a flat master switch, mount it where your hand naturally lands when you stand up.
Watch out: never daisy-chain power strips, and don’t plug a space heater or high-draw appliance into a strip shared with your workstation, check the strip’s joule rating (1,000+ for real surge protection) and its max wattage against your setup’s draw. Budget $20–$40 for a quality strip with USB ports.
13. Labelled Cable Tags: Know Which Cable in the Dark
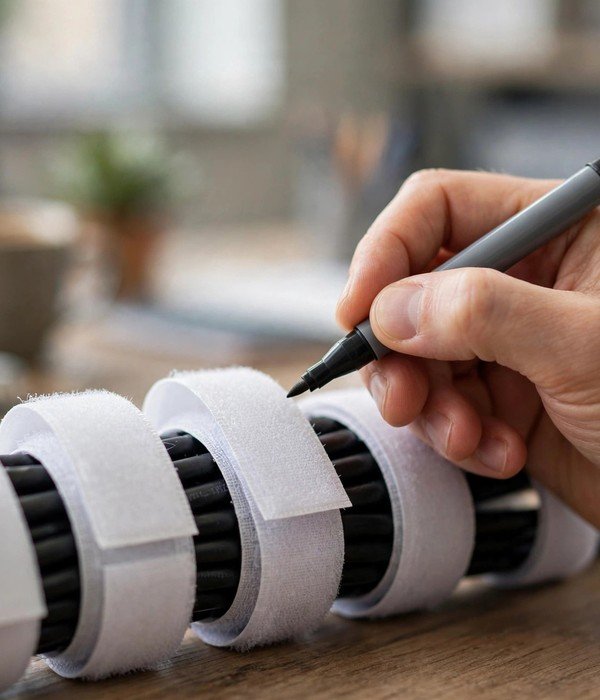
A pack of cable tags (the write-on velcro or clip-on kind, a 30-to-50-pack for under $12) labels both ends of every cable: “monitor power,” “dock,” “lamp,” “phone charger.” Five minutes of labeling on setup day saves the archaeology of unplugging the wrong thing during a video call, and it makes the cable tray (idea 11) actually maintainable instead of a managed mystery.
Tips for best results: label both ends, because the end you can see is never the end you need. Use a fine-tip marker that won’t smear, and write before you attach, tags are easier to label flat on the desk. Color-code by device if you’re feeling ambitious: red tags for power, blue for data.
Watch out: skip cheap paper tags, they tear and the adhesive gives up in warm environments (and cable trays get warm). Velcro wrap tags last years and can be re-labeled. For cables you move often, tags with a write-on loop let you rename without replacing.
14. Charging Station Drawer: One Drawer for Every Device
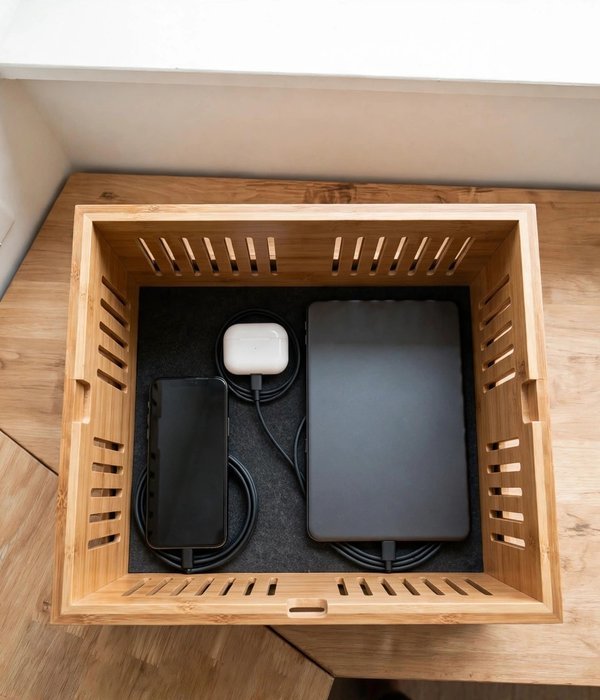
Dedicate one drawer, or a $25–$40 bamboo charging box (roughly 12 × 9 × 5 inches), as the single place phones, tablets, earbuds and readers charge. Drill or thread a single cable path to the power strip (idea 12), and every device lives in one dust-free, cable-contained zone instead of sprawled across the desk.
Tips for best results: put the charging drawer or box on the side of the desk you reach without looking up from the monitor, glance-and-grab placement. Use short cables (1 foot) inside the box so excess length doesn’t become the very clutter you’re solving. A box with ventilation slots prevents heat buildup with 3–4 devices charging at once.
Watch out: never charge damaged or swollen batteries inside an enclosed box, and keep the box away from paper piles, lithium batteries and paper are a bad roommate pair. For renters, the standalone box version needs zero desk modification; drawer versions can use adhesive cable guides instead of drilled grommets.
15. Cable Spine for Standing Desks: Tame the Moving Wires
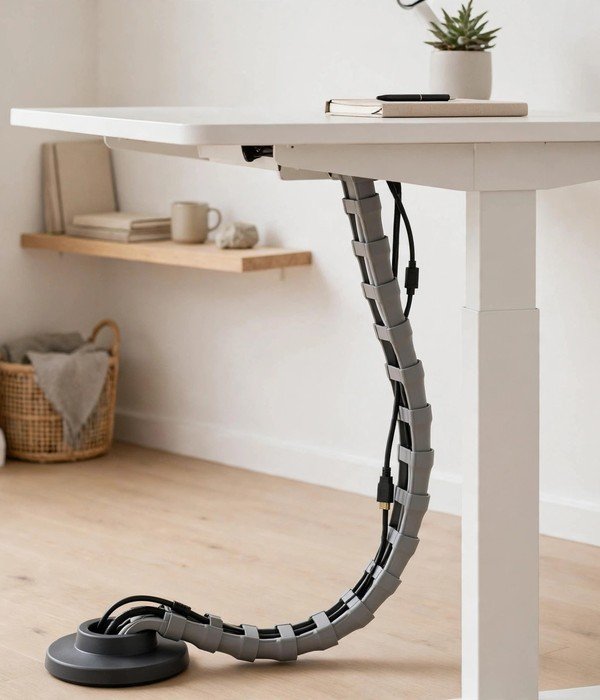
If your desk moves up and down, static cable trays aren’t enough, the cable spine (a segmented vertebra-style channel, typically 25–30 inches long) flexes with the desk and carries power and data cables from the floor to the desk underside in one organized column.
It solves the one problem standing-desk owners actually complain about: the floor tangle that grows behind a height-adjustable desk.
Tips for best results: mount the spine’s floor end in a weighted base or adhesive pad positioned directly behind the desk legs, and let the top end clamp or zip-tie to the tray (idea 11). Leave 4–6 inches of slack at the top so the desk can reach full height without tugging.
Route the monitor and dock cables through the spine; keep the power cable separate where possible.
Watch out: cheap spines with fewer than 4 segments kink instead of flexing, check the segment count. For a fixed-height desk, a simple adhesive cable raceway ($8–$15 for a 6-foot channel) does the same job without the spine’s $25–$40 price. Budget accordingly to your desk type, not the fanciest option.
Shelves & Walls
16. Floating Shelves Over the Desk: The Prime Real Estate
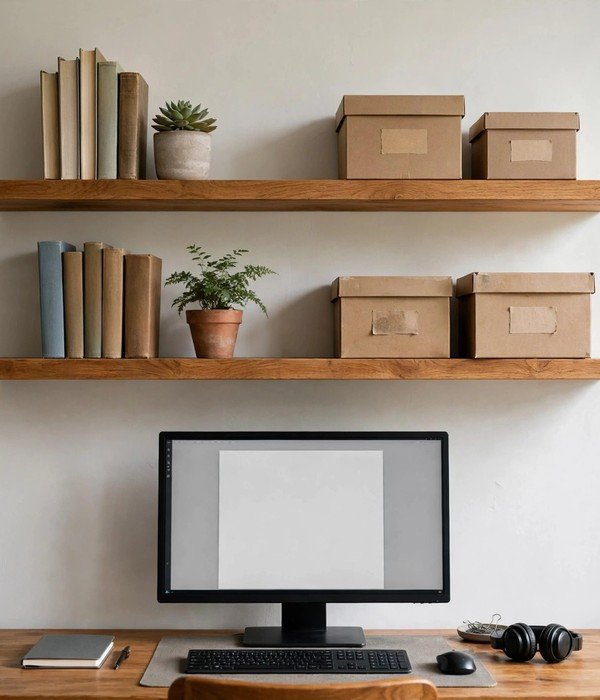
The wall above your desk is the highest-value storage real estate in the room, eye-level, arm’s-reach, and currently empty. Two floating shelves (8 to 12 inches deep, 24 to 36 inches wide), mounted 16 to 18 inches above the desktop, hold reference books, the project files from idea 9, and decor without touching the worktop.
The 16-to-18-inch clearance is the key measurement: enough for a monitor at eye level, low enough to reach without standing.
- What you can do with it: reference library, active project boxes, small plants, framed art, visible at a glance
- Where it works best: centered over the desk; offset works if a window claims the center
- Weight math: a 24-inch shelf loaded with books hits 20–30 lbs fast, use studs or toggle bolts rated 2× your load; adhesive shelves max out around 5 lbs
- Renter flag: screws are the honest option here, heavy shelves on adhesive is the failing renter move; use a tension or freestanding bookcase (idea 19) instead if drilling is banned
- Price band: $15–$30 per shelf for solid wood-look; bracket sets add $10–$20
Leave 2 inches of air at each shelf end, wall-to-wall shelves block lifting long items out.
17. Pegboard Panel: Rearrange Without a Drill (Again)
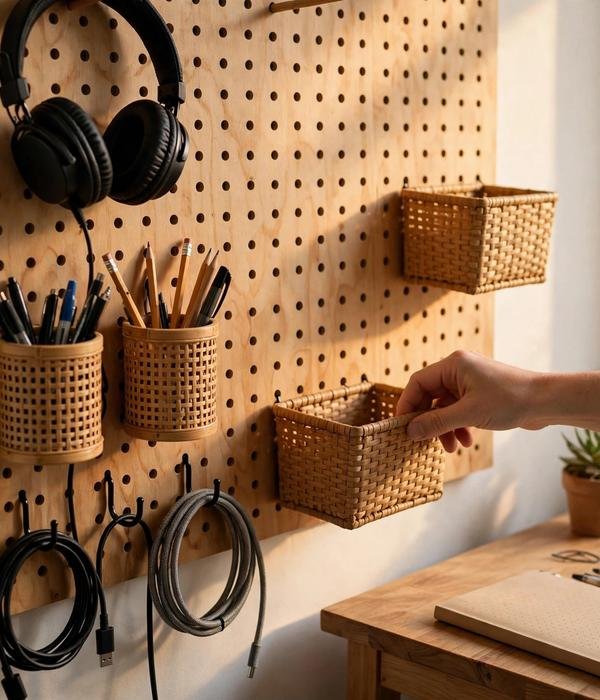
A pegboard panel (standard 24 × 24 or 24 × 36 inches, with 1-inch hole spacing) mounted above or beside the desk holds hooks, baskets, shelves and cup holders that rearrange in seconds, the only storage system you can reconfigure without touching a tool.
It turns a 2-square-foot wall into a customizable command center for headphones, scissors, cables and supplies.
- What you can do with it: hang headphones on a wide hook, pens in a cup, cables on small hooks, small baskets for sticky notes and stamps
- Where it works best: the 24 inches of wall directly beside your dominant hand’s side of the desk
- Hook math: pegboard hooks come in 1, 2 and 4-inch lengths, match hook length to item depth, and buy the locking kind so hooks don’t lift out when you grab something
- Renter flag: standoff-mounted panels need screws, but over-the-desk leaning panels and adhesive-backed boards exist, check the weight rating (usually 10–15 lbs for adhesive)
- Price band: $20–$35 for the board; a $15–$25 accessory kit makes it immediately useful
Paint it the wall color for a built-in look or leave it raw, rearrange monthly as your workflow changes instead of living with the first layout.
18. Wall Grid With Baskets: The Lighter Pegboard
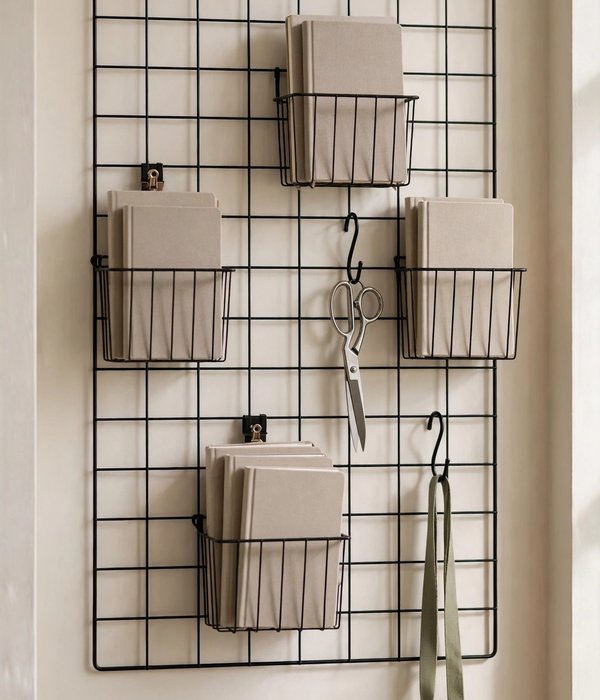
A wire wall grid (typically 24 × 16 inches) with S-hooks and clip baskets does the pegboard’s job with less visual weight, better for small rooms where a full board feels heavy. Clip-on baskets (4–6 inches deep) hold notebooks and tablets; S-hooks carry scissors, headphones and lanyards. It reads as decor first, storage second.
- What you can do with it: display-style storage for the things you use daily, the prettier layer of your desk system
- Where it works best: a narrow wall strip beside the desk, or the inside of a closet door for a hidden version
- Load limits: most grids hold 10–15 lbs total when adhesive-mounted, distribute weight low and center
- Renter flag: adhesive grids remove cleanly from smooth paint; textured walls need the screw-mounted version
- Price band: $18–$30 for grid + a 5-piece hook/basket set
Combine it with the file sorter from idea 8, the grid handles tools and supplies, the sorter handles paper, and the wall beside your desk becomes a full workstation panel.
19. Narrow Bookcase Beside the Desk: The 8-Inch Wonder
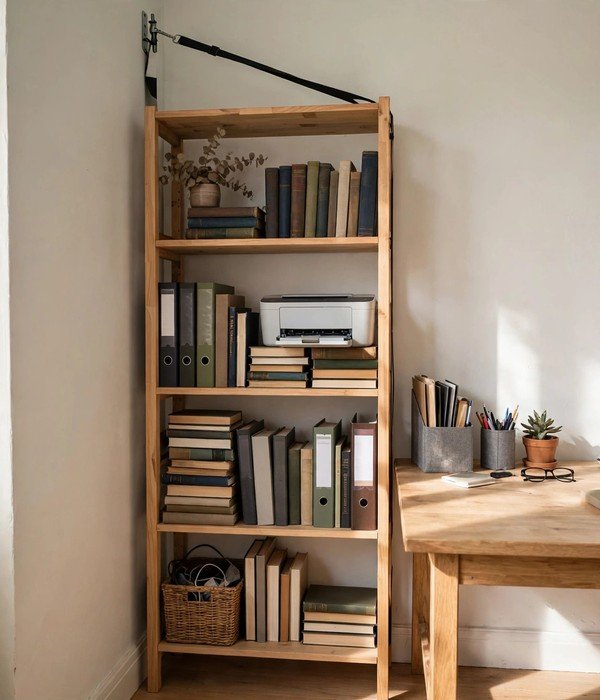
A narrow bookcase (8 to 12 inches deep, 24 to 36 inches wide, 60+ inches tall) fits in the 12-inch gap beside most desks and holds books, binders, project files and a printer in a vertical footprint of under 2 square feet.
Depth is the whole game: 8-inch shelves hold books and files without swallowing the room, and you can reach every shelf without a step stool.
- What you can do with it: full reference library, binder archive, project files (idea 9) in volume, printer or scanner on a mid shelf
- Where it works best: the desk-to-wall gap, flanking either side of the desk, or the corner where two walls meet
- Stability: anything over 48 inches tall needs an anti-tip strap ($5–$10), bookshelves tip, and a loaded 60-inch case is a real hazard
- Renter flag: freestanding, zero wall damage; tension rods between bookcase top and ceiling exist but straps are safer
- Price band: $40–$90 for laminate; solid wood starts around $120
Anchor it. Every year, unanchored bookcases cause preventable injuries, the strap costs less than the books on one shelf.
20. High Shelf for Backstock: The Archive Layer
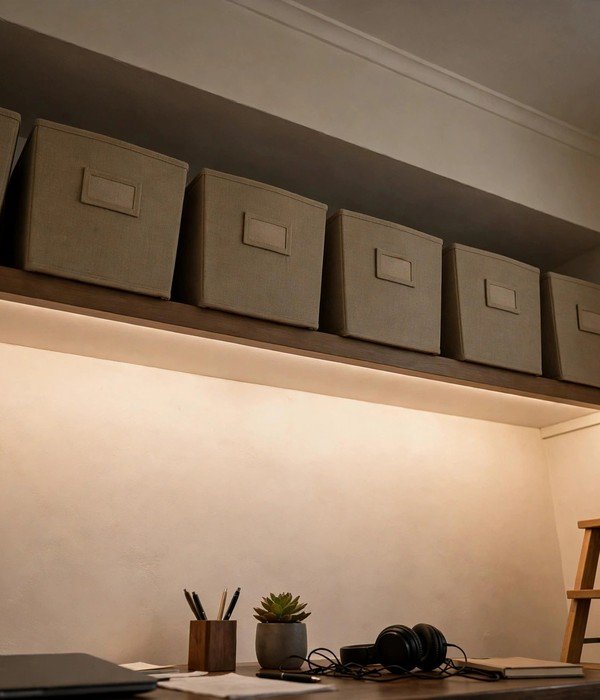
One shelf mounted 6 to 8 feet up, above the prime 16-to-18-inch zone from idea 16, holds the backstock: archived files, extra supplies, the printer paper, seasonal reference. It’s the archive layer of your system: visible, dust-free in bins, and retrievable with a step stool twice a year. Out of sight, out of the way, but never lost.
- What you can do with it: 6–10 labeled bins (6-quart, roughly 12 × 8 × 5 inches) of archived projects, spare cables, backup supplies
- Where it works best: the full wall above the desk zone, or the top of a closet (idea 22) in a cloffice setup
- Bin math: uniform bins look intentional and stack cleanly, buy one size, buy ten, label every one
- Weight and access: keep total load under the bracket rating (studs for anything over 30 lbs) and accept the step stool, backstock you reach weekly isn’t backstock
- Price band: $20–$40 for shelf + brackets; bins $4–$8 each
The discipline: if you touch a backstock bin monthly, it doesn’t belong up here, it belongs in the drawer unit (idea 1) or file cart (idea 6).
Closet & Room Edges
21. Printer Stand With Storage: A Home for the Awkward Box
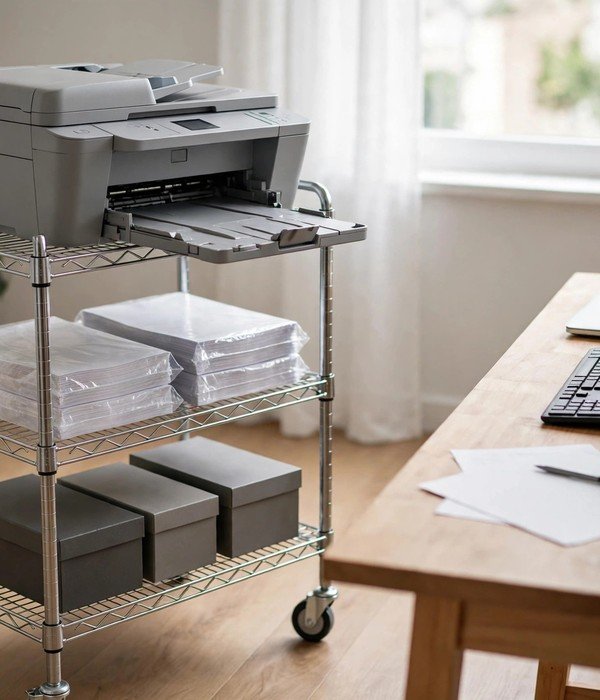
A printer (typical footprint 15 × 12 inches, plus 6 inches of paper-exit clearance in front) is the most awkward object in a home office, too big for the desk, too used to bury.
A rolling printer stand (18 × 16 inches, 24–30 inches tall) with two storage shelves below holds the printer on top, paper and ink on the shelves, and rolls wherever the printer is actually needed.
- Measure your printer’s full footprint with the paper tray open, add 3 inches on each side for ventilation.
- Choose a stand whose top shelf clears your printer’s height plus 2 inches for loading paper.
- Store paper in the middle shelf (flat, away from humidity) and ink/toner in the bottom shelf, upright.
- Roll the stand to the desk for big print jobs, then park it in its spot, mobility is the feature, so use it.
Price bands: $35–$60 for metal rolling stands, $60–$100 for wood versions that double as side tables. The top surface earns its keep between print jobs, treat it as a landing zone, not a dead zone.
22. Closet Rod as Supply Rail: Office Storage Inside the Closet
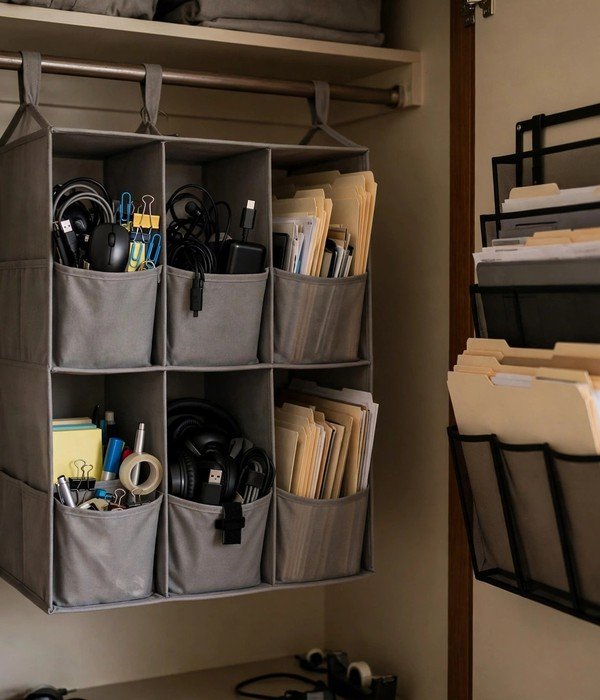
If your office has a closet, even a shallow 24-inch-deep reach-in, its rod is wasted hanging space. Install a second tension rod 12 inches below the top rod (or use the existing rod alone) and hang fabric cube organizers ($20–$35 for a 6-cube hanger, each cube 10 × 10 × 10 inches) for paper, supplies and tech accessories.
The closet door closes and the office disappears, the mechanism is invisibility.
- Measure the closet depth, 24 inches fits standard cube organizers; shallower closets need 12-inch-deep bins instead.
- Hang one 6-cube organizer for office supplies and a second for paper/files if the width allows.
- Put the file sorter from idea 8 on the inside of the closet door for active projects.
- Keep the top shelf for backstock bins (idea 20), the closet version of the archive layer.
This is the cloffice-lite approach (see how to turn a closet into a full home office), office storage that vanishes behind a door. Renters: tension rods need no screws, and the whole system removes in minutes.
23. Storage Ottoman With a Flat Top: Seat, Table and Filing Cabinet
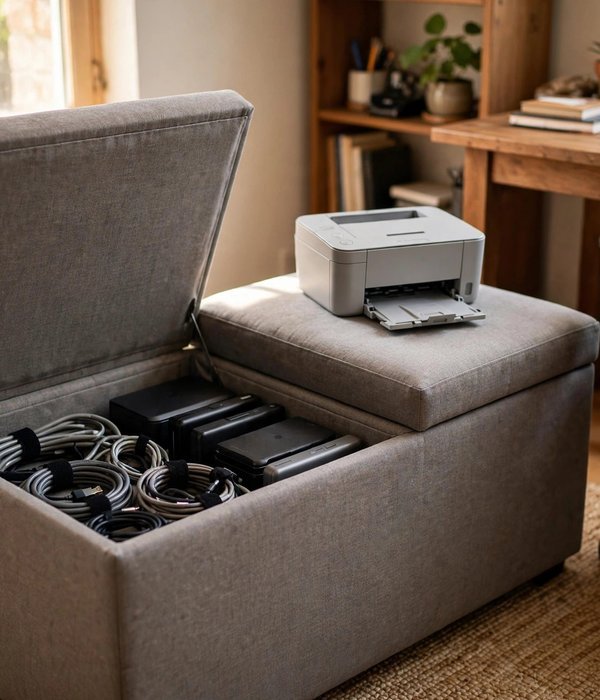
A storage ottoman (typically 30 × 15 × 15 inches, 2–3 cubic feet inside) works three jobs in a home office: extra seating for a colleague, a flat top that holds the printer (idea 21) or a stack of files, and hidden storage for the bulky, ugly essentials, spare cables, the label maker, backup drives.
Flat-top versions (not tufted) are the desk-adjacent pick because things sit on them without tipping.
- Choose a flat, firm top, test in store with a stack of books; if it wobbles, it’s seating, not storage furniture.
- Size it to your printer if that’s the plan: the ottoman top must exceed the printer footprint by 2 inches each side.
- Put the heaviest items at the bottom of the storage compartment, stability first.
- Keep a small tray on top to corral the printer’s output pages so they don’t slide.
Price bands: $40–$80 for fabric ottomans with storage; $80–$130 for leather-look or wood-top versions. The three-job test is the filter: if it can’t seat, surface and store, it’s just a box.
24. Rolling Caddy in the Dead Corner: The 6-Inch Solution
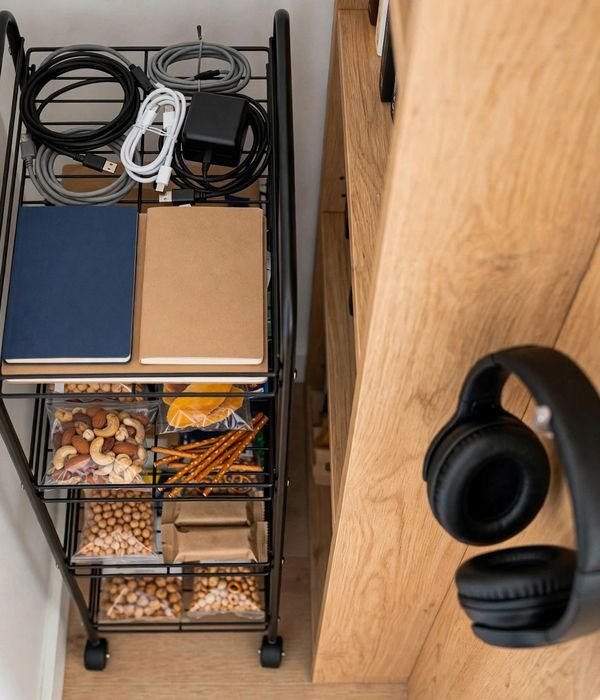
Every office has a dead corner, beside the bookcase, behind the door swing, the 6-inch strip nobody planned. A slim rolling caddy (5 to 7 inches wide, 15 inches deep, 25–35 inches tall, with 3–4 tiers) slides into that strip and holds chargers, notebooks, snacks and the reference books you reach for hourly.
It’s the same logic as the kitchen gap cart, applied to the room’s most ignored inches.
- Measure the gap at floor level and at 30 inches up, baseboards and chair rails narrow the usable width.
- Choose a caddy 1 inch narrower than the tightest measurement so it rolls freely.
- Load the top tier with daily-use items (the ones from the desk that didn’t earn worktop space) and lower tiers with backstock.
- Add adhesive hooks on the caddy’s side for headphones, vertical real estate on a vertical object.
$20–$40. Renters: fully freestanding, and it rolls out for vacuuming, the corner stops being a dust trap and starts being storage.
25. Freestanding Shelf Tower at the Room’s Edge: The Final 2 Square Feet
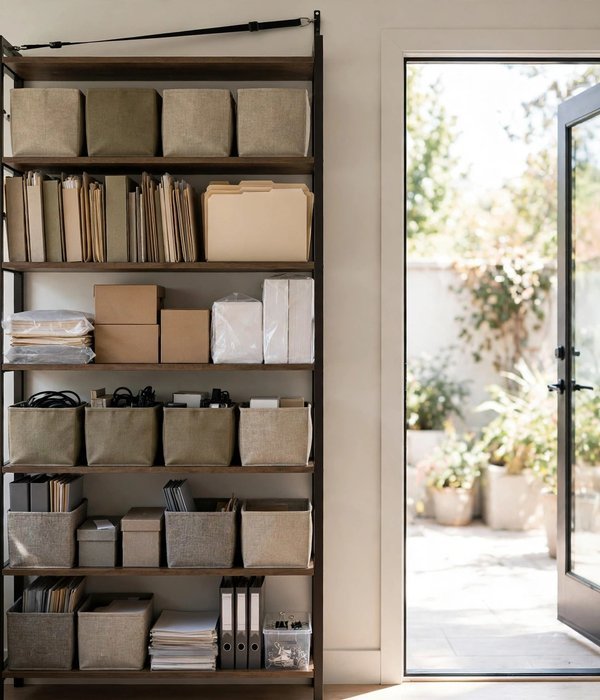
A narrow shelf tower (12 to 16 inches wide, 12 inches deep, 60–72 inches tall) parked at the room’s edge, beside the door, at the end of a wall, absorbs everything the desk zone couldn’t: the backstock bins, the project files, the printer supplies, the reference overflow.
Five to six shelves in 2 square feet of floor space is roughly 10 cubic feet of storage, which is more than most home offices need in total.
- Place it where it doesn’t block the door swing or the desk chair’s roll path, map both arcs on the floor first.
- Put heavy items (paper, books) on the bottom two shelves and light items (bins, decor) up top, top-heavy towers tip.
- Add the anti-tip strap from idea 19’s playbook, 60+ inches tall means it gets one, no exceptions.
- Label the shelf edges with a label maker so the tower stays a system instead of becoming a shelf-shaped pile.
$35–$70 for laminate towers; $70–$120 for solid wood. This is the pressure valve: when the desk-zone systems overflow, the overflow has a designed home instead of colonizing the desk.
Conclusion
If I had to pick one move that clears a desk fastest, it’s this: the under-desk rolling drawer unit paired with the one-inbox rule. That’s my Best desk-clearing win, the drawer unit (idea 1) gives your supplies a home 24 inches from your hands, and the inbox rule (idea 7) stops new paper from ever colonizing the worktop.
Together they cost under $70, need zero screws, and take an afternoon to set up. Everything else in this guide is optimization, those two are the foundation.
See also the Office spokes as they publish: 15 desk organization ideas that keep your workspace clear, 14 small home office storage ideas for tiny corners, 11 paper organization ideas for bills, mail and files, 10 home office wall storage ideas, 10 cloffice ideas for turning a closet into a home office, and 10 IKEA home office storage hacks, plus the existing 7 creative storage-friendly home office decor ideas already live on the site.
Frequently Asked Questions (FAQ)
How do I organize a home office with no closet?
If you have no closet, build the closet’s functions into the room’s edges: the rolling file cart (idea 6) replaces closet files, the shelf tower (idea 25) replaces closet shelves, and the wall grid (idea 18) replaces the inside-of-the-door zone.
You lose the “close the door and hide it” trick, so lean harder on closed storage, bins and cabinets, to keep the room visually calm.
What is the best home office storage for a very small desk?
If your desk is under 40 inches wide, go vertical and external: a clamp-on tray (idea 5) adds worktop without footprint, wall shelves (idea 16) take the reference layer off the desk, and the under-desk drawer unit (idea 1) holds supplies in the knee space.
Keep only the keyboard, monitor and current task on the top, everything else parks within arm’s reach but off the surface.
How do I keep office cables organized without drilling?
If drilling is banned, use the full damage-free stack: an adhesive cable tray or a tray that rests on the desk’s back edge (idea 11), adhesive-mount power strips (idea 12), and velcro cable ties instead of zip ties.
Wipe surfaces with rubbing alcohol before sticking, give adhesives 24 hours to cure before loading, and keep total loads under the stated rating, usually 3–5 lbs per mount.
Where should a printer go in a small home office?
If the printer won’t fit the desk, the rolling stand (idea 21) is the answer: it holds the printer plus paper and ink in about 3 square feet, and it rolls to the desk for big jobs. A storage ottoman (idea 23) with a flat top works for smaller printers.
Measure the printer with its tray open first, add 3 inches per side, and keep 6 inches of paper-exit clearance in front.
How do I store paper files so I can actually find things?
If your files are findable, the system is working, and findability comes from three habits: one inbox processed weekly (idea 7), one folder per active project in the rolling cart (idea 6), and labels on everything. Archive finished projects to the high backstock shelf (idea 20) so active files stay lean.
If a folder hasn’t been opened in 6 months, it moves up, or out.
What home office storage works best for renters?
If you’re renting, the damage-free winners are the rolling drawer unit (idea 1), the monitor riser (idea 2), the file cart (idea 6), the pegboard on a leaning or adhesive mount (idea 17), and the closet tension-rod system (idea 22). Avoid screw-mounted floating shelves for anything heavy, use freestanding bookcases (idea 19) instead.
Felt pads under clamp mounts prevent pressure marks on soft wood.
How do I stop my desk from getting cluttered again after organizing it?
If the clutter returns, the system leaked, and the leak is almost always paper or cables. Re-commit to the weekly inbox processing (idea 7): one session, every sheet touched once. Then do a monthly 10-minute cable check (re-tie, re-label) and a quarterly bin audit.
Systems that survive are systems with a maintenance rhythm, not systems that were perfect on day one.