
I used to think trash cans were harmless little companions. Then came a stormy night. I woke up to the sound of garbage flying across my driveway—plastic bags, wrappers, and even the lid from my 33-gallon bin bouncing around like it was auditioning for a circus. That’s when I realized: if your outdoor trash cans aren’t secured, even a moderate gust can turn your neat yard into a trash tornado.
After a few frustrating mornings collecting debris, I decided to get serious about securing my bins. Over time, I learned which methods work, which don’t, and how to make sure your trash cans survive the wind without tipping, spilling, or making your neighbors laugh at your flying garbage.
In This Guide, I’ll Cover
ToggleWhy Wind Can Be a Big Problem
I never realized just how much wind affects outdoor trash cans until one evening. A gust lifted my 32-gallon bin like a feather, flipped it upside down, and sent trash across the driveway. The mess wasn’t just annoying—it attracted pests, and cleaning it took almost an hour.
Here’s why wind is more trouble than most people think:
- Lightweight bins tip easily: Plastic bins, especially small or medium ones, can feel sturdy when empty, but once filled with loosely packed bags, they become top-heavy and unsteady. Even a 15–20 mph gust can knock them over.
- Lids act like sails: A lid that isn’t tightly secured catches wind like a sail. I’ve seen lids fly off entirely, sending the contents scattering. Some bins even “walk” a few feet before tipping.
- Nearby structures can intensify gusts: Walls, fences, and corners can create funnels that amplify wind speed. I learned the hard way that placing a bin at the end of a driveway or in an open corner is a recipe for disaster.
- Bag weight distribution matters: Unevenly packed bags shift when wind hits, sometimes causing the bin to tip unexpectedly.
By understanding these dynamics, I realized that securing a bin isn’t just about weight—it’s about placement, balance, and lid security as well.
How to Physically Secure Your Bins
Over the years, I’ve tested multiple ways to keep my outdoor trash cans grounded, and a few methods consistently work well. Here’s my detailed approach:
1. Use Weights Inside the Bin
A simple but highly effective method is adding weight at the bottom of your bin. I’ve tried everything from bricks to sandbags. Here’s what works best:
- Bricks or pavers: Wrap them in plastic to avoid scratches. Place 2–4 depending on the bin size.
- Sandbags: Lightweight, flexible, and easy to adjust for different bins. I keep one inside each bin during stormy seasons.
- Heavy recyclables: Cans or bottles in a sealed box can add stability without permanent weight.
Why it works: Adding weight lowers the center of gravity, making bins more resistant to tipping. I’ve had bins survive 25+ mph gusts thanks to this simple trick.
2. Strap Bins to a Fixed Object
Straps, bungee cords, or tie-downs are underrated tools for securing bins. Anchor your bin to a fence post, deck railing, or even a sturdy tree.
- Adjustable straps: These let you secure the bin tightly and remove it easily when it’s trash day.
- Bungee cords: Stretchy, forgiving, and great for bins that may expand slightly when full.
- Permanent tie-down points: If you’re in a consistently windy area, consider installing small hooks or eye bolts near the bin location.
Personal note: I loop a bungee cord around my Suncast bin and fence post. It takes seconds to secure and prevents the bin from “walking” during strong gusts.
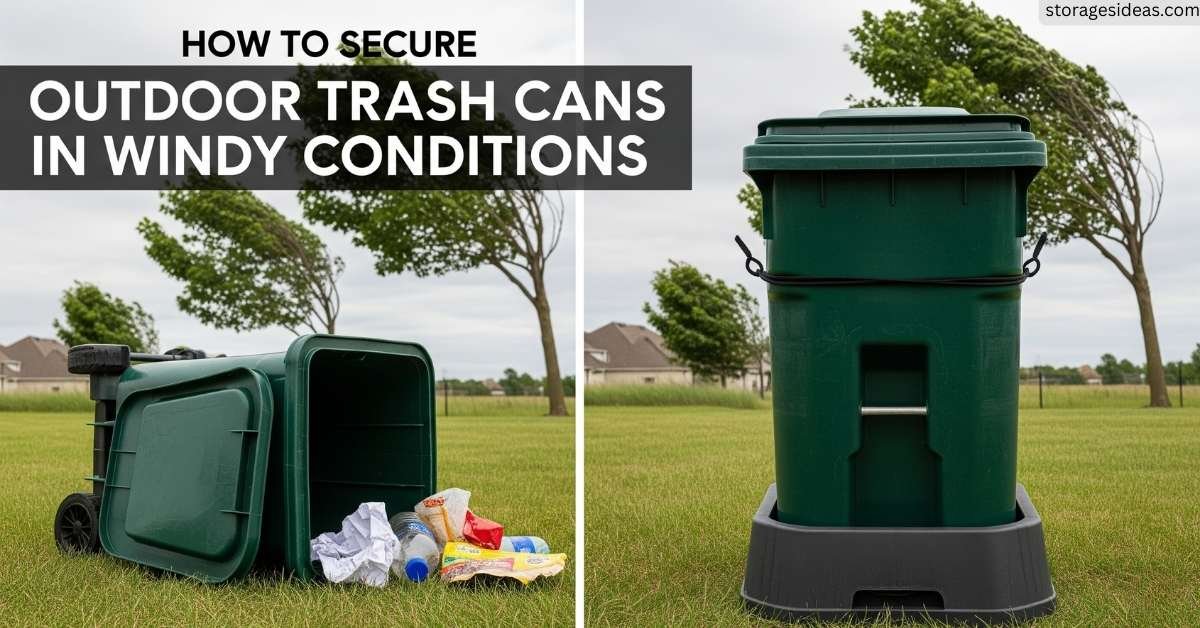
3. Use Heavy-Duty Lid Clips or Locks
Lids are often the weak point when it comes to wind. A bin may be heavy, but an unsecured lid can act like a sail, tipping the whole thing over. For bins with dependable lids and mobility, explore Best Outdoor Trash Can with Lid and Wheels
- Lid clips: Keep the lid firmly in place, reducing spillage.
- Locking lids: Extra security if you live in a windy, wildlife-prone area.
- DIY solutions: Heavy-duty binder clips or small clamps work in a pinch for bins without built-in clips.
Tip: I use a clip on my EAST OAK bin. Even when the wind is strong enough to rattle other bins, this one stays closed and tidy.
4. Add a Base or Platform
Some bins are designed with a flat base, but for bins without one, a platform or paver makes a big difference.
- Concrete pavers: Provide a stable, flat surface. I use one under my Keter bin.
- Rubber mats: Reduce sliding and prevent scratches on patios.
- DIY wooden platforms: Can be custom-sized for oddly shaped bins. Make sure the platform is level to prevent tipping.
Why it helps: A level and weighted base stabilizes the bin, preventing small gusts from toppling it.
5. Combine Multiple Methods
For ultimate security, I often combine several techniques:
- Weighted bottom (bricks or sandbags)
- Secured strap or bungee cord
- Lid clip or lock
- Flat, stable base
This combination makes my bins nearly invincible during storms. Even when gusts reach 30+ mph, my bins remain firmly in place.
6. Consider Specialized Securing Accessories
Over time, I discovered products designed specifically for windy areas:
- Anchor kits: Small metal stakes that secure bins to the ground. Perfect for gravel or grass yards.
- Bin cages: Metal frames that encase the bin, preventing tipping or rolling. Great for areas with extreme winds or wildlife.
- Weighted lids: Lids with built-in weights or the option to insert a sandbag add extra security.
Pro tip: I use a combination of anchor stakes for my smaller bins in an open side yard. It’s quick to install and removes the worry of a flying bin.
7. Mind Seasonal Changes
Snow, ice, and wet leaves can affect stability. I keep sandbags handy in winter, and in autumn, I make sure leaves aren’t piling against bins—they can catch the wind and act like a sail.
Placement Strategies for Windy Areas
Where you place your bin matters just as much as how you secure it:
- Avoid open corners: Wind funnels increase gust speed. Placing bins in open areas makes them more vulnerable.
- Use natural windbreaks: Shrubs, hedges, walls, or fences reduce direct wind exposure. My bins tucked behind a 3-foot fence hardly move during storms.
- Don’t crowd bins: Allow enough space for lids to open freely. Piling bins too close together can actually make them unstable.
- Consider elevation: Slightly raised, flat surfaces prevent puddles from forming and make bins easier to clean after rain.
Extra Tips for Maximum Stability
Even with weights, straps, and secure placement, I’ve found a few additional tricks that make outdoor bins nearly unshakable:
- Weighted Trash Bags: Evenly packed bags keep the bin balanced. For heavier items like garden waste, I place them in smaller bags rather than one large one.
- Interlocking or Grouping Bins: Multiple bins connected with bungee cords act as mini windbreaks for each other.
- Choose Bin Shape Wisely: Shorter, wider bins are more stable than tall, narrow bins.
- Use Accessories: Lid clips, soft-close lids, and weighted bases improve stability.
- Temporary Barriers: Cardboard, plywood, or patio furniture can protect bins during storms.
- Maintain Consistent Weight: Balanced loads prevent tipping and make lids easier to close.
Common Mistakes to Avoid
Over the years, I’ve made several mistakes that caused my bins to tip—here’s what to watch out for:
- Ignoring lid security.
- Choosing a bin that’s too light.
- Placing bins in open, exposed areas.
- Overloading trash bags.
- Skipping straps, anchors, or bases.
- Ignoring seasonal factors.
- Neglecting surface leveling.
- Failing to check the bin condition.
Final Thoughts
Securing outdoor trash cans in windy conditions may seem minor—until a gust of wind turns your bin into a runaway projectile. I’ve learned that weight, anchoring, lid security, and smart placement make all the difference.
My go-to setup: sturdy resin bin, bricks at the bottom, bungee strap to a fence, and a lid clip. This combination has saved me from countless mornings chasing trash—and kept raccoons away.
Even small steps, like interlocking bins or using temporary barriers, can make a huge difference. By taking a few precautions, you can avoid messy cleanups, stray litter, and that embarrassing flying trash scene.
Nothing feels better than seeing a strong wind blow across the yard—and your bins stay perfectly put.
FAQs
Q: Can I secure bins without straps or weights?
Yes, but placement and lid security are essential. Straps or weights provide extra reliability.
Q: Are metal bins better than plastic for windy conditions?
Generally, yes. Metal bins are heavier and less likely to tip. Ensure lids are secured.
Q: How do I handle bins during extreme wind or storms?
Move them to a garage, shed, or behind a windbreak. Temporary panels help.
Q: Can indoor trash bags be used outdoors?
Yes, but heavy-duty outdoor bags are recommended.
Q: How can I prevent lids from slamming in the wind?
Use clips, weighted lids, or soft-close mechanisms.
Q: Are straps and anchors necessary for all bins?
Not always, but highly recommended for taller bins or windy areas.
Q: Does bin placement affect animal access, too?
Yes, sheltered bins are less likely to be disturbed by wildlife and stay more stable in the wind.
Q: How often should I inspect my bins for wind readiness?
I check seasonally—before winter, spring, and storm-prone months.
