
Toys have personalities. That’s my theory. Some toys sit politely in a basket. Others spread across the living room like they’re exploring Earth for the first time. And I used to mop up after them like a full-time cleanup crew.
That changed once I started building DIY toy storage for the living room setups that actually worked for my space. Real DIY ideas. Real results. Real freedom from stepping on a Lego piece and questioning all my life choices.
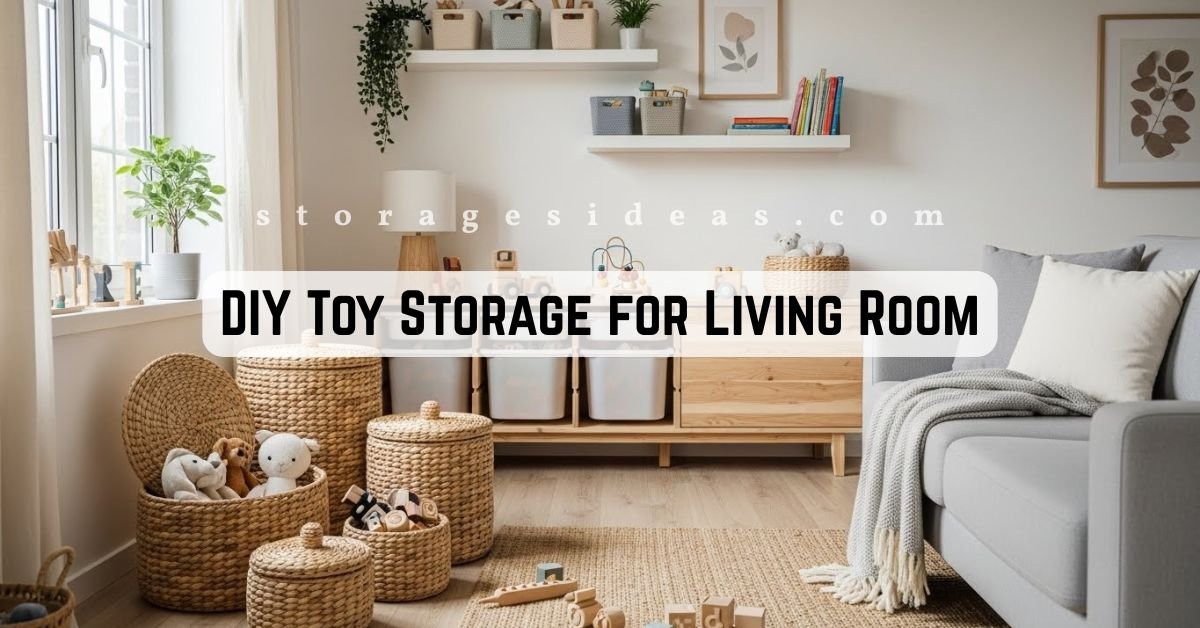
My living room used to look like a small toy city. I kept telling myself it was “creative chaos.” It wasn’t. As soon as I created storage systems that fit my routine, everything felt more manageable. The best part? These ideas are simple, flexible, and easy to build even if your toolbox is mostly just hope and a screwdriver.
1: Oversized Baskets With Lids (My Most Used Solution)

Large baskets are my first line of defense. They sit right where the action is, beside the couch, under the window, near the TV stand. I rotate their use depending on how chaotic the toy situation is that week.
How I make them work:
- I chose baskets with a neutral tone so they match my living room.
- Lids are essential because open baskets make toys too visible.
- I line the inside with fabric so small pieces don’t fall through the gaps.
- I keep one “rapid cleanup basket” specifically for moments when guests say, “I’m two minutes away!”
These baskets look harmless, but they’ve saved so many evenings. I can toss in toys quickly and pretend my life is organized.
When I need sturdier options, I sometimes shift larger items into a DIY living room storage cabinet, which gives me more structured space.
2: A DIY Storage Cabinet That Doubles as Decor

I built a simple plywood cabinet because I wanted something that blended in. Store-bought toy organizers often look like they belong in a daycare. My living room needed something more mature.
What I did:
- Measured the wall area behind my sofa.
- Bought plywood panels and cut them to size.
- Added two doors with soft hinges.
- Painted the entire cabinet to match my decor.
I store bulky toys here: building sets, dollhouses, puzzles, track sets, and board games. The cabinet closes everything off neatly.
If you’re building your first cabinet, you might find guides like DIY living room storage cabinet helpful for customizing size and depth.
3: Shelving With Decorative Bins (Easy and Flexible)

This system balances style with practicality. Shelves add structure. Bins hide the chaos. Together, they form the perfect disguise.
How I set it up:
- I use shelves at different heights so kids can reach their bins easily.
- Each bin has a job. One for blocks, one for cars, one for art tools.
- I choose bins that match my decor so they look intentional.
- I avoid transparent bins in the living room because I prefer a cleaner look.
The best part? I can replace bins anytime without rebuilding anything. And if I ever need more vertical inspiration, I check out wall storage living room ideas to make full use of my walls.
4: Under-Couch Storage for Stuff I Rarely Use

The space under my couch used to collect dust bunnies and lost crayons. Now it works extremely hard.
My under-sofa setup:
- I built flat wooden trays using scrap wood.
- I attached small wheels so the trays glide easily.
- I added handles for pulling them in and out.
- I keep categories that I don’t need daily: puzzles, craft sets, and seasonal toys.
This system creates invisible storage without taking up extra living room space. Just keep the tray height low enough so it doesn’t scrape the sofa base.
5: Ottoman Storage (Furniture That Actually Helps)

A good ottoman is a hero. I can store toys inside it and put my feet up at the same time. That’s efficiency.
How I upgraded mine:
- I lined the ottoman interior with thick fabric to protect toys.
- I added dividers using foam or cardboard so the toys don’t collapse into one mountain.
- I use mine for stuffed animals, board games, and larger toys.
If your living room doubles as a workout area (mine occasionally does), this storage style complements setups like workout equipment storage in the home, making everything feel intentional.
6: A Rolling Toy Cart That I Hide Behind the Sofa

This was a game-changer. It’s discreet, mobile, and easy to update.
How I built it:
- Two shelves made from leftover boards.
- Four wheels from a hardware store.
- Paint to match the wall color.
- Small bins on each shelf to keep things sorted.
I use this rolling cart for coloring books, crayons, cars, and anything portable. Kids love it because they can pull it out during the day, and I love that I can push it out of sight at night.
7: Wooden Crates Turned Into Flexible Toy Stations

Crates are like building blocks for adults. Stack them horizontally, vertically, or attach them to a wall.
How I use them:
- I screw them together when I want a sturdy unit.
- I leave some loose when I want flexible storage.
- I paint them to match my living room palette.
- I label each crate so cleanup becomes a quick habit.
Crates also pair well with shelving, and they can even work in tight spots if you’re exploring layouts like a living room with bike storage, where every inch matters.
8: Furniture With Hidden Compartments

Hidden compartments feel magical. Kids think it’s a secret hideout. I think it’s genius.
My hidden-storage furniture:
- A bench near the window with a lift-up lid
- A coffee table with a sliding top
- A side table with a disguised drawer
I store heavier toys here because the furniture can handle the weight. The bench holds dolls and tracks. The coffee table holds craft materials. Everything stays accessible but invisible.
9: Wall-Mounted Solutions for Limited Floor Space

If your floor is precious real estate, walls become your best friends.
What I mounted:
- Floating shelves for books and small toys
- Pegboards for art supplies
- Hanging buckets for tiny parts
- Shallow crates for lightweight toys
The trick here is to keep wall storage at kid height when the toys are kid-focused. Otherwise, you become the designated “toy retriever,” and nobody wants that job.
10: A Toy Rotation System That Actually Works

I used to keep all toys in the living room. That was a mistake. Visual clutter makes the room feel messy even when the toys are inside bins.
My rotation method:
- Keep 20–25% of toys in the living room
- Store the rest in another room.
- Swap toys weekly
- Put older toys in “quiet storage” for a few months.
Kids respond well to rotation. They get excited when old toys feel new again. I get to enjoy a calmer living room. It’s a rare scenario where everyone wins.
For simpler ways to keep toys under control, I also found these extra toy organization tips from Pehr helpful.
11: A Narrow Storage Console Behind the Sofa

I built this because I had unused space behind my sofa, and I hate wasted space.
What I store there:
- Baskets with toy sets
- Craft kits
- Small items that I don’t want on display
- Chargers and small electronics
This console also gives me a surface for decor, which distracts guests from knowing toys are hiding right below it.
12: Repurposed Nightstands or Side Tables With Drawers

I’m always surprised by how useful old furniture becomes with small adjustments.
How I repurpose:
- Drawers become toy compartments
- The top becomes display space.
- I sometimes add drawer organizers to sort toys.
I’ve kept puzzles in one drawer, dolls in another, and random figurines in the last. It’s incredibly tidy and looks intentional.
13: Labeling Systems Kids Actually Follow

Labels saved my evenings. They reduce arguments, confusion, and floor mess.
What makes my labels work:
- Simple categories
- Clear fonts
- Colorful symbols for younger kids
- A spot for everything
Kids surprisingly respect labels. I wish adults followed the rules that well.
14: Entryway-Friendly Toy Storage for Shared Spaces

If your living room connects to the entryway, this area can become a small battlefield. I turned it into a controlled zone.
My setup:
- A thin bench with hidden storage
- Hooks for backpacks and quick-grab items
- Slim baskets for tiny toys that travel in and out
This keeps toys from drifting into the living room like migrating birds.
15: Mixing Multiple DIY Solutions for a Smooth System

My living room finally works because it uses several ideas together.
My combination:
- Shelves with bins for everyday toys
- Baskets for fast cleanup
- A cabinet for organized storage
- Hidden compartments for bigger toys
- A rotation system for simplicity
It took trial and error, but now everything has a spot. My living room remains calm even on busy days.
How I Keep Things Under Control Every Week
I follow a simple routine:
- I do a quick evening cleanup.
- I return toys to labeled zones.
- I rotate toys to keep things fresh.
- I check for toys that can be donated.
- I keep one emergency basket ready for surprise guests.
This routine takes little time but makes a big difference.
Final Thoughts
Creating DIY toy storage for the living room changed how I use my space. Everything feels calmer now. I can sit down, drink my coffee, and not worry that a toy truck will roll under my foot.
You don’t need fancy tools. You don’t need a big budget. You just need systems that fit your room and your routine. Pick one idea. Try it. Then build up from there. Your living room will thank you.
