
I never thought I’d get this excited about trash cans. Seriously. But after one too many overfilled bins and awkward juggling of garbage bags, I realized that choosing the right trash can size is a surprisingly important part of home organization. Picking the right size isn’t just about how much trash you make; it’s about convenience, hygiene, and avoiding the little daily annoyances that add up. If you want a guide for outdoor bins specifically, check out my perfect outdoor garbage can article.”
Here’s what I’ll cover, so you know exactly what you’re getting:
- Understanding different trash can sizes.
- Matching your trash can to household needs.
- Placement and accessibility tips.
- Material and durability considerations.
- Common mistakes I made (so you don’t have to).
- Maintaining your trash can to last longer.
Let’s dive in.
Understanding Trash Can Sizes
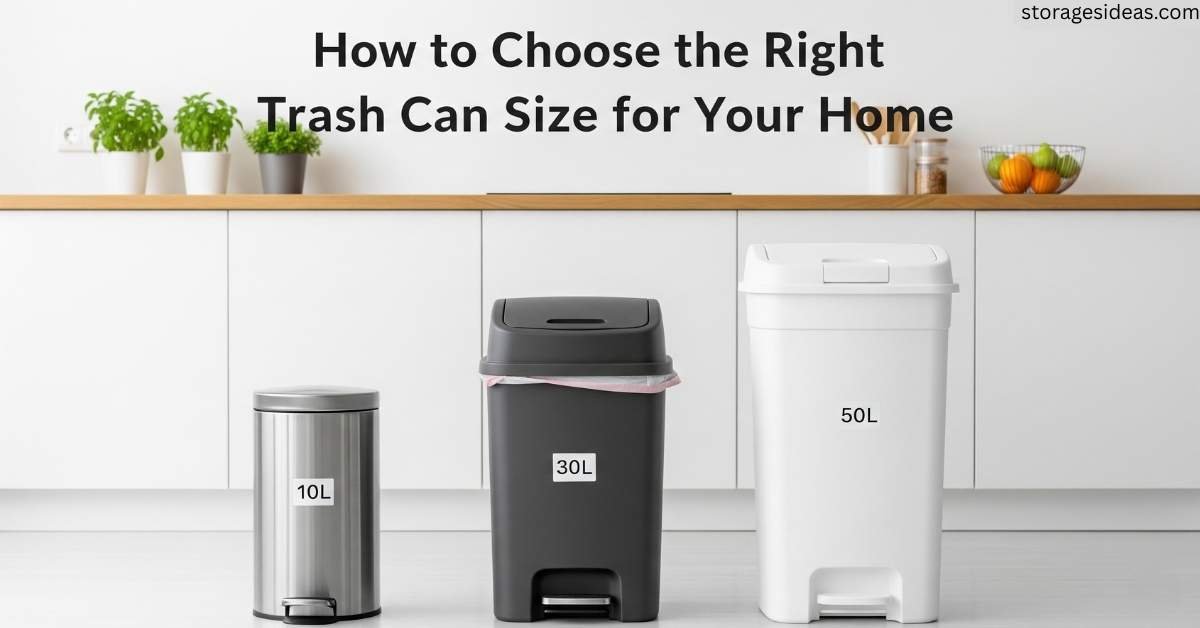
Trash cans come in more sizes than I initially realized, and picking randomly can lead to chaos. Here’s a breakdown I’ve found useful:
- Small (5–10 gallons): Perfect for bathrooms, offices, or tiny kitchens. I used a 7-gallon bin in my bathroom for years, and it never overflows before I remember to empty it. Small bins are easy to tuck into corners, hide under desks, or place beside the sink. They’re lightweight, making them easy to carry when full. For outdoor small bins, you can see my top picks for small outdoor trash cans with lids.”
- Medium (10–20 gallons): Ideal for average kitchens or single-to-couple households. My 13-gallon kitchen bin hits the sweet spot—enough space to hold a couple of days’ worth of trash without feeling like a landfill. Medium bins work well for homes with limited floor space but regular trash accumulation.
- Large (20–40+ gallons): These bins are for big families, garages, or high-traffic areas. My 32-gallon outdoor can has made weekend cleanup much easier. They’re also useful for occasional bulk trash like party leftovers or garden debris. Large bins take up more space but save multiple trips to the curb. If you need guidance on public or high-traffic spaces, see my best trashcan for public spaces article.”
Tip from experience: I once tried a medium bin for an active household of four—it overflowed within 24 hours. Size really matters!
Matching Trash Can Size to Household Needs
Choosing a bin without considering household habits is like buying shoes without trying them on—they might not fit. Here’s how I evaluate needs:
- Number of people: More people mean more trash. A single person might get by with a 10–13-gallon bin, but a family of four quickly fills the same bin. I once lived with roommates, and our medium bin overflowed by midweek.
- Frequency of emptying: Think about how often you realistically take out the trash. If you prefer emptying it once or twice a week, aim for a larger bin. I personally empty my kitchen bin every other day, but during parties or holidays, I temporarily use a second bin to avoid overflow.
- Type of waste produced: Different types of waste occupy space differently. Organic scraps are dense, plastic packaging is bulky, and cardboard can take up a lot if not shredded. I separate recyclables so my main bin doesn’t fill as fast.
- Special situations: Occasional household events create temporary spikes in waste. Holiday dinners, parties, or home projects produce triple the usual volume. I keep an extra bin in the garage for these times—it’s a lifesaver.
- Seasonal considerations: Gardening or seasonal cleaning generates extra trash. My outdoor 32-gallon bin sees heavy use in the fall for leaves, while the kitchen bin remains manageable.
Pro tip: Estimate your household’s average daily trash for a week, multiply by how many days you want between emptying, and pick the right size. It works better than guessing.
Placement and Accessibility
Even the perfect-sized bin can become a nuisance if it’s not placed well. I’ve learned that strategic placement reduces daily friction and keeps the house organized:
- Kitchen: Keep the most-used bin near food prep areas, but not blocking cabinet doors or appliances. I position my 13-gallon bin about three feet from the counter where I chop vegetables. At least 2–3 inches of clearance around the bin makes it easy to pull out and replace liners.
- Bathroom: A small 5–7 gallon bin near the sink or toilet works best. I like pedal-operated lids in bathrooms for hygiene—especially for tissues, cotton pads, or hair clippings. For limited floor space, corner or slim vertical bins save space.
- Garage/Outdoor: Large bins belong here. My 32-gallon outdoor bin sits near the back door, making it easy to toss garden debris or recyclables without crossing the yard. Bins with wheels or handles make moving them much easier on collection day.
- Child or pet-friendly placement: Consider who will use the bin. My kids need small bins at their height for snack wrappers, while outdoor bins need secure lids to prevent raccoons or dogs from tipping them over.
- Traffic flow: Ensure bins don’t block walkways. My first medium bin partially blocked the dishwasher, causing awkward sidesteps daily. Ideally, place bins where they’re reachable but out of main paths.
- Accessibility for cleaning and replacement: Leave enough space to pull out the bin when emptying. I measure 6–8 inches of clearance in front of my kitchen bin so I can slide it out without dragging it across the floor.
- Zone-specific tips: Consider usage frequency. Kitchen bins fill daily, bathroom bins weekly, and garage/outdoor bins bi-weekly. Placement should reflect usage. I rotate outdoor bins seasonally, placing them closer to the garage during leaf collection.
Extra tip: Use visual cues for placement, like a small mat, to remind everyone where the bin belongs and prevent shifting.
Material and Durability
Choosing the right material is just as important as picking the right size. The material affects durability, ease of cleaning, appearance, and hygiene. I’ve tried almost every common type, and here’s what I’ve learned:
Plastic Trash Cans

Plastic bins are lightweight, budget-friendly, and widely available. I’ve used them in bathrooms, home offices, and laundry rooms. Their main advantage is portability—full bins aren’t heavy. They also resist rust, making them suitable for humid areas.
However, not all plastics are equal. Cheap plastic scratches easily and can warp under heat. I once left a bin in direct sunlight, and the lid deformed. For longevity, I recommend high-density polyethylene (HDPE) bins—they resist cracking and handle heavy loads.
Some plastic bins even have built-in deodorizing compartments. I tried one, and it reduced odors from food scraps, though I still add baking soda at the bottom.
Stainless Steel Trash Cans

Stainless steel bins are my favorite for kitchens. They’re sleek, durable, and often come with pedal mechanisms, so I never touch the lid with dirty hands. The downsides? Stainless steel can dent if heavy objects fall on it, and fingerprints appear constantly. A microfiber cloth solves this problem quickly.
For larger bins, a removable inner bucket makes cleaning and emptying much easier. Some models have fingerprint-proof coatings; I invested in one, and it significantly reduces daily maintenance.
Pedal vs Manual Lids

Pedal-operated bins are a hygiene game-changer. I toss scraps without touching the lid. Some have soft-close pedals, preventing slams. Manual bins work in low-traffic areas like guest bathrooms. They’re cheaper and simpler. Kids and pets? Go pedal-operated. Accidents happen less.
Outdoor Durability
Outdoor bins face sun, rain, wind, and animals. Heavy-duty plastic, treated metal, or UV-resistant materials last longer. I’ve seen cheap bins crack after one summer. Secure, lockable lids prevent raccoons and stray dogs from scattering trash. My neighbor learned this the hard way. Some outdoor bins even have wheels, making them easy to roll to the curb.
Specialized Features
Motion sensors, odor filters, and built-in liners improve convenience. I tried a motion-sensor bin; it’s fun and hygienic, but requires batteries. For most kitchens, a reliable pedal bin is sufficient, but motion sensors can be useful in offices or high-end setups.
Durability tips:
- Inspect bins regularly for cracks, dents, or broken pedals.
- Use the right-size liners to prevent slipping or tearing.
- UV-resistant plastics last longer outdoors.
- Avoid stacking heavy items on bins.
- Polish stainless steel occasionally to keep it looking new.
Investing in the right material saves money, reduces frustration, and improves hygiene. A cheap bin may seem fine at first, but a durable, practical choice makes daily life easier.
Common Mistakes I Made
Here are mistakes I’ve experienced that you can avoid:
- Oversized bins in small kitchens: Clunky and obstructive. My first 20-gallon kitchen bin felt like a robot in the middle of my kitchen.
- Ignoring lids and odor control: Open bins smell fast. A pedal lid solves this.
- Neglecting recycling separation: Paper got soggy, bottles dented. Now I separate bins for plastics, paper, and compostables.
- Not considering floor space: Large bins can block appliances or walkways.
- Skipping liners: Wrong size, tears, or slips. Proper fit protects the interior.
- Ignoring peak trash periods: Holiday dinners or parties can overflow bins. Keep a backup ready.
Maintaining Your Trash Can
Even the best bin won’t last if neglected. Here’s how I maintain mine:
- Cleaning: rinse and wipe. For stubborn smells, baking soda or vinegar works wonders.
- Odor control: Sprinkle baking soda at the bottom; scented bags are optional.
- Inspect for damage: Check lids, pedals, and bin bodies monthly.
- Liner strategy: Right-size liners fit snugly, preventing leaks.
- Extra tip: A Microfiber cloth for stainless steel keeps bins looking new.
Extra Tips From My Experience
- Peak trash days: Add an extra bin for holidays or projects.
- Child accessibility: Smaller bins at child height encourage proper habits.
- Animal-proofing: Heavy, lockable lids prevent raccoons and stray dogs.
- Stackable bins: Save space; keep extras ready for events.
- Color coding for recycling: Easy sorting reduces mistakes.
- Seasonal considerations: Outdoor bins should handle sun and frost.
Final Thoughts
Choosing the right trash can size is simpler than I thought, but requires attention to habits, space, and routines. My approach:
- Count household members.
- Consider emptying frequency.
- Factor in the type of waste.
- Choose a material that suits your lifestyle.
- Think about placement, accessibility, and traffic flow.
- Maintain bins regularly.
A well-chosen trash can isn’t just a container; it’s a small convenience that prevents chaos, saves time, and keeps your home pleasant. Don’t underestimate it. Choose wisely, place thoughtfully, and maintain consistently, and you might even appreciate your trash can more than you expected. (Okay, maybe not as much as your coffee mug, but close.)
