
I used to overlook the space under my side table.
It felt too small to matter. So I ignored it.
But over time, that “insignificant” space started collecting things. A blanket I didn’t fold. Chargers, I didn’t put them away. A few random items that didn’t have a proper home.
Nothing extreme. Just enough to make the room feel slightly off.
That’s when I realized something simple: clutter doesn’t always come from big problems. It often comes from small spaces that aren’t used well.
So instead of buying more storage, I decided to use what I already had.
If you’ve already explored different table storage ideas for the living room, this is one of the simplest upgrades to start with.
Once I tested a few under-side table storage ideas, I noticed a clear shift. My space looked cleaner. I stopped misplacing things. And most importantly, I didn’t have to “try” to stay organized.
Why This Small Space Matters More Than I Expected
I didn’t expect much from this change.
But this area turned out to be one of the easiest places to improve my space without effort.
Many small homes struggle with hidden clutter, and using overlooked areas can make a noticeable difference. Concepts like space-saving furniture also show how using existing space more efficiently can improve everyday organization.
Here’s why it worked for me:
- It’s within reach, so I actually use it
- It doesn’t interrupt the main layout
- It helps reduce surface clutter instantly
Most importantly, it supports daily habits.
I didn’t need a complicated system. I just needed something that worked without thinking too much.
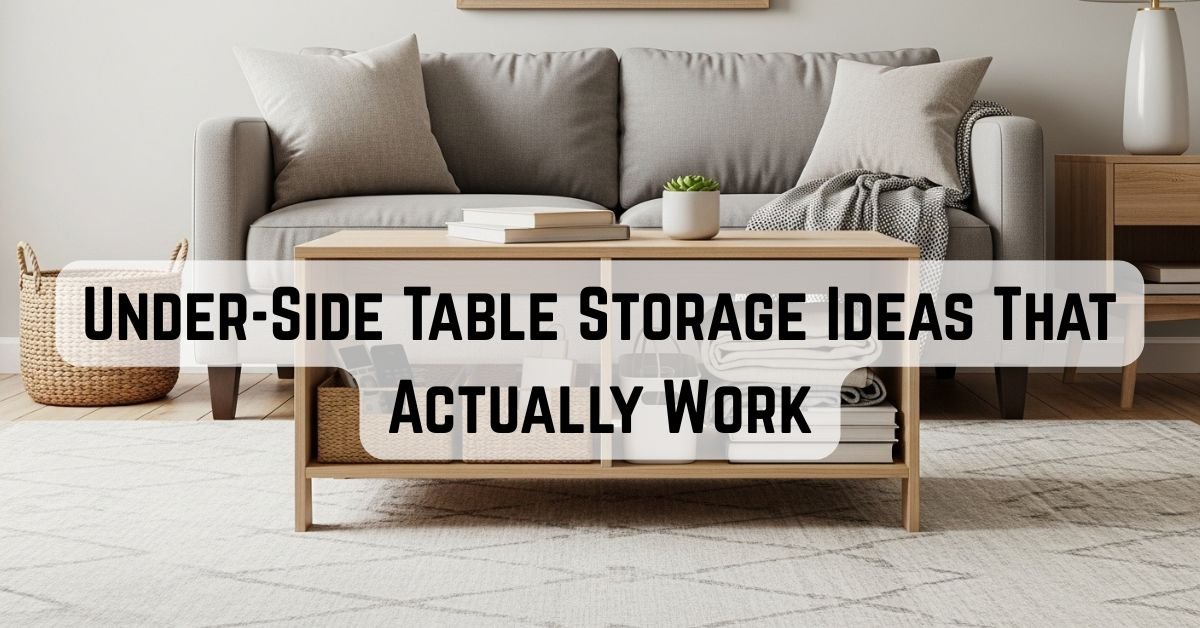
7 Under-Side Table Storage Ideas That Actually Work
1. I Created a Drop Zone with One Structured Basket (That Actually Stays Organized)

The problem I had wasn’t big clutter—it was constant small clutter.
Things I used daily never had a fixed place. So they kept moving:
remote → table → couch → floor → repeat.
I fixed that by creating a single drop zone under my side table.
But here’s what made it work:
I didn’t just grab any basket. I chose one that:
- holds its shape (so it never looks messy)
- fits the width of the table (not too small, not oversized)
- has a slightly open top (easy to drop things in quickly)
Now, everything I use casually goes there:
- remotes
- chargers
- a folded throw
- even random “I’ll deal with this later” items
Why this works so well:
- It removes decision fatigue → I don’t think, I just drop
- It visually hides clutter instantly
- It creates a boundary (things stop spreading)
What most people get wrong:
They overfill the basket.
I keep mine at about 70% full max. That’s the sweet spot where it still looks clean.
This is the easiest system to maintain because it works with lazy habits, not against them.
This setup works especially well if you already like using basket storage ideas in your living room.
2. I Used Slim Bins to Turn a Tight Space Into Hidden Storage

At first, I almost ignored this space completely.
Why? Because the gap under my table looked too small to be useful.
But that’s exactly where slim storage works best.
Instead of forcing a bulky box, I used a low-profile bin that slides in smoothly.
The difference is subtle but powerful.
Now that narrow gap stores:
- cables (no more visual mess)
- notebooks
- small tech items that used to float around
Why this works:
- It uses space that normally goes unused
- It stays visually invisible
- It doesn’t make the room feel tighter
Micro tip that made a difference:
I chose a bin with a matte or neutral finish.
Shiny plastic stands out. Matte blends in.
Also, I always leave a small gap around the bin instead of cramming it edge-to-edge. That keeps the setup from feeling heavy.
This idea is perfect if your space already feels tight and you don’t want to add visual weight.
3. I Turned Book Stacks Into Intentional, Functional Storage

I didn’t buy anything for this one.
I just stopped treating books like temporary clutter.
Before, my books were everywhere. Now they live under my side table, but with structure.
Here’s how I do it:
- I limit the stack (usually 4–6 books max)
- I align the edges cleanly
- I group similar sizes together
Sometimes I place a small decor item on top of a candle or a small object to make it feel styled.
Why this works:
- It turns storage into decor
- It uses items I already own
- It avoids adding more containers
But here’s the real benefit:
It removes visual randomness.
Scattered books feel messy. A controlled stack feels intentional.
Small detail that matters:
I rotate books occasionally.
That keeps the stack functional, not just decorative.
This works best if you want your space to feel styled without adding anything new.
4. I Switched to Fabric Storage to Change How the Space Feels

This idea isn’t just about storage, it’s about how the space feels.
At one point, everything under my table looked too sharp:
hard bins, clean edges, solid surfaces.
It wasn’t messy, but it didn’t feel comfortable either.
So I replaced those with fabric storage cubes.
That one change softened the entire corner.
Why this works:
- Fabric absorbs light instead of reflecting it
- It reduces visual harshness
- It blends into cozy or neutral interiors
I use these for:
- backup items
- things I don’t need daily
- anything that would look messy if visible
Key detail most people miss:
The color matters more than the material.
I stick to:
- neutral tones
- or colors that match nearby furniture
That way, the storage disappears visually instead of standing out.
If your space feels slightly “off” but you can’t explain why, this small change often fixes it.
5. I Made Storage Effortless with a Rolling Basket (So I Actually Use It Daily)

I didn’t realize this at first, but one thing was quietly breaking my organizational system:
friction.
If I had to bend awkwardly, pull something out slowly, or adjust items just to access storage, I avoided it.
That’s how “organized spaces” slowly turn into ignored spaces.
So I switched to a rolling basket.
Now, I don’t reach under the table; I just slide it out in one motion.
That tiny upgrade completely changed my behavior.
What I store here:
- chargers and cables I use often
- notebooks or planners
- small daily-use items
Why this works better than static storage:
- zero resistance → I actually use it
- No digging or rearranging needed
- Everything stays accessible
Small detail that made a big difference:
I chose a basket with slightly raised edges, so items don’t fall out when sliding.
Also, I keep heavier items at the bottom so it rolls smoothly.
This setup works best for “active storage” things you touch almost every day.
If you’re not using your current storage, this is probably the fix.
6. I Used an Open Basket to Keep the Space Feeling Light (Not Boxed In)

At one point, I had everything hidden.
Closed bins. Solid containers. No visible clutter.
Sounds ideal, but the space started feeling… heavy.
Not messy. Just visually dense.
That’s when I realized something important:
Too much hidden storage can make a small space feel smaller.
So I swapped one setup for an open basket.
That single change made the area feel lighter instantly.
What I keep inside:
- neatly folded throw or fabric
- a couple of magazines
- simple, clean-looking items
Why this works:
- It keeps airflow (visually and physically)
- It breaks the “solid block” effect of closed storage
- It adds texture without adding clutter
Rule I follow strictly:
If it looks messy, it doesn’t go in an open basket.
This is curated storage, not a dumping zone.
Pro tip:
I limit it to 2–3 items max. More than that, and it starts losing its clean look.
This works best if your room already feels slightly crowded or heavy.
It balances everything out without removing functionality.
7. I Doubled My Storage with a Simple Shelf Insert (Without Adding Bulk)

This was the most practical upgrade and, honestly, the most underrated.
Before this, everything under my side table sat on one level.
That caused two problems:
- Items overlapped
- Things at the back became hard to reach
So I added a small shelf insert.
Nothing fancy. Just a simple riser.
But the effect?
I instantly created two separate layers of storage.
How I use it:
- top level → daily items (easy access)
- bottom level → backup or less-used items
Why this works so well:
- no stacking = no digging
- Everything stays visible
- The setup looks structured instead of crowded
It also forces better organization.
When space is divided, you naturally become more selective about what goes where.
Small detail that made it look better:
I made sure the shelf width didn’t fully fill the space.
Leaving a bit of breathing room on the sides keeps it from looking cramped.
This is one of the smartest upgrades if your table has enough height underneath.
You’re not adding more storage, you’re multiplying what you already have.
What Actually Makes These Under-Side Table Storage Ideas Work
I tested multiple setups before things started working consistently.
Some ideas looked great for a day. Then slowly, they stopped working. Not because they were bad, but because they didn’t match how I actually live.
That’s when I realized something important:
Good storage isn’t about the setup. It’s about how easy it is to maintain.
Here’s what made the real difference for me:
I Design for Lazy Moments (Not Perfect Habits)
I don’t organize when I’m tired. I don’t fold things perfectly every day.
So I stopped expecting that from myself.
Instead, I built systems that work even when I’m being lazy.
- Drop zones instead of precise placement
- Open access instead of stacked storage
- Quick resets instead of deep organizing
If something takes effort, I won’t stick with it.
So I removed the effort.
I Reduced Micro Decisions
Clutter builds when every item needs a decision.
“Where should this go?”
“Should I organize this now?”
That mental friction adds up.
So I simplified everything.
Each table has one clear purpose:
- one basket
- one bin
- one system
No mixing. No confusion.
Now, I don’t decide, I just act.
I Control Visual Noise, Not Just Physical Clutter
This was a big shift.
A space can be technically organized but still feel messy.
That usually comes from visual noise:
- too many shapes
- too many materials
- too many competing elements
So I started paying attention to how things look together.
I keep:
- similar tones
- consistent materials
- limited item variety
That’s what makes the space feel calm, not just clean.
I Use Accessibility as the Main Rule
If I have to reach too far, bend too much, or move things around…
I stopped using the storage.
That’s it.
So now I test everything with one question:
Can I access this in one simple motion?
If the answer is no, I change the setup.
Because unused storage = future clutter.
I Leave Space Empty on Purpose
This is where most setups fail.
People try to “maximize” every inch.
I used to do the same.
But full space ≠ functional space.
When everything is packed:
- It looks heavy
- It feels messy
- It becomes harder to maintain
Now I leave about 20–30% empty space.
That breathing room keeps everything looking clean even when life gets busy.
I Reset Based on Use, Not Schedule
I don’t follow a strict routine.
I reset when I notice friction.
When things start to feel slightly off, I fix it.
That usually takes less than a minute.
This approach keeps the system flexible and realistic.
The biggest lesson?
Storage works when it fits your behavior, not when it looks perfect.
That’s why these setups last.
Final Thoughts
I didn’t think this small change would matter.
It felt too simple to make a difference.
But once I started using the space properly, everything shifted.
My surfaces stayed cleaner.
I stopped misplacing things.
And my room felt easier to manage without extra effort.
The best part?
I didn’t add more furniture. I didn’t spend much. I just used what I already had, better.
If you’ve been looking for under-side table storage ideas that actually hold up in real life, this is where I’d start.
Not with all seven ideas.
Just one.
If your goal is a calmer space overall, these clutter-free living room ideas can help you take it even further.
Pick the one that fits your space and your habits. Try it. Adjust it. Keep it simple.
Because in the end, it’s not about creating a perfect setup.
It’s about creating something you’ll actually use every day.

