
I used to avoid opening the cabinet under my sink.
It wasn’t full, but it always felt frustrating to use. Every time I needed something, I had to move two or three other things first. Bottles would fall over. Small items disappeared. And somehow, it always looked messier after I closed the door.
At one point, I knocked over a cleaner bottle just trying to grab a sponge.
That’s when I realized something simple.
The space under the sink isn’t just about storage. It directly affects how easy your daily routine feels.
If that area is messy, even simple tasks start to feel annoying.
In this guide, I’m sharing under sink storage ideas that actually made my daily life easier. Not just more organized but easier to use, faster to manage, and less frustrating overall.
Why Under-Sink Storage Feels So Difficult (But Doesn’t Have to Be)
Before fixing the space, I had to understand why it kept getting messy.
First, the pipes break the space into awkward shapes. Spaces like this are harder to organize because of layout limitations, and understanding basic kitchen cabinet organization principles can help make better use of tight areas.
Second, the height is uneven. Some areas are tall, others are tight, which makes stacking difficult.
Third, I used to place items randomly. Wherever something fit, I left it there. That worked for a few days, then everything got mixed again.
And finally, I had no system to maintain it.
I organized once and expected it to stay that way.
It didn’t.
So instead of trying to “fit everything,” I started organizing based on how I actually use things every day.
That changed everything.
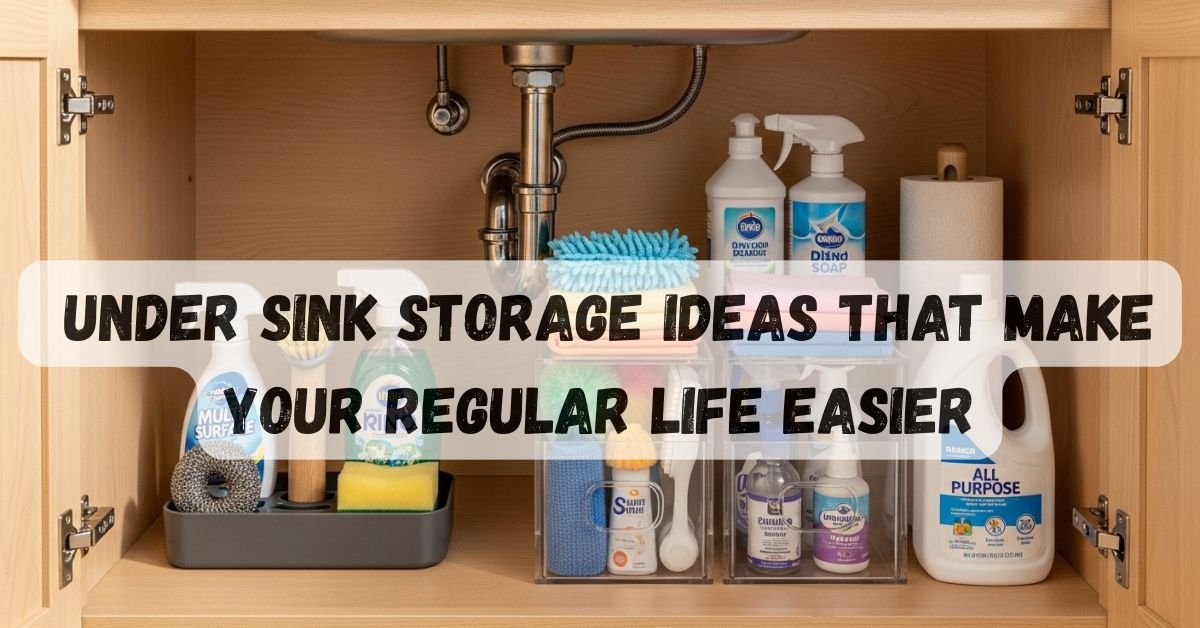
10 Under Sink Storage Ideas That Make Your Regular Life Easier
1. The “Grab Zone” Setup (Front-Access Essentials)

This is the most important change I made.
I created a front area just for daily-use items.
Things like:
• Dish soap
• Sponge
• Cleaning spray
These stay right at the front where I can reach them instantly.
No moving things. No searching.
What helped me most here was limiting this zone.
At first, I tried to keep too many things in front, and it quickly became crowded again.
Now I only keep what I use almost every day.
If something isn’t used regularly, it doesn’t belong here.
This keeps the space clean and makes daily tasks feel effortless.
2. The “Hidden Zone” for Backup Items

Once I created the front “grab zone,” I needed a place for everything else.
That’s where the back section comes in.
I store backup items there:
• Extra cleaning supplies
• Refill bottles
• Rarely used items
This keeps the front area clean and easy to use.
It also prevents overcrowding.
I also make sure this area doesn’t turn into a dumping spot.
Every few weeks, I take a quick look at what’s stored there.
If something hasn’t been used in a long time, I remove it or move it somewhere more appropriate.
That keeps the space from slowly becoming cluttered again.
3. Split-Level Storage Using Mini Platforms

The space under the sink isn’t flat or even.
So instead of fighting that, I worked with it.
I created small levels using simple items I already had.
Now I can place things on top and underneath.
For example:
• Cleaning sprays on top
• Smaller items below
I didn’t buy anything special for this.
Even a sturdy box or container can create a second level.
The goal isn’t to make it look perfect.
It’s to make better use of the available space.
4. Hanging Storage That Frees the Floor

The bottom of the cabinet used to get crowded fast.
So I stopped placing everything there.
Instead, I started hanging some items.
Using a simple rod or hook, I hang:
• Spray bottles
• Cleaning cloths
This frees up floor space and makes everything easier to see.
After doing this, I noticed the space felt much more open.
It also became easier to clean.
Spills don’t spread as easily when items aren’t sitting directly on the base.
5. The “One-Move Rule” Layout

This rule completely changed how I organize this space.
If I need to move more than one thing to grab something, the setup isn’t working.
So I adjusted everything around that idea.
Now every item is reachable with minimal effort.
I tested this over a few days.
Whenever I had to move multiple items, I noticed the frustration immediately.
So I adjusted the layout again.
Now everything is either directly accessible or requires just one quick move.
That small change removed a lot of daily friction.
6. Small Caddies Instead of One Big Bin

I used to store everything in one large container.
That made things worse.
Every time I needed something, I had to search through everything.
Now I use smaller caddies.
Each one has a purpose:
• Cleaning supplies
• Dishwashing items
• Extra tools
I can pull out exactly what I need without disturbing the rest.
Another benefit is cleaning.
Instead of moving many loose items, I can lift one caddy, wipe the surface, and put it back.
It keeps everything simple and manageable.
I use a similar approach in other areas as well, and these electronics organization ideas also follow the same idea of grouping items so they’re easier to find and use.
7. Side-Wall Storage Most People Ignore

The inside walls of the cabinet are often empty.
I used to ignore them, too.
Now I use them for small storage.
I added:
• Hooks
• Slim holders
• Small racks
These are perfect for items like gloves, brushes, or cloths.
These additions may seem small, but they make a difference.
They reduce clutter on the main base area and make the whole space feel more organized.
I’ve also used wall space in other rooms, and these wall storage ideas for the living room show how vertical areas can add storage without making a space feel crowded.
8. Clear Zones Instead of Random Placement

Before, my storage was random.
Now I divide the space into clear zones.
Each area has a purpose.
For example:
• Front = daily-use items
• Middle = regular supplies
• Back = backups
This structure makes everything easier to understand at a glance.
I also avoid mixing categories.
Cleaning supplies stay together. Dishwashing items stay together.
This makes the system easier to maintain over time.
9. Leak-Proof Base Setup

I didn’t think about this at first.
But under-sink areas can leak.
Even a small spill can create a mess.
So I added a simple liner at the bottom.
Now, if something leaks, it’s much easier to clean.
It also protects the cabinet surface.
After dealing with a small leak once, I realized how useful this step is.
10. The 5-Minute Reset System

This is what keeps everything working long-term.
Once a week, I spend a few minutes resetting the space.
I:
• Put items back where they belong
• Throw away empty bottles
• Wipe small spills
That’s it.
What I like most is how quick it is.
Because everything already has a place, resetting doesn’t take much effort.
It’s not about deep cleaning.
It’s just about keeping things from slipping back into chaos.
How I Decide What Goes Under the Sink (And What Doesn’t)
Not everything belongs under the sink.
This was something I had to learn.
Now I only store items I use regularly.
Things like:
• Cleaning supplies
• Dishwashing items
• Daily-use products
I avoid storing:
• Rarely used items
• Bulk packages
• Large or unnecessary items
Keeping fewer things makes the space easier to manage.
Small Changes That Made the Biggest Difference
Some changes made a bigger difference than others.
Creating the grab zone had the biggest impact.
It made daily tasks faster and easier.
Using smaller caddies also helped more than I expected.
Each group of items had its own place, which reduced clutter immediately.
The weekly reset was the final piece.
Without it, things slowly become messy again.
With it, everything stays under control with minimal effort.
None of these changes was complicated.
But together, they completely changed how the space works.
Mistakes That Made My Under-Sink Area Worse
I’ve made plenty of mistakes while organizing this space.
Most of them came from trying to make things fit instead of making them easy to use.
Overfilling the Space
I used to pack everything in.
It looked efficient, but it made access difficult.
Now I focus on usability instead of capacity.
If I can’t reach something easily, it doesn’t belong there.
I noticed the same issue in my living room too, and these table storage ideas for the living room helped me keep surfaces useful without overcrowding them.
Ignoring Daily Habits
I used to organize once and expect it to stay that way.
It didn’t.
Without simple habits, clutter slowly returned.
Now I rely on small routines like the weekly reset.
Using Random Containers
I used whatever containers I had.
Different shapes and sizes made the space look messy.
Now I keep things simple and consistent.
Not Thinking About Access
This was the biggest mistake.
I used to organize based on space, not usage.
Now I think about how often I use each item.
Frequently used items stay easy to reach.
Everything else goes further back.
Final Thoughts
For a long time, I thought the space under my sink was just awkward.
Now I see it differently.
It’s not about making it look perfect.
It’s about making it easy to use.
These under sink storage ideas helped me turn a frustrating space into something that actually supports my daily routine.
I don’t waste time searching anymore.
I don’t knock things over.
And I don’t avoid opening that cabinet.
If your under-sink area feels messy, start with one small change.
That one change can make your everyday routine a lot easier.

